
GRAPHICALLY
SPEAKING....
Russ Walter
PIXELS
Most microcomputers (such as Radio Shack, Apple, and Atari) use a television screen instead of paper; and the screen is divided into thousands of little rectangles, called pixels. The pixel in the upper-left corner of the screen is called pixel 0,0; just to the right of it is pixel 1,0; then comes pixel 2,0; etc. Underneath pixel 0,0 is pixel 0, 1. Here are the positions of the pixels:
pixel 0,0 1,0 2,0 3,0 4,0 5,0, etc.
pixel 0,1 1,1 2,1 3,1 4,1 5,1, etc.
pixel 0,2 1,2 2,2 3,2 4,2 5,2, etc.
pixel 0,3 1,3 2,3 3,3 4,3 5,3, etc.
Each pixel's name consists of two numbers. The first number is called the X coordinate; the second number is called the Y coordinate.
For example, if you're talking about pixel 5,3, its X coordinate is 5, and its Y coordinate is 3. The X coordinate tells how far to the right the
pixel is; the Y coordinate tells how far down; so the pixel 5,3 is the pixel that's 5 to the right and three down.
So on the computer, the Y coordinate measures how far down. If you had the misfortune to read an old-fashioned math textbook (in which the Y coordinate measured how far up), you'll have to reverse your thinking!
How many pixels are on the screen? If you're using high resolution, the screen contains many pixels; each pixel is tiny. If you're using low resolution, the screen contains few pixels; each pixel is huge. You can choose either low resolution or high resolution. Here's how on the Atari ...
ATARI
TO produce colors, Atari's computer uses sixteen hues, which are numbered from 0 to 15 Hue 0 is gray; I is gold (orangish yellow); 4 is red; 8 is blue; 12 is green; and 15 is russet (reddish brown). The other numbers are hues that are in-between; for example, 2 is orange, 6 is purple, and 10 is turquoise.
The computer also uses eight luminances, which are numbered 0, 2, 4, 6, 8, 10, 12, and 14. Luminance 0 is "very dark"; 14 is "very light"; the other numbers are in-between. For example, since "pink" is the same as "light red", you can produce pink by choosing hue 4 ("red") and luminance 12 ("light"). Since "brown" is the same as "dark gold", you can produce brown by choosing hue I ("gold") and luminance 2 ("dark"). Since "black" is the same as "very dark gray", you can produce black by choosing hue 0 ("gray") and luminance 0 ("very dark").
You have five major paint buckets, numbered from 0 to 4. Usually, the buckets contain these paints...
Bucket 0 contains medium orange (hue 2, luminance 8).
Bucket 1 contains light green (hue 12, luminance 10).
Bucket 2 contains dark greenish-blue (hue 9, luminance 4).
Bucket 3 contains medium red (hue 4, luminance 6).
Bucket 4 contains black (hue 0, luminance 0).
But you can change what's in the buckets. For example, to change bucket 2 to pink (hue 4, luminance 12), put this command into your program:
50 SETCOLOR 2,4,12
It means: set the color of bucket 2 to hue 4 and luminance 12. If you give that command, everything you paint by using bucket 2 will be pink. Moreover, the command works retroactively: everything that you had already painted by using bucket 2 changes its color (from dark greenish-blue) to pink. For example, if you had painted a picture of a dark greenish-blue fish (by using bucket 2), and then you say SETCOLOR 2,4,12, the entire fish suddenly changes its color from dark greenish-blue to pink.
Besides those five major paint buckets, you also have an "auxiliary" paint bucket. It automatically contains the same luminance as bucket 1, and the same hue as bucket 2. For example, if bucket 1 contains light green (whose luminance is 10), and bucket 2 contains dark greenish-blue (whose hue is 9), then the auxiliary bucket contains the color whose luminance is 10 and whose hue is 9: that color is light greenish blue.
You can use 32 graphics modes, which are numbered from 0 to 3 1. Your program's top line must say which graphics mode to use. For example, if you wish to use graphics mode 19, your program's top line must say:
10 GRAPHICS 19
The next few lines should say SETCOLOR, if you wish to change the colors that are in the buckets.
Here's how to use the most popular graphics modes...
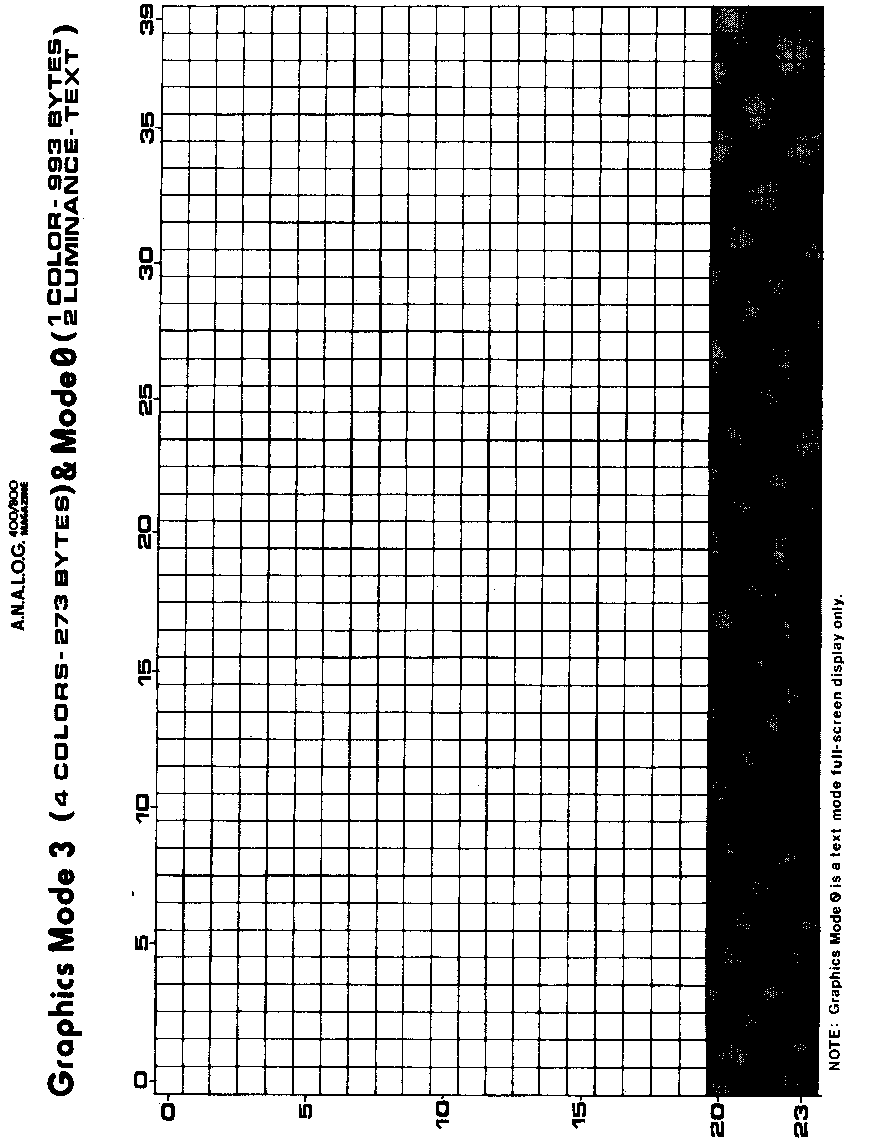
Mode 19. In this mode, the X coordinate must be from 0 to 39, and the Y coordinate must be from 0 to 23. Initially, the entire screen has been painted by bucket 4; but you can change the color of each pixel, by using four paintbrushes:
Brush 0 has been dipped in bucket 4.
Brush I has been dipped in bucket 0.
Brush 2 has been dipped in bucket 1.
Brush 3 has been dipped in bucket 2.
Example:
Use graphics mode 19 - 10 GRAPHICS 19
Using brush 2, paint pixel 27,13 and pixel 25, 19 -20 COLOR 2: PLOT 27,13: PLOT 25,19
Using brush 1, draw a line from 20,17 to 13,15 30 COLOR 1: PLOT 20,17: DRAWTO 13,15
Pause, to let the human admire the picture - 40 GO TO 40
To abort that program, and to stop using graphics mode 19, press the SYSTEM RESET button.
Mode 20. This resembles mode 19, but lacks brushes 2 and 3, and therefore consumes less memory.
Mode 21. This resembles mode 19. But the X coordinate can go from 0 to 79, and the Y coordinate can go from 0 to 47.
Mode 22. This resembles mode 21, but lacks brushes 2 and 3, and therefore consumes less memory.
Mode 23. This resembles mode 19. But the X coordinate can go from 0 to 79, and the Y coordinate can go from 0 to 95.
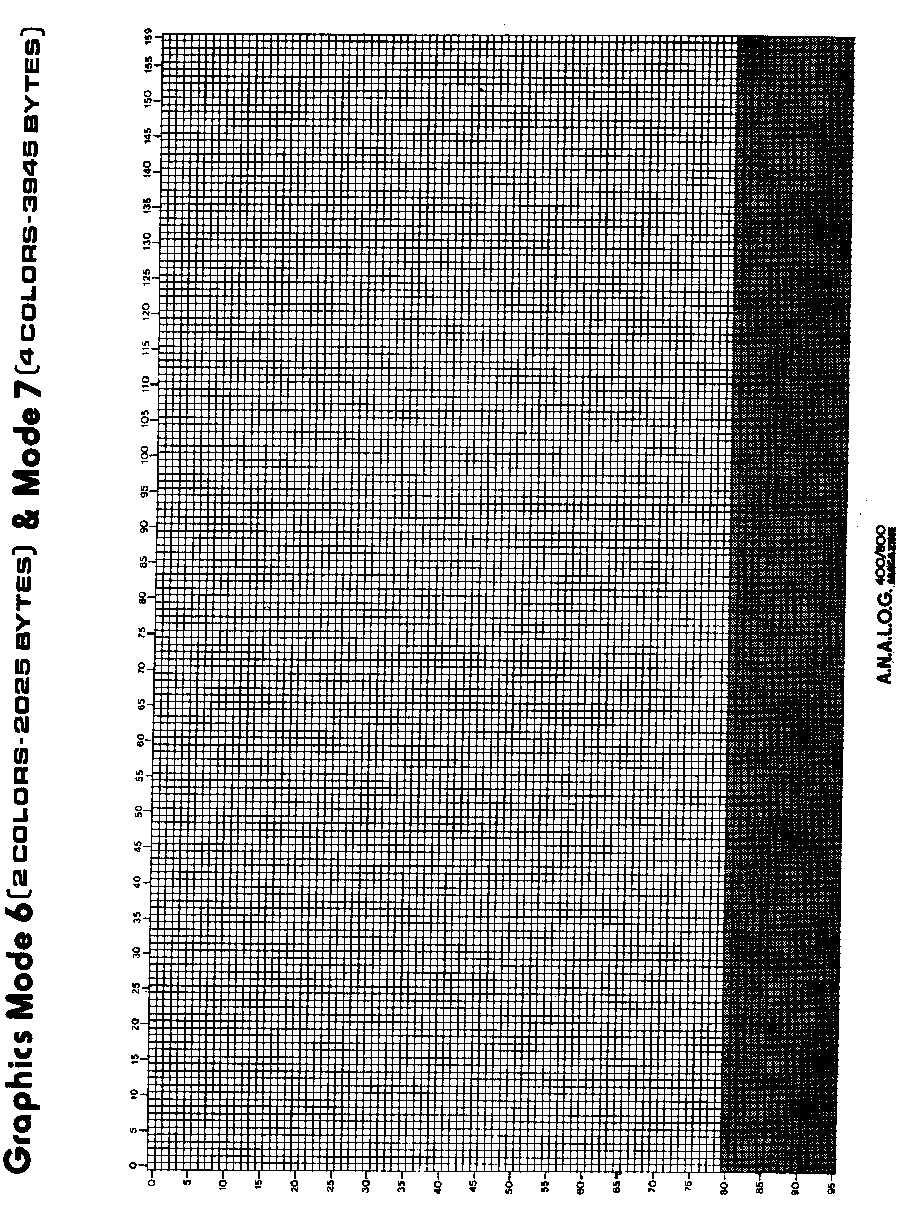
Mode 24. To use this mode, you must buy at least 16K of RAM memory. In this mode, the X coordinate can go from 0 to 319; the Y coordinate can go from 0 to 19 1. Initially, the entire screen has been painted by bucket 2; but you can change the color of each pixel, by using two paintbrushes:
Brush 0 has been dipped in bucket 2.
Brush 1 has been dipped in the auxiliary bucket.
Because the pixels are so tiny, you might have trouble seeing them. To help yourself see them, make the luminance of bucket 1 very high, by giving this command:
20 SETCOLOR 1,0,14
Here's a complete program:
Use graphics mode 24 - 10 GRAPHICS 24
Use high luminance - 20 SETCOLOR 1,0,14
Using brush 1, paint pixels 140,17 and 142,19 - 30 COLOR 1: PLOT 140,17: PLOT 142,19
Using that brush, draw a line from 20,7 to 302, 146 - 40 PLOT 20,7: DRAWTO 302,146
Pause, to let the human admire the picture - 50 GO TO 50
To abort that program, and to stop using graphics mode 24, press the SYSTEM RESET button.
Mode O. This is the "normal" mode: it's the mode you find yourself in, whenever you press SYSTEM RESET, and whenever you aren't thinking about graphics. In this mode, the X coordinate can be from 0 to 39, and the Y coordinate can be from 0 to 23. Initially, the entire screen is painted by bucket 2 except for the screen's border, which is painted by bucket 4. This program prints the word JAR, so that the J is at pixel 14,9, and so that the A is at the next pixel (15,9), and so that the R is at the next pixel (16,9):
Clear the screen - 10 GRAPHICS 0
Beginning at pixel 14,9, print JAR - 20 POSITION 14,9: PRINT "JAR";
Pause to let the human admire it - 30 GO TO 30
The word JAR is painted by the auxiliary bucket.
Mode 17. In this mode, the X coordinate must be from 0 to 19, and the Y coordinate must be from 0 to 23. Initially, the entire screen has been painted by bucket 4. This program prints the word JAR, so that the I is at pixel 14,9, and so that the A is at the next pixel (15,9), and so that the R is at the next pixel (16,9):
Use graphics mode 17 - 10 GRAPHICS 17
Beginning at pixel 14,9, print JAR - 20 POSITION 14,9: PRINT#6; "JAR";
Pause, to let the human admire it - 30 GO TO 30
The word JAR is painted by bucket 0. If you try to print a small (lower-case) letter (by pressing the LOWR key), the computer will print it capitalized instead, and will paint it by using bucket 1. If you try to print a dark-on-light capital letter (by pressing the /|\ key), the computer will print it light-on-dark instead, and will paint it by using bucket 2. If you try to print a dark-on-light small letter (by pressing the /|\ and LOWR keys), the computer will print it as a light-on-dark capital instead, and will paint it by using bucket 3.
Mode 18. This resembles mode 17. But the Y coordinate must go from 0 to 11.
Split-screen modes. You can make the bottom part of the screen be in mode 0, and the top part of the screen be in a different mode. Here's how:
GRAPHICS 1 - The screen's bottom is in mode 0; the screen's top is in mode 17.
GRAPHICS 2 - The screen's bottom is in mode 0; the screen's top is in mode 18.
GRAPHICS 3 - The screen's bottom is in mode 0; the screen's top is in mode 19.
ETC.
GRAPHICS 8 - The screen's bottom is in mode 0; the screen's top is in mode 24.
In those split-screen modes, the bottom sixth of the screen is in mode 0; the top five-sixths are in a mode from 17 to 24. The bottom sixth, which is in mode 0, contains just 4 lines of text. To create that text, you can say PRINT, but you can't say POSITION: in-split-screen mode, the bottom sixth doesn't understand POSITION. The top five-sixths, which are in a mode from 17 to 24, have fewer Y coordinates than if the whole screen were devoted to that mode: a sixth of the Y coordinates are missing.

Digitized by CyberRoach Publishing for CyberRoach’s Digital A.N.A.L.O.G. Archive; restored here with permission.