FEATURE APPLICATION
SIGNMAKER
Flashy electronic billboards with your Atari. By Andrew Thomas
SignMaker is a BASIC program that will turn an 8-bit Atarl computer with at least 64K and disk into an electronic sign displaying as many as 10 lines of moving text in four colors, with scrolling, blinking, fading, uppercase and lowercase characters and graphics.
If you have a message to get across, electronic message display centers are a highly effective medium. Electronic signs attract and hold viewers' attention with an ever-changing display of scrolling messages and graphics.
But these signs are expensive. A one-line indoor message center-- the cheapest -- costs several hundred dollars. And all that sign will do is display uppercase characters scrolling and maybe blinking.
SignMaker is a menu-driven editor that will turn your inexpensive 64K 8-bit Atari computer into an electronic sign with up to 10 lines of text, four colors, scrolling, blinking, fading, upper and lower case text and graphics.
GETTING STARTED
If you don't have a business, SignMaker can be used to title videos or as a high-tech refrigerator door. ("Billy!"
Type in Listing 1, SIGN.BAS, check it with TYPO II and SAVE a copy before you RUN it. Be especially careful typing the data and set-up section from 12000 to 13000. An error here can cripple the entire program.
If you have trouble typing the special characters in lines 12610-12642, don't type them in. Instead, type Listing 2, check it with TYPO II and SAVE a copy. When you RUN Listing 2, it creates these hard-to-type lines and stores them in a file called LINES.LST.
To merge the two programs, disk users LOAD "D:SIGN.BAS" and then ENTER "D:LINES.LST". Remember to SAVE the complete program before you RUN it.
SignMaker's menus are arranged in a branching "tree" structure. Choosing an item in a menu will often lead to yet another menu. Pressing [ESC] returns you to the previous menu.
Select items from the menu using either keyboard or joystick. The menu pointer can be moved with a joystick or the arrow keys. Press [RETURN] or the joystick button to select an item marked by the pointer. On most menus an item can also be selected by pressing its first character on the keyboard.
MAIN MENU
The main menu offers seven choices: [P]lay, [R]cord, [E]dit, [L]oad, [S]ave, [N]ew and [Q]uit. Throughout SignMaker, you select a command simply by typing its first letter.
[P]lay: runs your message in a continuous loop on screen.
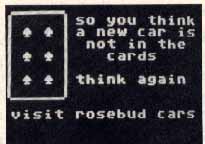
To show you whatyou can do with SignMaker, a sample file has been included on this month's Antic disk. To play it, first [L]oad D:DISKS.SGC, then choose [P]lay. The sign will play over and over. Press any key to stop it and you will be returned to the opening menu at the end of the current loop.
CREATE A SIGN
From the main menu, choose [R]ec to record the "script" for your message. You can also use [R]ec to add to an existing script. [L]oad and [P]lay the script you want to add to, then press any key to stop it. When the main menu appears you can then add on to the end of the script by pressing [R].
The [R]ec submenu has five choices: [W]rite, [S]croll, [P]ause, [O]ption, and [L]oad. All but the last lead to more submenus. Choose [W]rite to actually put things on the screen. The four choices in this submenu are [E]nter, [P]lace, [C]lear, and [O]nscreen.
In [E]nter you can type in up to 119 characters (3 lines), followed by a [RETURN]. The string you enter will be kept in a temporary buffer which you can [P]lace on the screen one or more times. To cancel this operation, delete any unwanted text and press [RETURN].
[P]lace puts the string just entered somewhere on or just off the screen, as directed in the submenu. Position the text by moving the cursor with the joystick or arrow keys. If you selected the [O]nscreen option from the submenu, the string will begin at the spot you choose on the screen.
[C]lear leads to a submenu allowing you to clear a character, line, or the whole display.
In the [W]rite submenu, [O]nscreen lets you put single characters on the screen, in any position. The characters will appear one at a time, in the order entered, as the message plays.
You can move the cursor with the arrow keys or the joystick. [RETURN] will send the cursor to the beginning of the next row. The [DELETE] key will not work here. Space over what you want deleted and edit it out later, in the [E]dit menu. Special characters (those used for the movement keys) can be entered by pressing [ESC] first, then the key. Press [ESC] twice to exit.
[L]oad asks for a filename and records it on the script. When the program reaches this instruction while playing a script, it will load the new script into the buffer and play it. (If the file cannot be found, the instruction is ignored.)
With this command you can set up a chain of files to be played, and later easily cut and paste messages out of or into the chain. Editing long scripts can be excessively time-consuming, so it's a good idea to separate messages into different files to keep scripts short.
[S]croll moves a line or the whole screen horizontally or vertically. If you choose to scroll a line, use the joystick or arrow keys to position the cursor over a line, and press [RETURN] or the joystick button to select it. Next choose the distance to scroll with the joystick, arrow key or the [SPACEBAR]. Then choose a speed.
[P]ause records a pause on the script. The submenu offers sixteen lengths of pauses--[0] is about seven seconds, [15] is about 40. To save time, the pause won't play during [E]dit mode.
[O]ption leads to some nifty effects. The four choices are: [S]hift, [C]olor, [B]link, and [M]isc.
[S]hift is a toggle between upper-case and lowercase for the screen display. Graphics 2 only allows upper-case, numbers and punctuation, or lowercase and graphics on the screen at one time.
[C]olor lets you set the colors and brightnesses of the background and the four color registers. (The four colors can be displayed by using uppercase and lowercase normal and inverse characters.) The pointer starts at the current value in the color and luminance menus. You can include many color changes on a script.
[B]link can select one of four groups of characters and make them blink at varying speeds. If characters are already blinking, use [B]link a second time to stop them.
[M]isc leads to [F]ade, which fades a character color in or out, and four items which can lead to user-defined routines.
EDITING SCRIPTS
When you chose [E]dit from the main menu, each instruction in thescript is played one at a time, then listed in the text window. After each step you can either [C]ontinue to the next instruction, [D]elete the last instruction, or [I]nsert more instructions after the last. The first instruction shown is BEGINNING. You can't delete this, but you can insert more instructions here, at the very start of your script.
After you [D]elete a step, you may either [C]ontinue or add changes at this point with [I]nsert. Because of memory restrictions, the effects of your deletion will not be shown on the screen--you have to play through the script again with [P]lay or [E]dit to see the effects.
[I]nsert leads the [R]ecord submenu. Everything you record is inserted into the script after the last instruction played. Exit this mode by pressing [ESC] to back up into the [E]dit menu.
MAKING GRAPHICS
To add graphics to your messages, you will need to first go into the alternate character set that includes the control characters. From the main menu choose [R]ec. From the submenu choose [O]ption, then the [S]hift option. (Any text already on screen will be converted to the alternate character set.) Because of the limitations of Graphics 2, you can only use lowercase text with your graphics.
Press [ES.C] to return to thre previous menu, and choose [w]rite, then
[O]nscreen. In onscreen writing, you can place characters one at a time where you want them on the screen. Using various combinations of keys, you can build graphics in four colors. Experiment to discover all the possible characters that result from using [ESC], [SHIFT], [CONTROL] or [INVERSE] with other keys.
Even if you space over a character, it will reappear briefly when you [P]lay the message. To clean up unwanted characters or make some changes, go into [E]dit from the main menu. Characters entered through onscreen writing will appear one at a time, giving you a chance to delete them.
Andrew Thomas recently graduated from Indiana State University with a degree in technical journalism. His program Quizzer appeared in the October 1988 Antic.
Listing 1: SIGN.BAS Download
[R]ecord: enter your message, or add on to an old one.
[E]dit: make changes to an existing message script.
[L]oad: load a message script from disk.
[S]ave: lets you save your current message script to disk. The filename can be up to 14 characters long, including the directory specification; if the DOS you're using has longer filenames, the maximum size can be increased in the DIM statement in line 12560.
[N]ew clears the current sign from memory and screen, so you can start a fresh project.
Listing 2: ANTIC.SGC Download
Listing 3: VALENTIN.SGC Download
Listing 4: CARDS.SGN Download
Listing 5: DISKS.SGN Download