JANUARY SPECIAL FEATURE
Talking Typewriter
Atari spells it out-8-bit or ST
BY BILL MARQUARDT, ANTIC TECHNICAL ASSISTANT
Talking Typewriter is a relatively easy software/hardware project that lets you add Computer-spoken letters and numbers to your own programs-for Atari 8-bit or ST computers. You need to know how to solder and follow schematic diagrams. This BASIC program works on all 8-bIt Atari computers of any memory size, with disk or cassette. Optional speech modules have been added to two of the other 8-bit programs in this issue-Door Prize and Math Attack.
ST OWNERS: See Machine Language Talker in this issue's ST Resource for full explanation of the ST version of this program. However, you'll need to read the relevant hardware sections of this article-particularly BUILD THE CIRCUIT AMPLIFIER and ST INTERFACE-in order to build the Talking Typewriter circuit board.
Now your Atari can talk to you. Antic's latest hardware-software project will enable any Atari computer to speak letters and numbers aloud as you type them from the keyboard. And the Talking Typewriter program-in either the 8-bit or ST version-is short enough to be inserted as a speech module in your own programs.
Two other 8-bit programs in this issue-Door Prize and Math Attack-have been modified to produce speech when used with the Talking Typewriter circuit. See the specific speech add-on instructions in each program article.
The Tandy SPO256-AL2 speech synthesizer chip ($12.95, part number 276-1784) is the heart of this project. Tandy has assured Antic that Radio Shack will continue to carry this chip for some time, so availability should not be a problem. We currently don't know of a 100% -compatible substitute speech chip.
The Talking Typewriter circuit is easier to build than the WEFAX circuit board in the September, 1986 Antic. It is a suitable project for beginning hardware hackers. And after your hardware is properly built and connected, producing speech is surprisingly simple. The 8-bit and ST Talking Typewriter programs look for a keypress and use the synthesized voice to tell you which key was pressed.
ST OWNERS: You need to see Machine Language Talker in this issue's ST Resource for a full explanation of the program's ST version. Skip to the hardware sections of this article for information on building the Talking Typewriter circuit board.
8-BIT OWNERS: Type in Listing 1, TYPETALK.TLK, check it with TYPO II and SAVE a copy before you RUN it. BASIC programs written for the Talking Typewriter circuit will normally be given the .TLK extender.
8-BIT TAKE-APART
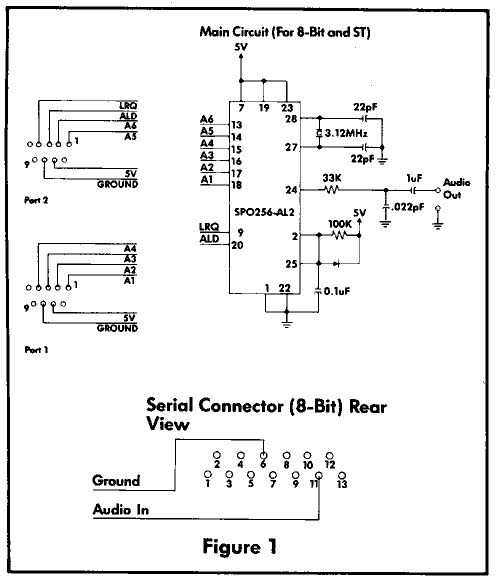
Atari 8-bit computers have at least two joystick ports that are programmable as either input or output ports. Four pins from each of the two ports combine to provide an 8-bit byte. PORTA (pronounced port A) at location 54016 ($D300), is associated with joystick ports 1 and 2. In order to set up PORTA properly, we will use the PORTA controller, PACTL, location 54018 ($D302).
Six address lines are required to access the 64 speech sound components-called "phonemes"-encoded within the SPO256 chip. (For some reason, the chip's documentation calls its speech sounds "allophones" instead of phonemes.) An example of phonemes would be the "th" sound in words like "the" and "those." The speech chip's phonemes combine to form recognizable speech when amplified and sent through a speaker.
Bits 0-5 of PORTA will be used as the address lines for output. Handshaking (communication control) between the speech chip and your Atari requires two signals. One is called ALD (Address LoaD) and is an output line. Whenever the computer tells the speech chip that it wants to load an address into the chip, it must pulse the ALD line LOW (change it from a 1 to a 0). Bit 6 of PORTA will be used for ALD.
The remaining signal will be an input to the computer and is called LRQ (Load ReQuest). Whenever the speech chip wishes to signal the computer that it is ready to receive an address it will pull this line LOW (make it a 0). Bit 7 of PORTA will be the LRQ line.
Lines 15-17 of the program use the variable P to store the value curently in PACTL. Subtracting 4 from that value clears bit 2 (makes it a zero, or LOW). This tells the Atari's operating system (OS) that we want to determine which bits of PORTA are used for input and which are used for output. To accomplish this, we have to POKE PORTA with a byte that represents the pattern of input and output lines we want. When the bit is set (equal to 1), the OS Is informed that the corresponding line will be used for output. A 0 in the bit will signify input. Using the information above, the resulting byte is equal to 127. We POKE this value into PORTA and then return PACTL to its original value by POKEing it with P.
Line 60 monitors the LRQ line, waiting for it to go LOW Since LRQ is bit 7 of PORTA, it will be represented as a value of at least 128. After LRQ goes LOW (PEEK(54016)<128), program control passes to Line 70. We obtain the data byte which represents one of the 64 phonemes and add 64 to it.
This sets bit 6, the ALD line, and makes it a 1. POKEing PORTA with this value places the address onto the address bus, where it waits until we pulse ALD to LOW (make bit 6 a 0)-which is exactly what happens when we POKE PORTA with our original data byte without the 64 added. It is this transition from a HIGH to a LOW that causes the speech chip to accept our data.
Use this routine to add speech to BASIC programs. Just be aware that the program might not immediately work properly because of timing requirements of the speech chip. For instance, when I combined different program lines into one BASIC line, I obtained no speech at all, even though the order of the commands was the same. You may have to experiment with your particular program, perhaps using a short time-delay loop between instructions.
PART II: HARDWARE
BUILD THE CIRCUITEssentially, we only need eight lines of communication between our computer and the SPO256 speech chip. Six lines (Al-A6) are used to determine which of 59 phonemes or five pauses is selected.
Speech data for the phonemes are located within the internal ROM of the chip. Two other lines are LRQ and ALD, described above. A list of all the phoneme addresses and their associated sounds is included with the SPO256 chip, along with a more detailed explanation.
In Figure 1, pin 19 is the strobe enable. By wiring this pin to 5 volts (HIGH), we're telling the chip to operate in Mode 1, which is one of two posible modes of operation for the speech chip. In this mode, the chip will accept an address whenever ALD pulses LOW.
In operation, we simply wait for LRQ to go LOW. When this happens, we send out a phoneme address to the speech chip with ALD set HIGH and then pulse ALD LOW, telling the chip to load that address. You are likely to think of these addresses as data, but technically they are actually addresses as far as the speech chip is concerned.
However, what's important is that we send a number between 0 and 63, which corresponds to a particular speech component (phoneme). We do this for each phoneme in the string of phonemes that make up the word to be spoken, making sure to end the string with a pause in order to turn off the sound.
While the Radio Shack specifications call for a 3.12 MHz crystal to provide the proper oscillator frequency, a 3.59 MHz crystal is much easier to find. Our results with the 3.59 MHz were satisfactory, so don't be afraid to try one. You might want to use a crystal socket so you can put in the preferred 3.12 MHz crystal later.
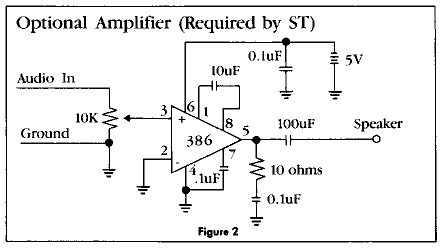
AMPLIFIERS: 8-BIT & ST
The SPO256 chip does much of the work, but it does not amplify sound to audible levels. Depending on which computer model you own, there are several amplification possibilities. These various approaches are discussed below.
With any Atari computer, you could run an audio cable with an appropriate connector to the input of your stereo. Or you might use a little one-watt amplifier (or kit) available at many electronics stores. Radio Shack does not currently carry these mini-amplifiers.
8-Bit Owners: We had very good results with an 800XL by simply plugging into the audio input of the serial port. But we experienced a low volume problem on an 800. If you have the same problem, you might replace the 33K ohm resistor in the circuit with a 50K ohm potentiometer.
ST Owners: The ST version requires an audio amplifier. You could build the one in Figure 2 and power it from its own five-volt supply. If you own an 8-bit computer, you might modify a serial cable as described in the paragraphs below and use the 8-bit machine as your amplifier.
8-BIT INTERFACE
Figure 1 shows how the audio signal from the circuit is routed into the computer through the serial port. If you have access to a spare serial connector (from a "daisy chain" cable connecting to your disk drive or modem), you could build a separate audio cable which can be plugged from the circuit board into the end of your daisy chain of peripherals.
If you do not have a spare connector, Figure 3 shows how you can make one of your daisy chain cables serve double duty. Remove the screw that holds the hood onto the end of any one of your serial cables and use a small screwdriver to pop out the two appropriate pins (6 and 11) by pressing down on the little retaining tabs. Pin 6 is the ground, pin 11 is audio-in. With a low-wattage soldering iron and a very small bit of solder, connect your audio cables to these two pins and then re-insert them. If you are unsure of your soldering skills, get an experienced person to do this.

The address lines are connected to the joystick ports via two female DB-9 connectors. Here's a snag: If you own an XL model, you'll probably need to bend back one corner of each connector to make them fit snugly into the computer. With an XE, you have a bigger problem-the two ports are recessed so far into the computer that standard connectors will not work.
Our solution was to buy two Joystick Extender Cables available at Radio Shack. Regular joystick cables won't work because they don't have a connection to the + 5V (five volts) pin needed to power the project. Anyone with a better solution is invited to send it to the Antic I/O Board
ST INTERFACE
For the ST hookup to the speech circuit-as shown in Figure 4-you will need a male DB-25 connector and a female DB-9 connector. The five volts needed to power the circuit are taken from the joystick port and, as with the XE computers, you'll need some sort of extender to fit the connector into the recessed port. The extender from a key" that comes with PaperClip (8-bit word processor from Batteries Included) will work, providing you can remove it from the key without damaging it. Or try the Radio Shack Joystick Extender Cables we suggested in the previous paragraph.

Other than the specific changes described, the 8-bit and ST speech circuit is the same.
NEXT...ENTIRE WORDS
Advanced experimenters could carry this project even further by using Radio Shack's companion chip, the CTS256A-AL2, which is a text-to-speech controller. With this chip-and the more complex circuit board diagrammed in the CTS256A-AL2 documentation-users can send out straight ASCII text and have the chip's built-in ROM programming decide how to pronounce entire words.
In other words, if you type in the word "Atari," the CTS256A-AL2 will pronounce the word recognizably. There is no additional POKEing or programming involved. We're considering building this hardware project for a future article, if there is sufficient interest from readers.
PARTS LIST
The following list gives standard Radio Shack part numbers and prices. Comparable parts from any source can be substituted. The parts required for this circuit are quite common and should be obtainable without difficulty from most large electronics stores.
Part    Description    Radio Shack #  Price

C1,C2   47pF *         272-121        0.39
C3      luF            272-996        0.79
C4      .022uF         272-1066       0.69
C5      .luF           272-1069       0.79
R1      33K **         271-1341       0.39
R2      100K           271-1347       0.39
XTAL    3.579 MHz ***  272-1310       1.69
Ul      SPO256-AL2     276-1784      12.95
Dl      1N914          276-1122       0.99
Pl,P2   DB-9 female    276-1536       2.49
You'll also need the appropriate cables and connectors based on what version you build. Use the diagram in this article-or the diagram included with the chip-to determine the parts needed for building a separate amplifier if you're going that route.
* Preferred is 22pF, not available from Radio Shack. 47pF worked satisfactorily in our version.
** If you have insufficient volume from your TV speaker substitute a 50K potentiometer.
*** Preferred is 3.12 MHz, available from Radio Shack on special order. 3.579 MHz worked satisfactorily in our version.
Listing 1: TYPETALK.TLK Download