THE START CALCULATOR
A fully programmable scientific calculator
by AIex Leavens
You say you want your computer to work like a calculator? You want to use extended math functions, complex expressions, and programmability? That's what Alex Leavens wanted, so he created a feature-packed desk accessory program called START Calc. You'll find this programmable desktop calculator on your START disk!
I needed a calculator for my computer. It was frustrating--here I was with an incredibly powerful microprocessor, hundreds of K of RAM, a machine that could blister its way through almost any benchmark. And every time I wanted to perform a calculation in the middle of another program I had to turn on my old Texas Instruments Tl-35 calculator.
I didn't want a little four-function adding machine, either. I wanted one with fancy features like the ones I saw in stores, calculators costing hundreds of dollars. I wanted extended math functions, multiple levels of parentheses, and, to top it all off, programmability--but no matter where I looked, I couldn't find an ST calculator desk accessory that did what I wanted.
So I stopped looking and started programming. The result is START Calc, START's desktop scientific calculator. It may well be the only calculator you'll ever need. Just look at the features you get:
- full floating point math, including 10 levels of nested parentheses
- log, trig and power functions
- 100 data memories
- 1000 steps of program memory
- full program control, including nested subroutines, label addressing, and much, much more.
GETTING STARTED
To use the calculator, first copy STRTCALC.ARC to a fresh disk, along with ARCX.TTP. Run ARCX, and type in the filename STRTCALC.ARC. ARCX will un-archive the files, and in a few minutes you'll be ready to go.
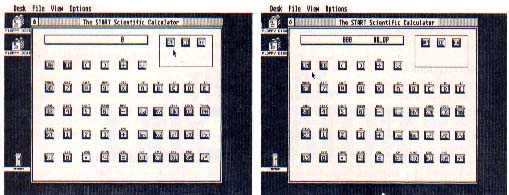
START Calc is a desk accessory, so you'll next need to reboot your ST. Then, when the desktop reappears, point at "Desk" to drop down the menu, and click on "START Calc." and the START Desktop Scientific Calculator will appear (see Figure 1).
You can, of course copy the calculator to any other disk you boot from, including your hard disk. Just copy STRTCALC.ACC (the desk accessory program) and STRTCALC.RSC (the resource file) to the disk; when you boot from that disk, you'll have the calculator immediately available.
USING THE CALCULATOR
Before we get into how to program the calculator, let's just get acquainted with how to use it. At its simplest level, it's a standard mathematical calculator--you type in an equation just as it appears, and the calculator solves it. Thus, for example you can type in the equation 2 + 3 * (5 + 9 / 6 * (3 + 8)) ENTER on the numeric keypad on the right side of your ST keyboard, at which point the calculator will evaluate the entire expression, and give the answer, 66.5. Or, instead of typing, you can click on the equivalent keys on the screen's keypad: 2 + 3 X (5 + 9 / 6 X (3 + 8)) = and you'll get the same answer. Note that, either way, the calculator does not evaluate intermediate steps of the problem, with the exception of parts of the expression that are entirely enclosed in parentheses.
(Speaking of parentheses, you should also note that you can have up to 9 parentheses open before you must close one. That is, you could enter: 2 X (((((((((3 + 5))))))))) = and still be safe. If you do exceed the parentheses level, there is no warning but the results are guaranteed to be wrong.)
The calculator understands algebraic precedence--that is, it will evaluate multiplication and division before addition and subtraction. It will also evaluate any expression completely enclosed by parentheses first, before evaluating other parts of an expression. Thus the expression (2 + 3) X (4 + 5) will be correctly evaluated as 45, and not 19, as would be the case if the parentheses were ignored. For a complete breakdown of the ordering of expression precedence, see Table 2.
The highest priority functions in the table are the immediate mode functions, which are processed immediately and affect only the contents of the display register. For example 1/x always changes the displayed number to its reciprocal, but affects nothing else.
THE KEYS
OFF Turn the calculator off and exit. Clicking on the close box in the upper left corner of the window does the same thing.
CLR Clear the calculator of any equations or results, and reset the display to 0.
CE Clear the current entry in the display. If you enter a number incorrectly (for example, you type a 3 but you wanted a 2), press this button to clear only the currently displayed number. This key does not affect calculations in progress, nor will it clear the result of a previous calculation. For example, keying 2 X 3 CE 4 = results in the answer 8.
2nd Activate the secondary function of a key. These secondary functions are displayed immediately above the main function of a key. For example the secondary function of the key SIN is Sinh.
INV Activate the inverse of a function. For example, lnx takes the natural logarithm of a number, so INV lnx takes the inverse natural log of a number (that is, eX). INV does not work with all keys--see the list below for those it does work with.
Note: Some functions require both the 2nd and INV keys. In those cases, you may press either key first--2nd INV and INV 2nd are equivalent.
MATH FUNCTIONS
+, - , X, / Add, subtract, multiply or divide two numbers.
. Insert a decimal point.
SIN Take the sine of the number in the display. INV SIN takes the arcsine, 2nd SIN takes the hyperbolic sine and INV 2nd SIN takes the hyperbolic arcsine.
COS Take the cosine of the number in the display. INV COS takes the arccosine, 2nd COS takes the hyperbolic cosine, and INV 2nd COS takes the hyperbolic arccosine.
TAN Take the tangent of the number in the display INV TAN takes the arctangent, 2nd TAN takes the hyperbolic tangent, and INV 2nd TAN takes the hyperbolic arctangent.
lnx Take the natural logarithm (base e) of the number in the display. INV lnx finds e to the value in the display.
log Take the common logarithm (base 10) of the number in the display. INV log finds 10 to the value in the display.
x2 Take the square of the number in the display, that is, x times x.
(square root symbol) x Take the square root of the number in the display.
1/x Take the reciprocal of the number in the display.
yx Take the number in the display and raise it to the power of the next number entered. For example, to raise 2 to the third power, you would type 2 yx 3 =.
INV yx takes the displayed value to the root of the next number entered; to find the cube root of 8, type 8 INV yx 3 =.
|x| (2nd / ) Take the absolute value of the number in the display.
DEG (2nd X) Switch the calculator to Degrees mode, and convert the number in the display from radians to degrees. DEG affects only the trig functions (SIN, COS, TAN and variants). The calculator starts out in Degrees mode.
RAD (2nd - ) Switch the calculator to Radians mode and convert the number in the display from degrees to radians. RAD affects only the trig functions.
µ (2nd3) Enter the value of µ to 10 significant places.
 |
|
| Figure 1 | Figure 3 |
CONTROL FUNCTIONS
+ /- Change the sign of the number in the display. If a number is positive, pressing this key makes it negative. If the number is negative pressing this key makes it positive. When entering an exponent, this key is used to make the exponent positive or negative as well.
EE Enter the exponent of a very large or very small number.
X<- >T Exchange the contents of the display with the test register. The test register is used mostly when programming the calculator, although it can act as a simple "temporary memory" area.
STO Store the displayed number to one of the calculator's data memories. After pressing this key, you must enter two digits to specify which memory the number is to be stored into. The memory addresses range from 00 to 99. This function does not affect the displayed number, other than to store it. CMS (2nd STO) will clear all data memories.
RCL Recall a number from one of the data memories into the display. Like STO, this key must be followed by two digits to specify the memory number. The current contents of the display are lost. EXC (2nd RCL) will exchange the current display register with the specified data memory; that is, the currently displayed number is saved in the specified data memory, and the number originally in the memory is displayed.
SUM Add the contents of the display to one of the data memories. This key must be followed by a two digit address (00 to 99), specifying which memory to use. INV SUM subtracts the contents of the display from the specified data memory. PRD (2nd SUM) multiplies the contents of the specified memory by the number in the display; INV PRD (INV 2nd SUM) divides the contents of the specified memory by the number in the display.
IT'S PROGRAMMABLE, TOO
In addition to being a powerful scientific calculator, START Calc is programmable as well. It can load and save programs, perform tests on numbers and branch to different locations as a result of those tests. Each function is explained in detail below. (Note however, that it is beyond the scope of this article to teach you programming per se. If you've never programmed anything before, I wouldn't recommend this as the place to start.)
LRN Enter or exit programming mode. If you are in calculator mode, LRN will put you in programming mode; in programming mode it will put you back in calculator mode.
LOAD (2nd.) Load a previously saved program from disk. This will erase any current program and labels that you have stored in memory.
SAVE (2nd +/-) Save program to disk. This saves the entire contents of the program area (1000 steps and all labels and locations) to a file you specify. This function leaves the contents of the memories unchanged once it has finished.
R/S Run or stop a program. If program is running, R/S stops it. If no program is running, R/S starts it.
RST Return to the start of the program. RST is used in calculator mode only.
CP (2nd X<- >T) Clear out the entire contents of program memory.
When you first click on LRN after starting the calculator, you'll see the display in Figure 3.
Each program address has three fields: a label, address and an operation. In Figure 3 you can see the address (000) and the operation (NO_OP). No label is currently set to program address 000, so there's nothing in the label field. There are 1000 program addresses, so you can create a calculator program up to 1000 steps long. When you first begin programming the calculator, all addresses are set to NO_OP, which means "no operation," or "do nothing." You can move forward and backward through your program by using the arrow keys on your ST's keyboard.
Almost any operation or series of operations that the calculator can perform when in calculation mode it can also perform in program mode. Thus, if we have the equation
22 + 34 =
we could enter it into the calculator in calculation mode:
22 + 3 yx 4 =
and get the answer, 103. However, we could enter the following instead:
2nd X<->T LRN 2 2 + 3 yx 4 = R/S LRN
This sequence will clear the program memory, then enter the program and return to calculator mode. Now, if you click on RST and then R/S to run the program, the calculator screen will go blank briefly, then display the result, 103.
This is not particularly exciting--after all, we had to enter a lot of extra keystrokes and do some fancy gyrations to get an answer we could find more easily just by using the calculator normally. However, when combined with the other programming capabilities of the calculator, we can get much more interesting results.
LABELS
A label is a way for a program to tell the calculator to remember a particular program step. To use a label, you must first set it, using the LABL function (2nd SBR). For example, to set label A at program step 000, you'd type
2nd SBR A
and the display would change to read:
LB: A 000 NO_OP
| TABLE 2 | |
| Precedence | Function |
|---|---|
| 0 (Highest) | Sin, inverse sin, sinh, inverse sinh |
| 0 | Cos, inverse cos, cosh, inverse cosh |
| 0 | Tan, inverse tan, tanh, inverse tanh |
| 0 | Lnx, e ^ x |
| 0 | Log, 10 ^ x |
| 0 | x ^ 2 |
| 0 | root(x) |
| 0 | l/x |
| 0 | +/- |
| 0 | |x| |
| 1 | ( |
| 1 | ) |
| 2 | y ^ x |
| 2 | y root x |
| 3 | x (multiplication) |
| 3 | / (division) |
| 4 (lowest) | + |
| 4 | - |
You can add a label to any program step whenever you're in program mode. Then, when you're in calculator mode, you can start the program beginning with the step at label A by clicking on the A button on your screen. The buttons A through E and 2nd A through 2nd E can all be used as labels that you can execute from the calculator mode.
For example, suppose you want to multiply several numbers by 2/3. You can write a short program to do this using the A key:
| 2nd x<->t | Clear program memory |
| LRN | Enter learn mode |
| 2nd SBR A | Set label |
| X | Multiply by. . . |
| 2 | Two |
| / | Divide by. . . |
| 3 | Three |
| = | Compute the answer. . . |
| R/S | Stop |
| LRN | Return to calculator mode |
Now, whenever you press the A key, whatever number is in the display will be multiplied by 2/3.
There are also a number of spare labels available that can't be called from calculator mode; they're listed under LABL in the programming functions.
PROGRAMMING FUNCTIONS
INS (2nd + ) Insert space for another program step. When you insert, all instructions below the current program step move down, and if there is an instruction in program step 999, it is lost.
DEL (2nd = ) Delete the current program step. When you delete, all instructions below the deleted program step move up, and the instruction in program step 999 becomes a NO_OP.
LABL (2nd SBR) Set a label to the current program step. Follow this command by clicking on a valid label key to set that label to the current program step. If the label was previously set, its old setting is lost. If more than one label is set to the same program step, only the highest priority label will be displayed.
You can perform the program at an executable label directly from calculator mode. The executable labels are A through E and 2nd A through 2nd E. Spare labels, which will function only from within program mode, include SIN, COS, TAN, lnx, log, X2, (square root symbol) x, 1/x, yX, SUM, RCL, STO, X< - >T, =, +, - , X, /, +/-,.,0, 1,2,3,4,5,6,7,8,9, EE, (, and ).
GTO Go to a label or the address of a program step. In a program, GTO is followed by a label or address, and jumps to the program step at that label or address. If GTO is followed by a label name and the label has not been set, the GTO instruction is ignored.
Because the numbers 0 through 9 can be labels, you must be careful in using them with GTO. For example, if label 1 has been set, the instruction GTO 123 will not jump to program step 123, but instead to the program step pointed to by label 1.
In calculator mode, GTO simply changes the current program step, without performing the program.
SBR Execute a subroutine beginning at a label or the address of a program step. SBR must be followed by a label or address. If SBR is followed by a label name and the label has not been set, it is ignored. You may nest up to 30 subroutine calls. A subroutine must end with a RETRN instruction.
RETRN (2nd 6) Return from a subroutine. If the instruction is not part of a subroutine that has been called with the SBR instruction, the RETRN instruction is ignored.
X < - > T Exchange the current contents of the display with the test register.
X = T,X NOT = T,X<= T,X>= T Test the current contents of the display against the contents of the test register. If the condition being tested for is met, then jump to the label or program step specified; otherwise execute the next instruction. Like a GTO instruction, each test instruction must be followed by a label or address of a program step; if the label has not been set, the test is ignored.
The X >= T and X <= T functions can also be used with INV. INV X >= T provides the test X < T, and INV X <= T provides the test X > T.
STFLG (2nd RST) Set a flag to the on position. There are ten available flags, numbered 0 through 9. The STFLG instruction must be followed by a number from 0 through 9, specifying which flag to set. INV STFLG sets the specified flag to the off position; it appears as CRFLG is the program display.
IFFLG (2nd 1) Test a flag to see if it is on; if so, jump to the label specified; execute the next instruction. IFFLG must be followed by a number from 0 through 9, specifying which flag to set, and a valid label. INV IFFLG tests whether a flag is off; it appears as IF-NOT in the program display.
DSZ (2nd 0) Decrement a memory register; if the result is zero, then branch to the label specified; otherwise execute the next instruction. DSZ must be followed by a number from 0 through 9 (only these ten memory registers will work with this instruction) and a valid label. INV DSZ decrements a register, but jumps only if the result is not zero; it appears as DSNZ in the program display.
PAUSE (2nd GTO) Update the display in the course of program execution. PAUSE makes it possible to see the progress of calculations in a program, but it does not change any values in the calculator.
NOP (2nd 9) Do nothing, and proceed to the next program step. This instruction appears in the program display as NO_OP; it performs no operation, and changes no values in the calculator.
PRACTICE, PRACTICE, PRACTICE. .
And that's it! You now know about every function in this calculator. I've touched only briefly on many of the functions, but as I said before it's far beyond the scope of this article to give detailed examples of all the features. The best way to understand each feature is to experiment with the calculator.
There wasn't room for the source code for the calculator desk accessory on this month's START disk. However, you'll find it in Antic Online, the Atari online magazine on CompuServe. Just log on to CompuServe and type GO ANTIC, then check the "What's New" menu to find the STRTCALC source code.
I've tried, with my routine names, to keep things in the source code as clear as possible, but several of the routines are worth special note:
do_everything( ) processes 90 percent of the keystrokes; when you press one of the keys on the calculator, you almost always end up here. run_calc( ) is responsible for executing calculator programs. evaluate_it( ) sifts through the stack to evaluate the equation it finds there; it calls itself recursively as needed. (It also caused me to lose many nights of sleep--unless you're really interested in how to build a complex algebraic calculator, you can skip this routine and never worry about it.)
I had a lot of fun writing the calculator, and I find new uses for it every day. I hope you do, too. And if you come up with particularly useful calculator programs, send them to START--you might see them appear in a future issue!
Alex Leavens, author of The START Desktop Icon Editor (Spring 1987) is a games designer with Activision Software.