ARCADE
Brickyard!
A GFA BASIC version of an old classic
by PATRICK BASS
START TECHNICAL EDITOR
The year: 1976. The game: Breakout. Back then, it took legendary hacker Steve Wozniak to create Atari's ultimate version of the popular Pong arcade game. Eleven years later, all it takes is GFA BASIC. START Technical Editor Patrick Bass lets you knock out those bricks, then shows you how it's done!
Well, you can't say I didn't wait. I sat and tapped my foot for almost two years, waiting for Atari to release ST versions of the legendary games they're famous for. I wasn't greedy. But after all this time, all I saw was Star Raiders--none of the simpler, standard games. Why not?
Well, to make a long story short, I decided to do it myself. I had written Breakout-type games before on a number of different computers, and I was sure that GFA BASIC from MichTron was powerful enough to give a reasonably good showing, so I decided to write my own quick ST interpretation of this classic theme
FILE BRIKYARD.ARC on your START disk.
RECOVERING BRICKYARD
You'll find Brickyard on your START disk under the name BRIKYARD.ARC. To play the game, copy this file and the program ARCX.TTP to a fresh disk. Next, double-click on ARCX.TTP, and in the box that comes on screen, type in the filename BRIKYARD.ARC. The disk will spin for a minute or so, and when it's finished you'll find BRIKYARD.BAS, BRIKYARD.PI1, and BRIKYARD.PRG on your disk.
BRIKYARD.BAS is the GFA BASIC source code for the game. It's saved as a text file so you don't need GFA BASIC to examine it; you can SHOW or PRINT it from the desktop, or load it into a word processor like ST Writer or WordWriter ST. (To load it into your copy of GFA BASIC, you'll need to merge it.) BRIKYARD.PI1 is a DEGAS-format picture that forms the game's title screen. You can change this picture using any DEGAS-compatible drawing program--like Flicker, the drawing and animation program from the Summer 1987 issue of START.
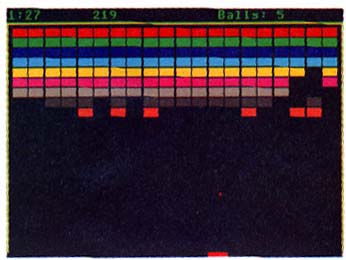
You don't need GFA BASIC to play the game, either--it's compiled as BRIKYARD.PRG. Be sure you've got BRIKYARD.PI1 on the same disk, then double click on BRIKYARD.PRG. When the title screen comes up, click on [Play]. Your mouse will move the paddle from side to side, and you'll get five tries at keeping the ball going as you knock bricks out of the wall.
PLAYING IN THE BRICKYARD
Once you've played the game, return to the title screen to see the options that are available. (You can return to the title screen at any time by holding down both mouse buttons.) Unless you've changed the screen with a drawing program, you may want to put on your sunglasses--we'll be staring at those flashing lights for a while!
From the menu you can play the game (using [Play], of course), or quit and return to the Desktop by clicking on [Quit]. There are also ten other controls you can change and play with:
SOUND ON/OFF This switch controls whether your ST will beep when the ball hits a wall, ball, or paddle. Even when the sound is off, you'll still get a booping noise when the ball misses the paddle.
AUTOMATIC PLAY ON/OFF When Automatic Play is on, Brickyard runs as a demo game--the paddle centers itself under the ball and follows it automatically, without your guidance.
ENGLISH ON/OFF There are two different ways for the ball to bounce when it whacks the paddle. When English is off, the ball will rebound at the same angle at which it struck the paddle. When English is on, the ball bounces at an angle proportional to where it struck the paddle. If the ball strikes the left side of the paddle, it will bounce further to the left; on the right side, it bounces further to the right.
NEVER MISS ON/OFF For practicing, it's nice to not have to worry about the ball rolling off the bottom of the screen. When Never Miss is on, the ball will bounce back up whether it struck the paddle or not. When Never Miss is off, the ball will continue normally.
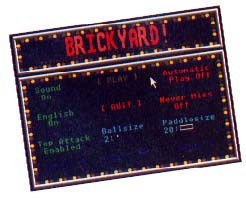 |
| Title screen of Brickyard |
TOP ATTACK ON/OFF There are two basic ways of playing Brickyard. When Top Attack is off, the ball will only knock out a brick when it's moving toward the top of the screen. When Top Attack is on, the ball will also knock out any bricks it hits moving back toward the bottom of the screen which can push your score higher much faster. Play with this switch and check for yourself how it changes the playing strategy.
BALL SIZE This lets you change the size of the ball. Point at Ball Size and press the left mouse button to decrease the size of the ball; hold down the right mouse button to increase it. You may vary the ball's size from a single pixel to a square five pixels high and wide.
PADDLE SIZE This lets you vary the size of the paddle. Again, the left mouse button decreases the paddle size, and the right button increases it. The paddle width may vary from a single pixel to 50 pixels wide.
# BALLS Here you may select how many balls you get, from 1 to 99 balls per game.
# COLS This lets you choose how many columns of blocks there are, from 1 to 99 columns.
# ROWS Finally, this lets you change the number of rows of bricks, from 2 to 9 rows.
THE FACADE BEHIND THE FRONT
If you're a programming type, let's get our hands dirty--the source code is in the file BRIKYARD.BAS.
The top eight lines comprise the title, copyright, and version information for the program. The next four program lines comprise the entire main program. All we need to do is initialize, then handle the menu (which will call the gameplay if desired), terminate when the game is finished, then end the game. That's not too hard, right? The rest of the program is all in the subroutines.
INITIAL-EYES
To get the program up and running, it needs to be told a few things. First we set default values for soft switches, tell the computer where the boundaries of the video screen are, and then determine the default sizes for the paddle, the blocks, and the ball. The first For-Next loop gets the default color palette from the ST and saves it in an array, so we can fool around with the colors all we want inside the game and then restore the default colors when we eventually leave the program. This function calls the Atari XBIOS function Setcolor.
PLAY BRICKYARD
Here we just build the playfield, meaning we clear the screen and draw the blocks and boundary, then call Bounce It, which is the subroutine that actually plays Brickyard.
TERMINATE
In here we do two things. First, we restore the screen pointer to point at the original screen we had when the game started up, and then we restore the original color palette. Remember when we saved it? Here's where we put it back down.
BUILD PLAYFIELD
This subroutine draws the game playfield on the ST screen. First it hides the mouse, clears the screen, and sets the background color to black. Then it creates a single brick onscreen, grabs it and saves it in BLOCK$, and repeats the create/grab/ save process with the ball and paddle. Now it's time to draw the border around the edges of the playfield, made up of a single yellow and a single green line. Finally, it draws the field of blocks: For each column and row coordinate, it places a single block down in the color specified by the current row we happen to be on.
When that is finished, it grabs a copy of the complete field of bricks and places it into Zz$, which will be used to quickly restore the field when the last brick has been knocked out. Finally it places the paddle at the bottom of the screen, and refreshes the pointers for the paddle position.
BOUNCE IT
This is the largest subroutine in the program; in here we actually play the game. At the top, it resets game-length variables to their standard starting value. The subroutines Text_report and Init_ball initialize the text along the top of the screen and the default starting values for the ball. Next the routine hides the mouse and falls into a Repeat loop, which will continue playing the game until the exit condition has been satisfied. In our case, the game will stop only if all the balls have drained out the bottom, or if you hold both mouse buttons down during game play.
The first thing to do is refresh the position of the ball to the ball's last known. Now it calculates where the ball will be placed next. There's a check to see if the ball will hit the left or right wall. If so, it will reverse the ball's direction, make a sound (if allowed), and then recalculate the extra-new position of the ball. Next it performs the same tests to determine if the ball has struck the top wall. When the two tests are complete, it grabs the current horizontal position of the mouse and captures the state of the mouse buttons.
Next, it determines if the ball is about to drain off the bottom of the screen. If you have the Never Miss switch on, it will simply bounce the ball back up and make a sound if it's allowed. However, if it is possible to miss the ball, it will check to see if the ball is anywhere within the boundary of the paddle. If it is not, the ball just drained, so it counts it, makes an obnoxious noise, and re-initializes the ball parameters.
But if the ball is at the bottom of the screen, and is somewhere between the left and right edge of the paddle, the ball must be about to hit the paddle, eh? So we reverse the vertical direction of the ball, and then test to see if English is allowed on the ball. If it is, then we generate a new ball direction based on where the ball struck the paddle; if not, we let the ball bounce back up. The next test determines whether you have the Automatic switch turned on. If it is, the paddle position is computed to follow the ball back and forth across the screen. It's a much better player than you are, I assure you.
So much for all those tests--now let's start doing something onscreen. First we Vsync to make sure you draw at a stable time on the screen, then Put the ball image down at the old position of the ball, which erases it, and then Put the ball image down at the newly computed ball position. Next we compare the old position of the paddle to the new position. If they haven't changed, we don't redraw the paddle; otherwise We erase the old image and redraw it at the new paddle position.
Before we actually move the ball, we check the location on the screen where the ball will eventually wind up. If the color there is greater than color one, then we must be about to place the ball down on a block, which means we're about to hit the block. The blocks use colors 2 through 11; the background of the screen is drawn with colors 0 and 1. If we do indeed detect that the ball is about to enter the block, we make a noise if we can, then quickly erase the ball, Fill the block with the background color zero, which effectively erases it, and redraw the ball. We decrement the count of the total number of blocks onscreen, and increment the number hits we've made. These two numbers are not just reciprocals of each other--remember, we can have more than one field of blocks. Now we calculate a new vertical velocity for the ball based loosely on the total number of blocks which have been hit and erased so far.
If the number of blocks left onscreen at this point is less than one, then all the blocks have been erased, so we increment the Wave count and replace the field of blocks onscreen. One of the last things to do at this point is update the text line at the top of the screen. Then we loop back to perform the entire ball placement loop again.
INIT THE BALL
This is a very short routine whose sole purpose is to select a random place onscreen to place the ball initially. The subroutine that follows, TEXT REPORT, will update the text line at the top of the screen to reflect the current values for the Wave, number of Hits, the Score, and how many balls are left to play.
HANDLE MENU
This routine starts by grabbing the address of the screen buffers we'll keep pictures in, like the picture that makes up the Menu Screen. With that address, it Bloads the menu image into the buffer, and then falls into the menu Repeat loop.
In the loop, we first copy the menu image over to the screen buffer we'll actually wind up looking at, then use the GFA call that corresponds to the GEM Setscreen function to place the internal image pointer to show the picture onscreen. Next, we place the button text in the center of the menu, then fall into the Repeat loop that does the color shifting that gives the menu screen its "moving lightbulb" look. Once every loop, we look to see if you've pressed either mouse button; if you have, we try to determine which menu item you are pointing at and handle it accordingly. Otherwise, we continue in this loop until both buttons on the mouse have been pressed, and continue the outer loop until the game is actually finished.
HANDLE MOUSEPRESS
When you press either mouse button on the menu screen, you must be trying to handle one of the selections on the screen, right? So this subroutine goes down the list, trying to find which section of the screen the mouse was in when the button was pressed. For example, look at the first selection, which tests to see if the mouse was near the Handle_ Beeping area. If it was, then it calls the routine that toggles the beeping flag, and puts the results onscreen. The rest of the buttons are handled in exactly the same way.
SHOW BUTTON TEXT
This is a generic routine that calls each of the possible button handling routines in turn, thus showing them all onscreen. We call this routine right after we've drawn the initial menu screen, which comes without any buttons actually drawn.
SUPER END-O-GAME
The rest of the subroutines to the end of the program handle the different areas of the menu screen. Some are simple toggles, which write the proper string to the screen. If the subroutine calls for a value to change up or down, then it determines which button was pressed when you pointed at it and clicked. If the left button was pressed, then it decreases the value there, and if the right button was pressed it increases the value, checking for the limits that apply for that particular subroutine.
UNDERTURE
As you can see, it's not that hard to do this in GFA BASIC. I am constantly struck by how the leading edge of technology a decade ago is now a simple programming exercise. At that rate, within ten years we should have fifth-graders programming CAD-3D 12.0 in BASIC!
PRODUCT MENTIONED
GFA BASIC
MichTron
576 South Telegraph
Pontiac, MI 48053
(313) 334-5700
$79.95