ICONOGRAPHICS
FLICKER
Powerful ST animation for everyone
by JIM KENT
Have you ever wanted to be a cartoon animator? It doesn't take years of time or millions of dollars to make a face smile or a fish swim; all it takes is an old-fashioned flip-book--or Flicker, a new program by the author of Aegis Animator ST. You'll find Flicker and a few sample animation files on your START disk!
File FLICKER.ARC on your START disk
 |
| This Flicker animation sequence is on your START disk as GRAMMA.SEQ. |
You've seen flip-books: little pads of stiff paper, each page with a drawing on it. You bend the book into an arc, one thumb over the page ends; then, sliding your thumb down, you let the pages flip past very quickly. Like frames in a movie, the flipping pictures give the appearance of motion.
You may have made your own flip-books as a bored schoolkid, drawing a dozen or so little faces or stick figures in the corner of your thick, boring history book, then sending them through their gyrations--a wink, a growing smile, a stick figure kicking up his/her/its legs. It's probably the easiest (and certainly the cheapest) form of animation to produce. With a flip-book you have to draw each frame entirely, but the impressions your pencil left from your previous frame can help to guide you.
Flip-books won't let you create a full-length Fantasia, but they are a lot of fun, and in my case, the germ of a new program. Inspired by the multiple work screens of DEGAS Elite, I decided to write my own flip-book animation program for the ST. I call it Flicker.
Flicker is basically a nifty little ST paint program. It has some drawing features I'm really proud of--the airbrush, a non-blinking cursor (easy on the eyes) and a really nice fullscreen zoom. It also has lots of work screens, and, of course, the ability to cycle through them at various speeds. Flicker can read and save single-screen files from NEOchrome or DEGAS, and also save entire animation sequences. The program does have a limitation you should be aware of--it doesn't run on a monochrome ST. You'll see why when you run the program.
 |
||
| FIGURE 1 | FIGURE 2 | FIGURE 3 |
USING FLICKER
In the archive file FLICKER.ARC you'll find about 30 files. Most of them are source files. But to get started with the program, just copy the archive file to a disk with lots of free space, and un-ARC FLICKER.PRG. Change to low-resolution, then double-click on the FLICKER icon and in a few moments you should be greeted with a black screen with a white hollow-cross cursor on it. You can start drawing immediately by holding down the left mouse button as you move the mouse.
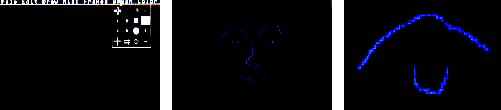
Flicker uses "pop-down" menus. These are much like normal ST drop-down menus except they are invisible until you hit the right mouse button, which toggles the menu bar on and off. I had a lot of technical problems using drop-downs, but worst of all, they make it hard for you to use the top part of your screen!
Try pressing the right mouse button down. The words "File Edit Draw Misc Frames Brush Color" should appear on the top of the screen. Move the mouse into one of the words and a menu should pop down. Try running the mouse from left to right across the top of the screen, and you'll see all of the options Flicker gives you. A picture of the Brush menu is in Figure 1. Most of the menu options have keyboard equivalents. I'll go through the menus an option at a time a little later, but first let's get started with a simple animation--a face winking. My version of a winking face is on disk as WINK.SEQ.
Pick a color you'd like from the Color menu, perhaps light blue. Figure 2 has the first face I drew, one with both eyes open. As you draw you might want to get close up to some areas. Just hit the z for zoom, and a framing box will appear. Position it over the area you'd like to blow up, then click. Figure 3 shows a zoom of my face's left eye. When you want to see the full screen just hit z again. Made a mistake? Hit the Undo key and the last line you drew will disappear. When you're done drawing, select Append from the Frames menu. Flicker will create a new frame that's an exact copy of the previous frame, and now you'll be drawing on the new frame. You'll see a message saying you're on frame 2 of 2 and how much memory you have available.
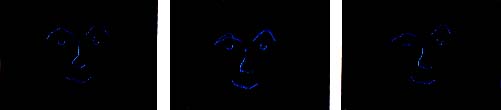
Now comes the fun part. From the Edit menu select Blue Pic. Figure 4 shows what happens. All colors on the screen except black (color 0) changed to dark blue (color 1). Think of this color as non-reproducing blue--you can see it, but it will vanish in the final version. You can use this blue silhouette to guide you as you draw the next frame. (Remember the pencil impressions left in your history book?) Trace over the blue, making slight changes to create the second frame of your animation. Then flick back and forth between frames with the left and right arrow keys. When you're happy with the new frame, select Unblue Pic from the Edit menu and the blue will vanish into the background color. Figures 5 and 6 show my second frame before and after "unblueing." You repeat this procedure--Append, Blue Pic, draw, Unblue Pic--until you have all the frames you'd like. For the final frame you might want to visit the first frame to make sure the picture doesn't jump too much when the animation loops around. You can use the up and down arrows to go to the first and last frames.
 |
||
| FIGURE 4 | FIGURE 5 | FIGURE 6 |
Flicker will let you make up to 128 frames if you have the memory--a Mega ST4, with four megabytes of RAM, would let you do it. On an unmodified 520, depending how many desk accessories you have you'll probably get an "out of memory" message if you make more than 8 frames; on a 1040 you should get over a dozen. Append will make a new frame immediately after whatever frame you're on, so you'll usually want to make sure you're on the last frame before appending. If you want to watch your animation play through, without getting manic on the arrow keys, go back to the Frames menu and select Play Forwards. This will go from one picture to the next in ten 1/60ths of a second (10 jiffies). You can also Play Slowly at 20 jiffies per frame, or Play Fast at 4 jiffies per frame.
After you finish your computer graphics epic (The Last Starfighter II?), you'll probably want to save the animation you've made. To do this, select Save Seq from the Files menu. You'll get the standard GEM File Selector box. Type in the filename for your animation (don't forget the .SEQ extender) and press the Return key or click on OK. Before saving the file, Flicker checks to see if you have enough space on your disk. Flicker doesn't save the whole picture for each frame--just enough of it to hold the part that isn't the same color as the background. Still, .SEQ files still can get pretty large; I have one that's 150K! (If you spend much time doing computer animation, you'll probably find as I do that a good, cheap, fast hard disk is more important to an animation programmer than a blitter chip--but I'm not going to knock any neat hardware Atari decides to offer.)
Though Flicker is most fun for quick flip-book type doodles, it is actually a fairly powerful paint system as well. While DEGAS Elite is definitely your choice if you have to do a lot of text in a variety of fonts, and NEOchrome has more different shapes, you might find as I do that Flicker is the best for drawing things by hand. You can see the time I spent on the frames shown on pages 16-17. (This animation's on your START disk as GRAMMA.SEQ). The combination of the full screen zoom, being able to pick up a color under the cursor, and not having the cursor blink at you all the time really makes Flicker great for doing detail work. The airbrush really sprays! Not just a little drizzle, but with enough guts to make you feel like decorating a couple of subway cars with graffiti. Try spray with one of the bigger brushes for real pixel demolition.
I dislike having to change from medium-resolution (where I do most of my text editing and programming) to low-resolution to run graphics applications in 16 colors. Unfortunately GEM is pretty silly about adapting to new resolutions unless you go through the "Set Options" dialog on the desktop. Ninety percent of Flicker's functions will work if you start it from medium resolution--enough to replay animations and use most drawing functions. However the flood fills and polygon fills will only work for the first three colors.
FLICKER A FUNCTION AT A TIME
Flicker has many more features than you saw in that brief walk-through, including cut-and-paste, some pre-defined shapes, and area fill.
There are 44 functions you can choose from the popdown menus, and you can select from among 16 brushes and 16 colors. One way to explore them is by just playing with the program--you can learn a lot simply through experimenting on your own. But here's a complete list of Flicker's functions, divided into separate sections for each of the popdowns. Where keyboard equivalents exist, they are noted in parentheses immediately after the function name.
File
- About Flicker--displays copyright notice.
- Load Pic--loads a DEGAS (.PI1) or NEOchrome (.NEO) file into current frame (DEGAS usually, NEO if you've selected NEO under Misc).
- Save Pic--saves a NEO or DEGAS file from current frame.
- Load Cel--loads a DEGAS .CEL file into the clip buffer. The cel will appear momentarily on the screen after it's loaded, but to use it in your animation you must select Paste under the Edit menu.
- Save Cel--saves the clip buffer to a .CEL file. Clip or Cut out a piece of a picture from the Edit menu first.
- Load Seq--loads an entire Flicker sequence. Careful with this one, because there's no undo!
- Save Seq--saves all frames to a .SEQ file. Checks disk free space first (this can take a while on a hard disk).
- Load Col--loads color map from a .COL file (a simple 16 word file).
- Save Col--saves color map.
Edit
- Undo--(or Undo key) forgets last thing you did to this frame.
- Blue Pic--(or ( key) turns everything that's not the background color (color 0) to "non-repro-blue" color (color 1).
- Unblue Pic--( ) key) removes non-repro-blue color.
- Clear Pic--(or Backspace key) turns this frame to back ground color.
- Clear Seq--deletes all frames. Watch it--this one also doesn't undo!
- Cut--(F1) cuts out a portion of the screen into clip buffer for later pasting or to save as a .CEL file. Your cursor will become a full-screen cross until you pick the one corner of the box to save. Hold the left button down and drag it to the opposite corner and release. Hit the right mouse button if you decide not to cut out anything.
- Clip--(F2) clips all non-zero portions of the picture into the clip buffer. That is, the ST will find the smallest box that has anything drawn in it.
- Paste--(F3) puts a copy of the clip buffer onto the screen. Hit the right mouse button to leave it exactly in the position you clipped it from, or drag it to a new place with the left mouse button.
- Fit Colors- (F4) If the .CEL has a different color set than the picture you're in, this will adjust the colors of the cel to the closest colors it can find in the picture's color set.
Draw
- Draw--plots a dot or brushes down as long as you hold down the left mouse button.
- Drizzle---a slow, relatively small airbrush.
- Spray--a big fast airbrush. Works with brushes, too--very quick!
- Flood--fills an area with a color.
- Line--draws one straight line. Push the left button down at the point you want to begin the line, hold it down as you move to the other end, then release it.
- Lines--draws connected straight lines. Click the left button at the endpoint of each line. Press the right button to end.
- Polygon--draws a free-form polygon. Click left button over each corner, right button to end. This will be hollow or filled depending on the Filled selection under Misc.
- Rays--draws rays radiating from a single point. Click the left button over the center, then move the mouse to where you want the first ray to appear. Click the left button again for each individual ray, or hold the left button down and whoosh around the center to create a series of rays quickly. Click the right button to end.
- Circle--Push the left button down over your centerpoint and drag out a circle to the desired radius. A circle can be either hollow or filled. If it's hollow it will be drawn with the current brush.
- Box--creates a rectangle. Hold the left mouse button down where you want a corner of the box to be, then drag to the box's opposite corner and release. A box can be either hollow or filled.
Miscellaneous
- Status--(space bar) displays which frame you're on, how many frames you've created, how much memory is left, and how much you started with.
- Zero Clear--determines whether the background color of a cel is treated as transparent when a section is cut and pasted (default is transparent).
- Filled--determines whether polygons, circles and boxes are hollow or filled (default is filled).
- NEOchrome--determines whether picture files are DEGAS (the default) or NEOchrome format.
- Zoom--(z) toggles zoom on and off. When you turn it on, a white frame will appear around the cursor. Move the frame to the area you want to magnify and press the left button. Flicker's zoom can only move horizontally in 16-pixel jumps.
Frames
- Go Forward--(right arrow) moves to next frame in sequence.
- Go Backward--(left arrow) moves to previous frame.
- Go to Last--(down arrow) moves to final frame in sequence. Usually you'll do this before appending a new frame.
- Go to First--(up arrow) moves to the start of the sequence.
- Append--(Clr/Home key) creates a new frame after this frame. It starts out as an exact copy of this one.
- Insert--(Insert) creates a new frame before this one.
- Delete--(Delete) removes this frame. Screen jumps to next one.
- Play Forward--(F10) flips through screens at normal speed--6 frames per second.
- Play Backward--(F9) flips through screens backward at 6 frames/sec.
- Play Slowly--(F8) flips forward at 3 frames/sec.
- Play Fast--(F7) flips forward at 15 frames/sec.
Brush lets you select one of 16 brushes. The hollow cross brush on the upper left actually draws a single point.
Color lets you select one of 16 colors. You can select the color under the cursor by hitting the c key
THE NITTY GRITTY
If I gave an exhaustive explanation of how this program works it would probably fill up this entire issue of START, and it would take me longer to describe Flicker than it did to write it in the first place! However, the source code is on your START disk in the file FLICKER.ARC for you to look at. To examine the source files, un-ARC them, following the instructions on the Disk Instructions page in this issue of START.
The program is roughly one-third assembler and two-thirds C. The text editor, assembler, compiler, linker, and make utility are all from Manx Software's Aztec C package. Aztec C is the developer's choice on the Amiga. By doing some work for Manx I was able to get an alpha version to work with on the ST. Since it's not released yet, all I can say is I hope the rest of you get to link this fast soon!
Most of the drawing and page-flipping routines are written in assembler, and most of that code is pretty boring. This is because to get any speed out of the ST you must have a separate drawing routine for each color. With the "interleave-bit-plane" organization of the ST, routines that draw only one color run two to three times as fast as routines handling any color. In the assembler source you'll find 16 dot-plotting routines and 16 ways to draw a brush. (Someday, I hope we'll have access to a byte-a-pixel graphics engine.)
Also of potential interest to graphics speed-freaks is the zoom routine, which can blow up an area by a factor of 4 onto a full screen in 1/26th of a second. It uses some table lookups and a lot of in-line code. There's another big table-lookup in the airbrush code, which does a conversion from polar to Cartesian coordinates with one lookup, two swaps and two multiplies.
Another reason the airbrush, cursor and draw routines can go fairly quickly is that I keep 16 copies of the current brush, each shifted over a pixel, so the poor 68000 doesn't have to shift during draw time. With a blitter chip, I wouldn't need to do this.
There's a circle-drawing routine in CIRCLE.ASM, and its filled version in DISK.ASM. Take a look at them. You might be surprised to find that incremental circle algorithms can be just as simple. and potentially faster, than incremental lines.
Finally there's the beam-skipping: In the file CLOCK.ASM you'll find not only a way to access the 200Hz system timer, but also ways to see where on the screen the video beam is. That way you can avoid drawing on the parts of the screen that the beam is updating. It's this code that prevents the cursor from flickering.
The C code, which handles most of the decision making and user interface, is a bit more convoluted. The main routine is in the file MAIN.C. This consists of little more than system initialization and a forever loop--for (;;)--checking to see if there's a key to interpret or if a mouse button is pressed.
If the right mouse button is pressed, main() calls the popdown interpreter in PULL.C. The data for the pop-downs is in CELPULL.C. If the left mouse button is pressed, control jumps through a function pointer (pentool) to some routine depending on what's selected from the Draw menu. Most of these routines are in PENTOOLS.C.
The pen tools themselves, as well as most of the other functions, are complicated greatly by doing hide_mouse() calls before any drawing begins, and show_mouse() calls when drawing is done. Further, making sure the screen gets updated in "zoom" mode leads to lots of little function calls. I haven't found a really elegant way to design this that would still be fast; I just beat on it until I got it right.
If you're interested in a fairly clean-looking piece of code that may be useful to you, take a peek at PULL.C. There are still some zoom-buffer complications, but with any luck you'll figure out how to yank them out and have nice, responsive, unobtrusive pop-downs for your own application. (Be forewarned: the one disadvantage to pop-downs is that they lock out desk accessories.) Pull() takes a simple tree data-structure. Rather than having a million flags to decide how to draw something (like GEM does), pull() has a slot for a drawing function. If you need something other than text, a brush, or a box, you can just write your own function and stick it here. The code calls the function in the structure with the structure itself. This very powerful programming technique is how object-oriented programming languages such as Smalltalk and C+ + implement "methods".
Don't be afraid to dig into the code and experiment with it. If you have any questions, I can be reached on BIX, where I'm the Atari ST moderator. In the meantime, happy flicking, and maybe happy tweening too!