Atari Animation: Lesson 4
Artifacting
By Robin Alan Sherer
To take full advantage of these Atari Animation lessons, you should be at least an experienced beginner in Atari BASIC. However, any 8-bit Atari user can enjoy using the short graphics demonstration type-in programs that accompany the lessons. These BASIC programs work on Atari 8-bit computers having at least 32K memory, with disk or cassette.
Last month's lesson introduced the two main software tools you'll be using throughout this series--Animation Editor, a professional-quality character set editor, and LinkBAS, which simplifies inserting machine language routines into your BASIC programs.
So this month we'll return to our haunted house animation sequence and use the new programming tools to create more colorful details for the picture.
GETTING STARTED
Type in Listing 1, HOUSE04.BAS, check it with TYPO II and SAVE a copy before you run it.
NOTE: The line numbers in this month's listing do not correspond to line numbers in previous Haunted House listings. Do NOT try to combine this month's listing with any of the previous Haunted House listings.
If you have trouble typing the special characters in lines 20 and 3020-3500, don't type them in. Listing 2 will create them for you. Type Listing 2, checking it with TYPO II, and SAVE a copy to disk. When RUN, Listing 2 creates these hard-to-type lines and stores them in a disk file called D:LINES.LST.
To merge the two programs, LOAD "D:HOUSE04.BAS" and then ENTER "D:LINES.LST". Finally, remember to SAVE the completed program before you RUN it. In upcoming articles, you'll need this program. Antic Disk owners will find a complete HOUSE04.BAS on this month's disk.
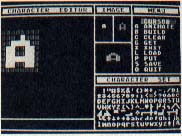
REDEFINED CHARACTERS
This month, we've redefined our entire character set. The data for our new character set is kept in CR$. The subroutine beginning at line 3000 inserts the character data into CR$.
At this point, CR$ contains a valid character set (font), but we can't use it until we place it in an appropriate place in memory. Remember, character sets must begin on an even-numbered page boundary, such as 158 or 224.
The MOVMEM (MOVe MEMory) subroutine at line 4000 takes care of this by copying CR$ into an appropriate location. This location is calculated in line 30. Finally, line 2060 tells the computer to use the new character set instead of its default set.
REDEFINED PROBLEMS
Normally, the letters "C" and "A" appear near the beginning of the character set. But in our new font, the letters "C" and "A" have been moved. They've now replaced the shapes for the [UP ARROW] and [LEFT ARROW] keys.
In other words, we changed the eight numbers telling your Atari how to draw a "A," into eight numbers telling your Atari how to draw the belly of the robot.
But your Atari still needs to know how to draw an "A" so we took our eight numbers and put them somewhere else. In this case, we put them in the place of the eight numbers which form the [UP ARROW] character. We used the same technique to move the "C" character to the [LEFT ARROW] position.
Normally, the [ARROW] characters don't show up on the screen--they just move the cursor around. If we want to PRINT a "C" or an "A" (such as in the word "CASTLE" in line 1280), we must learn a new technique.
We use the CHR$ function to PRINT the correct character. Adding 128 to a character's ATASCII value gives the inverse.
If you stop the program and LIST it, you'll notice that the program looks rather strange. This is because the computer is still using our new character set.
You can learn which of the newly created characters have replaced standard characters by examining the font with a character set editor such as Animation Editor which we printed last month.
 ON YOUR OWN
You should try creating and using your own fonts with this program. Use either version of last month's Animation Editor (CHAREDIT.BAS or CHAREDIT.EXE) to create monsters in various poses, and save the best ones to disk.
Once you've created a font, RUN last month's LINKBAS program to turn the font into a series of BASIC DATA statements. If you want to use your font with this month's listing, follow these steps when using LINKBAS. (In this example, TEST.FNT is the name of our font filename.):
1. starying line number should be 3000.
2. Type the following at the SOURCEFILE/VAR<@> prompt: TEST.FNT/ CR@
3. LOAD "D:HOUSE04.BAS" then ENTER the file created by LINKBAS. Type RUN and the program will use your new character set.
ARTIFACTING
The first time you worked with a character set editor, you probably noticed that selecting certain pixels made characters red, blue, or green--not just white. When your screen's resolution isn't high enough to support a particular graphics mode, you'll end up with several artifact colors, instead of the color you intended to draw.
If you have a very expensive color monitor you may never see artifact colors. But if you're using a standard television set, you'll see a lot of artifacting-particularly when you try to draw in high resolution. Try this sample:
10 GRAPHICS 8:SETCOLOR 2,0,0
20 COLOR 1
30 PLOT 100,100
40 DRAWTO 102,50
50 GOTO 50
Bingo--instant artifact colors!
In high resolution, such as Graphics 8, the computer normally draws white pixels. To get white on the screen, the computer actually turns on three adjacent dots at the same time. Each trio is called a color clock. When the video draws a line across the screen, it can only resolve (turn on) 160 of these trios of color dots.
To get the high resolution of 320 columns in Graphics 8, the computer must turn on either the left or right dot in each group. This gives you 320 dots possible in two colors--red and blue--in the above examples. If you see different colors, adjust your tint, color or contrast shown.
If both red and blue dots are lit, you'll see a single white dot on the screen. If you draw these three lines in Gnphics 8, you'll see a white horizontal line, a vertical line that's either blue or red, and a diagonal line mixed with both blue and red.
For another way to add colors to high-resolution graphics, type in Listing 3, ART.BAS, check it with TYPO II and SAVE a copy before you RUN it.
Depending on your screen, you should see eight or nine different colors. Lines 100-110 set up the Graphics 8 screen. Lines 120-130 go across the screen and draw slightly diagonal lines--because of the offset of 1, the lines are drawn in two parts. Lines 140-150 draw lines with an offset of 3. Lines 160-170 draw straight lines.
BLENDING COLORS
Blue and white make light blue. Red and white make orange. Other colors also can be created this way, but you can't just put them wherever you want them. Red and blue are no problem. If you want an all-blue area onscreen, just turn on every other pixel across the screen, starting with an odd-numbered pixel. To do the same for red, start with an even-numbered pixel.
To get other colors, such as light blue, try alternating blue and white lines. This won't be perfectly light blue because a few places don't have white pixels next to blue, causing the shape to be full of colors. The only way artifacting will yield these extra colors is if you fill in square shapes or, at least, large solid areas. If you're trying to plan your colors, use red, white and blue for the small, complicated areas of the screen, and use the other colors for larger solids.
Realistically, you're limited to five colors--red, white, blue, light blue and orange/light red--plus a background color. You can even add another color by installing a border. Mixing the "new" colors yields still more colors than are demonstrated in the example program. But these "extra" colors are hard-to-use and we won't be explaining the process until a later lesson.
OTHER TEXT MODES
In the Atari's text modes we sacrifice larger characters for four colors, but we can only use 64 characters at a time. Those larger characters in Graphics 1 and 2 are useful when you combine this technique with a modified display lists (to be covered in upcoming lessons).
You've all seen Space Invaders, which places large, moving characters at the top of the screen. If you wish, you can experiment with this effect by changing some of our previous examples into Graphics 1 and 2. Here's what to do:
1. Change the POSITION statements to reflect the new limits of the screen. This will be either 20 X 24 or 12 X 24.
2. Use a combination of uppercase and lowercase characters, as well as the inverse of both, to get five colors.
3. Plan to use no more than 64 characters at a time (unless you know machine language and want to use interrupts).
Robln Sherer co-wrote some of the best-known Atari programming books, including Tricky Tutorials, Master Memory Map of the Atari, BASIC Arcade Graphics Design and Atari Game Design.
Listing1:ART.BAS Download
Listing2:HOUSE04.BAS Download