Wild Inventions You Can Build For Pennies
From the "Rube Goldberg" of the Atari
It all started on page 30 of the May
1986 Antic with the illustrated article Repair Your Joystick,
which explained how to cure joystick pressure rings suffering from the
crippling "Simmons Fracture."
Ever since we encouraged Thomas Simmons by accepting
some of his text and drawings, he has been flooding Antic with more
of his eccentric do-it-yourself projects for the Atari. If you like this
batch of off-the-wall-but surprisingly practical-fix-it ideas, let us know
by CIRCLING 170 ON THE READER SERVICE CARD. We've got plenty more where
these come from.-ANTIC ED
SIMMONS HEX HOLDER
Have you ever been frustrated because the hexagonal nuts keep falling
Out of your hex nutdriver while you're trying to put your computer back
together after changing a RAM chip, or reassembling one of your peripheral
devices? Don't magnetize the nutdriver, because you're asking for trouble
around a sensitive computer or peripheral that can be fouled up by magnetism.
There's a better way.
Here's what you'll need:
1. An unmagnetized nutdriver.
2. A hexagonal nut or screw
3. Masking tape.
4. A tight, frustrating place.
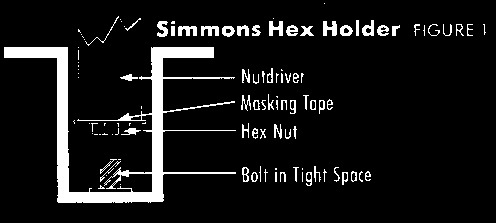
Place a strip of masking tape over the top of the nut Figure 1) and then insert it into the hex nut driver. It's tight! There'll be no fallout (radioactive or otherwise), and your frustration will vanish.
THERMAL PAPERMAKER
Are you tired of looking all over town, or through those mail-order
ads, for some reasonably-priced thermal printing paper? Why not make your
own? Figure 2 shows you how easy it is to assemble a Simmons Thermal
Papermaker.
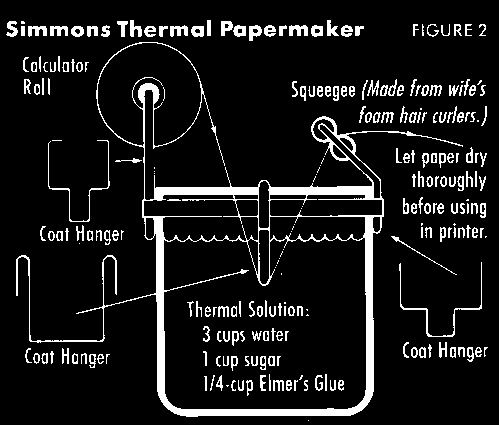
Buy ordinary calculator rolls in whatever width needed by your printer and dip them in the following solution:
3 cups water
1 cup sugar
1/4 cup Elmer's Glue
The glue holds the sugar molecules to the paper. Why sugar? Well, as you may remember from your chemistry classes, burning sugar turns it to carbon-it's better than ink. You'll find that your homemade thermal paper has a darker printout than any thermal paper you could buy.
Be sure to clean your thermal head occasionally with an alcohol swab. Oh, and don't eat the paper. A sweet roll it isn't.
BULK CASSETTE ERASER
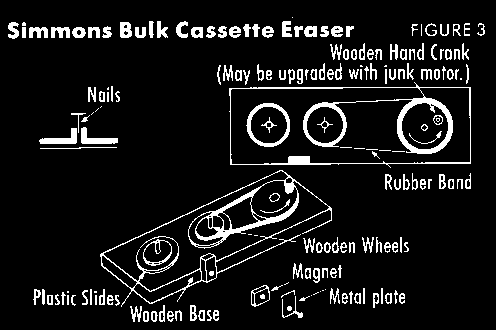
One main problem in storing computer data on cassettes is that if you don't thoroughly erase previous information, you might get data errors-or even lose some data. Have you ever tried to save a program to cassette, only to get error messages flashing onscreen? What about trying to load a program and getting a squeal instead of clear data transmission?
You are probably the victim of a dirty tape with interfering garbage on it that comes through with your data. But the homemade Simmons Bulk Cassette Eraser (Figure 3) will make your cassette tapes as good as new.
This simple bulk eraser will get rid of all the garbage and align the oxides on the tape-and you can build it for just pennies. Any cassette cartridge forms the template to get the correct spacing before you start nailing. The all-wood construction is a guarantee against "static cling." You'll be running the tape between a magnet and a metal plate. The bulk eraser is hand-cranked, but you can upgrade it with a motor from a junk cassette recorder.
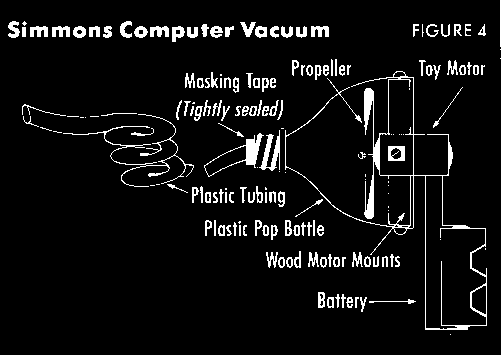
SIMMONS COMPUTER VACUUM
If you clean the insides of your computer with a brush, static electricity
could destroy your chips. A vacuum cleaner might suck some chips or other
little parts into the vacuum bag. The Simmons Computer Vacuum Cleaner is
a safer way:
Buy six feet of plastic tubing (1/8-inch diameter) from a hardware store-it costs about 30 cents. Buy a toy battery motor and a small plastic propeller from a hobby shop. Construct your Simmons Computer Vacuum as shown in Figure 4-it'll get the dust, hairs, lint, sand, cigarette ashes and Twinkie crumbs out of your computer in safe low-suction and you can get all the parts for less than a dollar.
STATIC CHARGE DETECTOR
You put your new RAM, POKEY or other chips into your computer. You
turn it on. You run the RAM test-no memory. What happened? Static electricity
from your hands, tools or clothing probably zapped your chips. They're
dead and you'll have to order some more. How could you have prevented this
mishap? Why, by spending a few cents and building a couple of Simmons Static
Charge Detectors (otherwise known to physicists as a "Leyden Jar"). What
you'll need is shown in Figure 5.
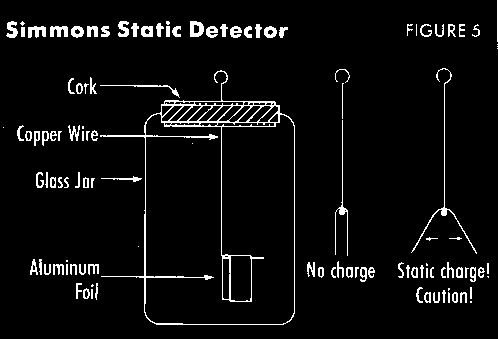
1. A glass jar
2. A cork that fits the jar
3. A copper wire
4. Aluminum foil
Put a comb, tools, your hand, wool or any other object near the top of the copper wire sticking out of the cork. The aluminum foil will move if there's a static charge, in which case you'd better touch a grounded piece of metal such as a cold water pipe. Only after you pass the Simmons Static Detection Test can you safely touch a chip or the innards of your computer.
You might as well build a few of these gadgets: you can pick up a chip-destroying charge just by walking across the rug on a dry day. Make sure to test yourself and your tools before you risk picking up another chip.
Tom Simmons is a 48-year-old grandfather who graduated in computer
science from Manatee Community College in Bradenton, Florida. He has a
master's degree from Kansas State University in communications and is now
involved in biomagnetic medical research in Sarasota, Florida. His areas
of expertise include CAT scan technology, nuclear magnetic monitoring and
and medical sensor construction.