AMAZING CARD SHUFFLER
Windows upon windows
by CHET WALTERS
Here's an eye-popping graphics display that proves the 8-bit Atari computer is no slowpoke when it comes to flashing multiple windows all over the screen. You can put your own pictures into the windows too. The BASIC program runs on 8-bit Atari computers with 48K and a disk drive.
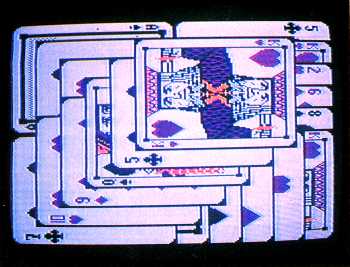
While working with an Atari ST the other day, watching windows, upon windows, upon windows, I was struck with an idea for an interesting display program for Atari's reliable 8-bit machines. Thus was born Antic's Amazing Card Shuffler, which takes twelve quarter-screen windows and lays them one over the other in a hypnotic cascade of color, pattern and motion, much like a deck of cards being shuffled.
Antic's Amazing Card Shuffler is a very interesting display which you'll never grow tired of watching. If you design several quarter-screens especially for the shuffler, you can use it for advertising. It's quite an eye-catcher. Not only that, once you've keyed it all in, you've got four useful subroutines to include in your library!
The first thing you'll need is a formatted disk with DOS.SYS on it. Use either DOS 2 or DOS 2.5, or any other compatible DOS. Do not use DOS 3. (You can get DOS 2 on any Antic Monthly Disk, or from your local user's group.)
Next, delete DUP.SYS so you'll have lots of disk space to work with. If possible, use enhanced or double density because the "decks" created for shuffling take quite a bit of disk space- 185 sectors.
THE PROGRAMS
It's very important to use the filenames noted here, or the Shuffler
won't RUN properly. If you have this month's Antic Disk, copy the files
COMPDECK.BAS, DECKLOAD.BAS, TITLE.PIC and SHUFFLE.BAS to another freshly
formatted disk and you're ready to go.
If you're getting the programs from this month's Antic Disk, skip ahead to USING THE PROGRAM. Otherwise, experienced programmers as well as beginners should read these instructions closely. Be careful; these programs are difficult to type in. Type in Listing 1, COMPDECK.BAS, check it with TYPO II and SAVE a copy before you RUN it. However, if you have trouble typing in the special characters in lines 20, 100, 200, 20010-20050 and 22010, don't bother typing them in. Listing 2 and Listing 5 will create these lines for you.
When RUN, Listing 2 creates a disk file called LINES2.LST which contains lines 20, 100 and 200 for COMPDECK.BAS. Listing 5 creates a disk file called LINES1.LST which contains lines 20010-20050 and 22010 for COMPDECK.BAS. This file may also be used with Listing 3, DECKLOAD.BAS.
Type NEW and LOAD listing 1, COMPDECK.BAS. Now, ENTER LINES1.LST and LINES2.LST Finally, SAVE the completed program to disk as COMPDECK.BAS.
You should also LIST lines 20000 to 23020 to another disk. To do this, type:
LIST "D:filename",20000,23020
This file contains a subroutine which lets you load microscreens into your BASIC programs. More on this later.
Now, type NEW and type-in Listing 3, DECKLOAD.BAS, check it with TYPO II and SAVE a copy to disk before you RUN it.
Once again, if you have trouble typing in the special characters in lines 150-160, 20010-20050 and 22010, don't bother typing them in. Listing 4 and Listing 5 will create these lines for you. When RUN, Listing 4 creates a disk file called LINES3.LST which contains lines 150-160.
If you used Listing 5 to help you type in COMPDECK.BAS, you can use the same file to help you with DECKLOAD.BAS. Type NEW and LOAD Listing 3, DECKLOAD.BAS. Next, ENTER LINES1.LST and LINES3.LST. Finally, SAVE the completed program to disk as DECKLOAD.BAS.
Finally, type in Listing 6, SHUFFLE.BAS, check it with TYPO II and SAVE a copy to disk before you RUN it. Next, delete the three LINES files, and the three programs used to create them.
USING THE PROGRAM
 At
this point, you should have a disk with only four files on it: DOSSYS,
COMPDECK.BAS, DECKLOAD.BAS and SHUFFLE.BAS. If you're an Antic Disk subscriber,
you will also be able to use two additional bonus programs, TITLE.PIC and
a ready-to-run .DCK deck file.
At
this point, you should have a disk with only four files on it: DOSSYS,
COMPDECK.BAS, DECKLOAD.BAS and SHUFFLE.BAS. If you're an Antic Disk subscriber,
you will also be able to use two additional bonus programs, TITLE.PIC and
a ready-to-run .DCK deck file.
Now you're ready to compile a deck of "cards" with COMPDECK.BAS and your micro-screen collection.
When you RUN it, COMPDECK.BAS asks you for a name for your deck. Type in any filename you wish, as long as it does not have an extender (such as .PIC) or a device identifier (such as D:). CARDS, for example, is an acceptable name, but D:CARDS, CARDS. SHF or D:CARDS.SHF are not acceptable names. When the COMPDECK.BAS program compiles your deck, it automatically adds a .DCK extender for use with the shuffler program. All .DCK files are written to disk drive 1.
When the program asks you to verify the deck name, make sure the name displayed has the form "D:filename.DCK". Otherwise, type [N] and re-enter it.
Next, enter the number of the drive from which you will be loading your microscreens. If you have two drives, you should choose drive 2 for your picture disks. It makes this a lot easier!
You can use microscreens created by either Micro-Painter or Micro Illustrator (KoalaPad, Atari Touch Tablet, etc.). If they're in a different format, you can use Antic's Rapid Graphics Converter (November, 1985) to convert your pictures into a compatible format.
When the COMPDECK program loads your picture, you'll notice that the colors have been reversed over most of the screen. You'll also see a window which frames about a quarter of the screen. Within this window, the colors are displayed normally.
Using the arrow keys or your joystick, move the window to frame the "card" you wish to lift from the screen. You can move the window faster by holding down the [CONTROL] key while using the arrow keys, or simply hold the joystick in the direction you want to move. In a moment, the window will speed up.
Press [RETURN], or push the joystick trigger, to save the card in the deck. Press [ESC] to go back to the LOAD menu.
Repeat the LOAD and SAVE steps until you have saved a series of 12 cards (windows), thus completing your "deck."
The program will display instructions to guide you through each step. There are a few cautions to consider, however. Since the Shuffler program displays your deck on a single screen, all of your cards must be "color compatible." This means each screen you load must have been drawn using similar colors. All pictures loaded into the compiler will be displayed using the colors of the first card. These color registers are always the first five bytes written to your deck file.
Should you have some files that are problematic as far as color compatibility goes, you can use Picture Plus ($29.95, Non-Standard Magic) or RAMbrandt ($19.95, Antic Catalog, AP157) to swap the colors where necessary.
One important note: the COMPDECK.BAS program adds information to your deck file throughout compilation. If you press the [SYSTEM RESET] key, you will crash the disk. If you wish to stop the program before you've entered all 12 cards, take your .DCK disk (the one with your .DCK file) and put it in drive 1. Then type /EXIT and the program will end. You won't be able to use this partial .DCK file, but your disk will be safe.
It's wise to compile your deck files on a scratch disk, then copy them to the "good" program disk. If you're using only one drive, please make sure it has the appropriate disk in it (as instructed by the prompts for each step). If everything has gone correctly, you're ready to...
SHUFFLE A DECK
Shuffling your deck is quite simple. Place your program disk (the one
with DECKLOAD.BAS and SHUFFLE. BAS) into drive 1. DECKLOAD.BAS and SHUFFLE.
BAS must be on the same disk. If you have a one-drive system, you should
also put your .DCK files on this disk. Otherwise, your deck files may occupy
a separate disk and be accessed through drive 2.
You may also include a picture file on your program disk. Loading a deck takes some time, so you might want to use this file as a title screen to look at while you wait. Your title screen may be in either Micro-Painter or Micro Illustrator (Koala) format, and should be named TITLE.PIC.
RUNNING THE PROGRAM
Simply type RUN "D:DECKLOAD.BAS". The deck loader is the controller
program, which automatically RUNs the shuffler program.
Since a deck of cards takes up so much RAM, we must find some way to conserve memory for our program. The deckloader first displays any available title screen, then, as its name suggests, loads a deck of cards into RAM. Finally, it tells the computer to RUN the shuffler program. Now for the beauty part-the computer clears the deck loader from memory, then loads the shuffler program in its place.
The names of all files with the extender .DCK (denoting "deck" files) present on the disk will be displayed. Select a file by typing in the name as it appears on the screen. If a title screen is present, the program will display it while loading your deck. This takes about 30 seconds.
Once the shuffle is underway, press the [OPTION] key to set the slowest speed. Press the [SELECT] key each time you want to step up the speed of the shuffle. Press [START] to return to the deck loader for another deck. Press any key to pause or resume the shuffle sequence.
SOME NOTES
- If the DOS you are using takes up more RAM than DOS 2.5, only 11 of the 12 cards in your deck will be shuffled.
- You can change the pattern of the shuffle by altering the DATA lines of the shuffler program, but I don't recommend it. If you're experimenting with the shuffler program in memory, you can just type RUN after you've made any changes.
- If you wish to draw some custom designed screens for the shuffler, Listing 7, QUARTER.BAS, will create a blank microscreen template that's divided into quarters. Save the template to disk in a file named PICTURE. To help you design cards that are just the right size for the shuffler, this PICTURE screen can then be loaded into Micro-Painter by entering the filename PICTURE, or into Micro Illustrator by pressing the [CLEAR] key.
USEFUL SUBROUTINES
As mentioned earlier, the microscreen loader subroutine (which you
hopefully have LISTED to your favorite utilities disk) appears in Lines
20000 to 23020 of COMPDECK.BAS (Listing 1) and DECKLOAD.BAS (Listing 3).
Used in any BASIC program, it can load either a Micro-Painter or Micro Illustrator picture file (figuring out which kind of file it is without any help from you). Not only that, it loads compressed Micro Illustrator files in about half the time you're used to. The screen is transferred, still in its compressed form, directly from the disk into a buffer. Then the buffer is treated as a RAMdisk to get the picture onto the screen.
To use the subroutine in your own program, first initialize the necessary variables by a GOSUB 20000, which should be done by your first program line. To load a picture from a disk into the buffer, fill the variable FI$ with a filename in the form "Dn:filename.*" and GOSUB 21000.
Next, set up an ANTIC Mode E (Graphics 7+) display list for pictures by a GOSUB 22000. To put the picture on the screen, use GOSUB 23000.
You can reduce the number of GOSUB calls by deleting the RETURN statements from Lines 21060 and 22020 and calling just Line 21000 to load and display your microscreen.
The routine needs RAM from memory locations 1536 to 1723, so part of Page Six is not available to your program. Also, since the screen location is stored in the variable SCR, the file type in TYPE, and the screen colors in array C(), you shouldn't use these variables in your main program. All variables in the subroutine will change value with each call, so use them with caution in your main code.
The subroutine also changes the BASIC data pointer to point to Line 21000. Keep this in mind if your program is reading information from your own DATA statements.
Another routine located at line 22010 creates a Graphics 7+ screen for displaying pictures. If you want a text window at the bottom, change the GRAPHICS 24 to GRAPHICS 8.
A machine language routine defined in Line 20010 as CIO$ is a very straightforward call to your Atari's SIO routines. This routine quickly transfers areas of RAM to or from a disk file. It is illustrated in Line 21040 of COMPDECK.BAS (Listing 1), and more clearly in line 60 of QUARTER.BAS (Listing 7).
As illustrated in the programs, you must first OPEN your disk file for access (explained in detail below) and pass four parameters in the USR call to the machine language subroutine. The subroutine is stored as control characters in CIO$. The first parameter is the IOCB channel number, multiplied by 16. If you use channel #1, the first parameter would be 16. For channel #2, you'd use 32 and so on.
The second parameter is the command parameter. It varies with the task you wish to perform. To load a disk file into the computer, you must first OPEN your file for reading. The number 4 in the command:
OPEN #n,4,0,"D:filename" tells the computer that you wish to open a file and read it. When you open a file to read it, you must also set the command parameter to 7. To write a section of memory to disk, use an 8 instead of a 4 in your OPEN statement (example: OPEN #n,8,0,"D:filename") and use an "11" for your command parameter.
The third parameter is the starting address of the area of RAM to be transferred. The fourth and final parameter is the number of bytes you wish to transfer.
Finally (and most importantly) you must always CLOSE the channel to your disk file when you're through with it! It's easy to CLOSE a channel. To CLOSE channel #2, for example, the command would be:CLOSE #2
Another useful machine language routine is stored in MV$ in Line 20020 of Listing 1. It rapidly moves bytes from one area of RAM to another. In line 20020, for example, it's used to move a machine language routine from BF$ into Page Six. This is a very fast and memory-efficient way to initialize RAM with non-relocatable machine language routines. As you can see, it's much faster than READing the bytes from DATA statements and POKEing them into memory. It's also used in Line 23020 to move uncompressed picture file data from the string buffer BF$ to the screen.
This routine has three parameters which a BASIC program must supply. The first parameter, shown in line 23020 as ADR(BF$), is the starting address of the source RAM. In other words, this is the address of the first byte to be moved.
The second parameter is the starting address of the destination RAM. This is where we want our data to wind up. The routine picks up data from the Source address, and moves it to the Destination address.
The third and final parameter is, of course, the number of bytes to be moved.
Chet Walters wrote the respected print utility software Lister Plus ($19.95) and Picture Plus ($29.95). Available from Non-Standard Magic, P0. Box 45, Girard, OH 44420. (216) 539-6033. Requires 48K disk.
(For details about the graphics software and hardware mentioned in this article, see the Graphics Products Source List in this issue.)
Listing 1 COMPDECK.BAS Download
Listing 2 LINES2.BAS (not needed)
Listing 3 DECKLOAD.BAS Download
Listing 4 LINES3.BAS (not needed)
Listing 5 LINES1.BAS (not needed)
Listing 6 SHUFFLE.BAS Download
Listing 7 QUARTER.BAS Download
On Disk TITLE.PIC Download
On Disk ROYAL.DCK Download
On Disk SPOTS.DCK Download