communications
VIDTEX CONVERTER
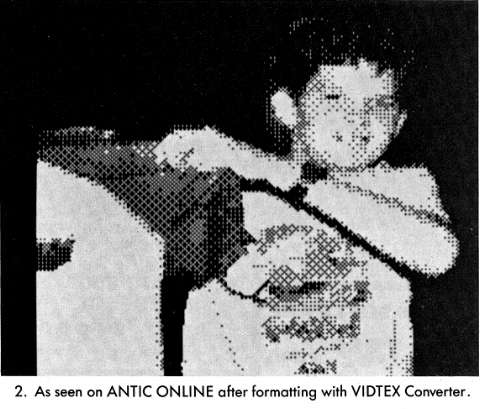
Online to Koala and back
by CHARLES JACKSON, Antic Program Editor
Learn how to access and download CompuServe's high-resolution online VIDTEX graphics with either an 8-bit Atari or an ST model. Then use one of the accompanying programs to convert your VIDTEX pictures into standard Atari graphics formats that you can change, color, and enhance with your touch tablet, light-pen, or joystick. The 8-bit BASIC programs require an Atari computer with at least 48K memory and disk drive. (See this issue's ST Resource for the GrafCon-ST VIDTEX converter program.)
VIDTEX is CompuServe's trade name for its collection of telecommunications programs developed by an in-house programming staff. One VIDTEX program, titled Video Special Effects, lets CompuServe draw high-resolution pictures and diagrams on your video screen.
VIDTEX graphics support is now available for most of the widely used personal computers-including all Atari 8-bit and ST models. You can view CompuServe's VIDTEX pictures with a modem program that supports VIDTEX graphics. Owners of 8-bit Ataris can use TSCOPE, a public domain program. ST owners can use Flash (available in the Antic Catalog).
HomeTerm, Pro * Term and Back-Talk will not work with VIDTEX. However, you can use any of these three programs to download a copy of TSCOPE from CompuServe's SIG * Atari. To do this, enter the Atari 8-bit SIG, go to Data Library 2 (Telecommunications). Use XMODEM protocol to download TSCOPE.XMO-or MSCOPE.XMO if you own an MPP modem. Rename the file AUTORUN.SYS and you're ready to go.
The Antic Catalog also has several public domain versions of TSCOPE available on disk. PD024 is for 850 interface users, PD025 is for the 1030 modem and PD040 has MSCOPE, a variant for MPP modems.
Log onto CompuServe with a modem program that supports VIDTEX graphics (TSCOPE or Flash) and set your software for VIDTEX. Here, TSCOPE users should press any one of the console keys while typing a [9]. If you're using Flash, tap the [INSERT] key and type mo vi on the command line.
Next, you need to tell the CompuServe computers that you want to use VIDTEX. At the ! command prompt, type GO DEFALT to get to the Terminal/Options Menu, and choose Option 2 (Setting Your Terminal Type). A menu will appear, listing several different terminal types. Choose VIDTEX (Option 1). In a moment, CompuServe will report that your terminal has been set for use with VIDTEX graphics.
When you exit the Terminal/Options Menu, you'll be asked whether you want to make these changes effective for all future sessions (Option 1), or just for the current online session (Option 2). If you choose Option 1, VIDTEX will be your default terminal type whenever you log-on.
GETTING THE PICTURE
CompuServe uses VIDTEX graphics to display computer art, digitized
photographs, aviation weather maps, and even pictures of the felons on
the FBI's 10 Most Wanted list. Below are some of the places on CompuServe
where you'll find VIDTEX graphics. To get there, type in one of the commands
at right when you see a prompt.
Computer Art Gallery GO VID-100
Weather Maps
GO AWX-4
FBI 10 Most Wanted GO TEN-114
Digitized Photos GO CB-58
Digitized Photos GO CBIG
Digitized Photos GO HHA-88
Digitized Photos GO PCS-155
Digitized Photos GO ARTSIG
WELCOME TO THE NIGHT SHIFT
You can also find RLE graphics on several bulletin boards (BBS). The Night Shift, based in Staten Island, New York, has one of the first BBS libraries of high resolution VIDTEX graphics.
The Night Shift, which runs on a TRS-80 computer, offers download libraries for many types of computers, including the 8-bit Atari and the ST.
The BBS is organized like a building-you enter on the "Main Floor," electronic mail is handled in the "Mailroom," graphics and photographs are kept in the "Darkroom" and so on. Newcomers might also want to visit the "Cafeteria," the "Employee's Lounge," and the "Computer Department."
Sysop Peter Paul founded the BBS about four years ago while working the late-night shift at a Manhattan insurance agency. "He named the board after his funny hours," said Michael Schuster, sysop (system operator) of the Night Shift's Atari section.
Schuster and Paul added an RLE library in March. The library contains Computereyes pictures, logos from several local boards and freehand drawings. Many of these files were created with Antic's machine-language RLE Converter. The RLE library is in the "Basement' of the BBS, next to the "Darkroom."
The Night Shift operates 24 hours a day, full duplex,
at 300, 1200 and 2400 baud. Dial (718)816-7792. There is a one-time $5
registration fee.-CJ
INTRODUCING RLE
All high resolution VIDTEX pictures are black-and-white images measuring
256 pixels across by 192 scan lines tall. These images are stored and transmitted
in RLE (Run-Length Encoding) format. While most Atari graphics files (such
as those created by Micro-Painter, DEGAS, Graphic Shop, KoalaPad and Atari
Touch Tablet) are bit-image "maps" of the image, an RLE file consists of
instructions for retracing the picture on your screen.
If we could listen to an RLE file "talking" to your computer screen, the monologue would sound something like this: "Go into a high-resolution, black-and-white graphics mode and clear the screen. Starting with the farthest left pixel on the top scan line, plot 19 black pixels followed by 27 white pixels. Now plot 2 black pixels followed by 39 white pixels. Now plot 57 black pixels followed by one white pixel..."
In an RLE file, these plotting instructions are stored as pairs of bytes, but the bytes take the form of ASCII characters. The first byte of each character pair represents the number of background (black) pixels to plot, and the second represents the number of foreground (white) pixels to plot.
Once a scan line is filled, plotting will wrap around to the next scan line. For example, if we've just plotted the first 200 pixels of a 256-pixel scan line, and we receive an RLE instruction telling us to plot 50 black pixels followed by 50 white pixels, the plotting instructions would proceed like this: "Plot 50 black pixels followed by six white pixels. This completes our 256-pixel scan line. Now plot the remaining 44 white pixels at the far left of the next scan line."
There are a few more rules. Each ASCII character in the pair represents the actual pixel count plus 32. For example, the character pair CJ represents 35 black pixels (35 + 32 = 67-an ASCII "C"), followed by 42 white pixels (42 + 32 = 74-an ASCII "J").
If a pixel count exceeds 127, the excess should be carried over to the next pair of characters. For example, if we have a row of 100 black pixels followed by one white pixel, the RLE instructions would say: "Plot 95 black pixels followed by zero white pixels. Now plot 5 black pixels followed by one white pixel."
Conveniently, these rules ensure that all RLE files are ASCII text files, and can be treated as such for sending and receiving them. (In other words, the parity bit may be ignored.)
PROGRAM LISTINGS
The three program listings included in this issue will help you create
and collect your own RLE Graphic files. Listing 1, RLEMAKE.BAS, a program
for the 8-bit Atari, will convert any picture file in Micro-Painter format
into an RLE Graphic file. It will also convert pictures created with Computereyes.
(The program is not compatible with the GTIA version of Computereyes).
Listing 2, BUILD.BAS, is another program for the 8-bit Atari. This program converts any RLE file into a Micro-Painter-compatible file. If you don't own Micro-Painter software, you can use the Rapid Graphics Converter (Antic, November 1985) to switch your picture formats.
Listing 3, GRAFCON.C, is a full-featured graphics conversion program for the 520ST. One of its options lets you convert ST picture files (DEGAS, NEO or DOODLE) into RLE files. See the GrafCon-ST article in this issue's ST Resource for full details.
INSTRUCTIONS: LISTING 1
Type in Listing 1, RLEMAKE.BAS, check it with TYPO II and SAVE a copy.
When you RUN it, RLEMAKE.BAS will ask you for the name of a Micro-Painter
picture to convert. Insert your picture disk into the drive, type in the
name of the picture you wish to convert, and press [RETURN]. The program
will also ask you to choose a name for the resulting RLE file. Type in
an appropriate name (such files usually have a .RLE extender, like MYPIC.RLE)
and press [RETURN].
The program will load your picture, display it on an ANTIC Mode F (Graphics 8) screen, and ask if you wish to invert the colors.
Next, the program will ask you if you're satisfied with the way the picture appears on the screen. If not, answer [N] to the "Are You Sure" prompt and you'll be returned to the "Invert It?" prompt. When you type [Y], insert your destination disk and press the [START] key to begin the conversion. During the conversion, you'll see a small cursor creep across the screen, marking the program's progress through the picture.
DISK BONUS
Antic Disk subscribers this month receive a special bonus file, RLE.EXE. It changes Micro-Painter or Koala picture files into RLE files in less than ten seconds. It also converts high resolution RLE files into Micro-Painter picture files. This all-machine-language version of RLEMAKE.BAS is too long to print as a type-in listing.
First, you should copy RLE.EXE to a formatted disk, and
rename the file AUTORUN.SYS. This will be your RLE Program Disk. Remove
any cartridges from your computer, place the disk in the drive, and turn
on your computer. If you're using an XL or an XE computer, you should press
the [OPTION] key while turning on the computer.
ARTIFACTING
Since we're working in a black and white mode, some of your four-color
microscreens may look a little different when loaded into the converter.
Color television sets and some monitors will seem to display two additional
colors-usually blue and orange.
These two extra colors are a product of "artifacting." Artifacting occurs when a monitor's resolution is not fine enough to distinguish two adjacent pixels of different colors. In their place, the monitor will display an orange or blue dot.
Although an RLE picture using artifact colors may look fine on a television set, the artifact colors will look like closely packed vertical stripes when viewed on a high resolution monitor. The Commodore 1702 monitor and the Atari ST monitors (both color and monochrome) are three such monitors which do not support artifacting. Since your RLE picture files can be seen on any VIDTEX-compatible computer system (not just Atari), it might be a good idea to keep artifact colors to a minimum.
INSTRUCTIONS: LISTING 2
Most RLE files are "read-only," not designed for downloading, so it
used to be difficult to get a clean copy of an RLE screen. But now you
can use any modem program that offers a "capture" function. BUILD.BAS will
change any high resolution RLE file into a picture file compatible with
Micro-Painter.
Type in Listing 2, BUILD.BAS, check it with TYPO II and SAVE a copy before you RUN it. It's time to capture an RLE file to your disk. The procedure is simple:
1. Open your modem program's Capture Buffer.
2. Display the RLE picture. (Note: If your modem program doesn't support VIDTEX graphics, the picture will appear as "meaningless characters." This is acceptable; you should capture these "meaningless characters" in lieu of the picture.)
3. Press [RETURN], close the Capture Buffer and save it to a disk file.
After you have an RLE file on a disk, RUN Listing 2 and type in the name of the RLE file you wish to convert. Type in a name for your resulting picture file. Finally, insert your RLE disk and press [RETURN].
The program will search for the beginning of the RLE picture file (denoted by an [ESC] [G] [H] sequence) then reconstruct the file on your screen. When it reaches the end of the RLE file (denoted by an [ESC] [G] [N] sequence,) it will write the picture to disk as a Micro-Painter picture file.
OPERATIONS
The program will ask what type of picture to convert. Type [K] to convert
a Koala picture, type [M] for a picture in Micro-Painter format, or type
[R] to change an RLE file into a Micro-Painter file.
Use the [K]oala option to load Atari Touch Tablet, Chalkboard and all other implementations of Micro Illustrator software. Use the [M]icroPainter option to load Computereyes pictures and any other 62-sector, high resolution picture files.
NOTE: The best RLE files tend come from microscreens having plenty of contrast. Computereyes pictures created with 4-Level, 8-Level and Normal Capture modes also yield good results.
The program will ask you for the name of the picture to be converted. A device identifier such as "D1:" is optional. If you leave it off, the program will read your picture from drive number one.
Type in the name of your picture. (Note: some versions of Micro Illustrator automatically append a ".PlC" extender to all picture files.) If you wish to see a disk directory, type DIR instead of the picture name, and the computer will display the names of all files present in disk drive number one.
Next, type in a name for the RLE file to be created, press [RETURN], and the program will load your source picture. Once your picture is loaded, the program will ask if you want to invert the colors, and then ask if you re sure you like the way the picture looks. If you change your mind and decide to load a different picture, press the [ESCAPE] key to return to the main menu. Otherwise, insert your destination disk and press [RETURN] to start the conversion.
Unlike its BASIC counterpart, this RLE converter needs only a few seconds to process a picture. A thin, horizontal line racing down the screen lets you watch the converter's progress through the picture (but don't blink, or you'll miss it!).
(For details about the graphics software and hardware mentioned in this article, see the Graphics Products SourceList in this issue.)
Listing 1 RLEMAKE.BAS Download
Listing 2 BUILD.BAS Download
On Disk RLE.EXE Download