GRAFCON ST
Universal graphics converter
It all started with one letter to the ST Resource. "Please,
can you help?" the writer asked. "I bought the Atari 520ST with a monochrome
screen and I can't view any of the great color NEO or DEGAS pictures that
I've been seeing. Do you know where I could get a picture converter program?"
A quick check revealed that nobody was currently offering such a package, so I decided to sit down and scratch out a small program to convert a color picture to monochrome.
THE 102% SOLUTION
What I wound up with is a large-scale application that performs two
jobs. First, it will convert any NEO, DEGAS, or DOODLE format picture-in,
any resolution- into any other ST format and resolution. (DOODLE
is the graphics program that comes with the ST Developer's kit.)
Second, it will convert any NEO, DEGAS or DOODLE picture into the CompuServe RLE (Run-Length Encoded) format for uploading pictures to CompuServe VIDTEX. Next month, we'll publish a smaller program that converts downloaded RLE graphics into GrafCon-ST format.
See Charles Jackson's VIDTEX Converter article in this issue for the full story about CompuServe's online libraries of high-resolution graphics and instructions about working with them. This is the only information we'll repeat from Charlie's story: FLASH is the only ST modem program that currently supports VIDTEX RLE files ($39.95, Antic Catalog, ST0220)
IMPORTANT: As you'll see, GrafCon-ST is a long program built up of many small parts (procedures). Due to lack of space, the listings for the medium resolution conversions will be printed in next month's issue. The rest of the program works fine without these procedures-and we think that most people will primarily be using the high-low, low-high conversions anyway. For simplicity's sake, this article explains the entire listing, including the missing portions.
If you have this month's Antic Disk, you will find this entire program- including the medium-resolution conversions-on Side B in both Alcyon C format source code (GRAFCON.C) and executable .prg format (GRAFCON.PRG). For instructions on how to move the files from an 8-bit Atari disk to your ST, see the ST Help File on Side B.
CONVERSION COMPLETION
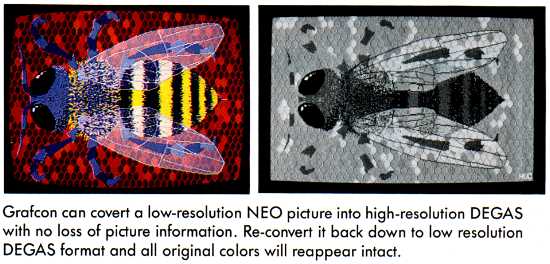
As one example of GrafCon-ST's wide range of format and resolution
conversions, this C program can convert a low-resolution NEO picture into
a high-resolution DEGAS format picture.
Adding frosting to this cake, GrafCon-ST can perform the conversion with no loss of picture information. This feature makes it possible to convert a low resolution NEO picture into high resolution DEGAS, save the picture and then re-convert the high resolution picture back down to low resolution DEGAS format-and all original colors still reappear intact.
WHY IT WORKS
GrafCon -ST works because any Atari ST screen-color or monochrome-
uses 32K of memory. Since the low, medium, or high resolution screens are
all contained in the same amount of memory, the difference must be in how
the picture data is arranged.
Figure 1 shows how a high resolution monochrome picture uses screen memory. Starting in the upper left corner of the video screen, the 16 bits in word zero correspond to dots 0-15 in the top line. Word number one uses its 16 bits to hold dots 16-31, and so on. Forty words per scan line means 40 x 16(640) dots per line. Four hundred scan lines-using one bit for color memory-means screen memory takes 400 x 40/1 bit = 16K words, or 32K bytes.
Each dot displayed on the screen corresponds directly to a matching bit in screen memory. Because a single bit can only show whether a dot is turned on or off, we can only display a dot in two colors-black and white.
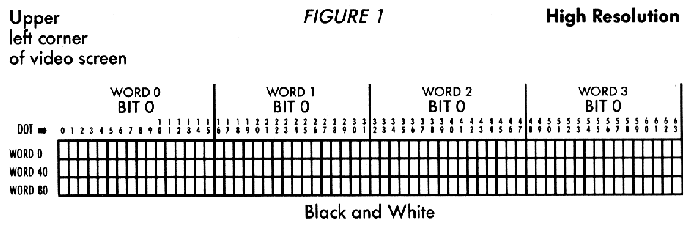
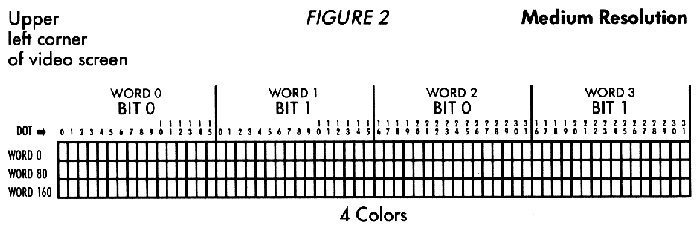
Figure 2 shows how to interpret screen memory for the four-color medium resolution screen. Instead of two colors, we now need to store information for four colors. To count to four, we need two bits, not one bit (as in high resolution).
Starting on the top line, word zero holds the first color bit for dots 0-15, and word one holds the second color bit for the same dots. Word two holds the first color bit for dots 16-31, word three holds the second color bit for the same dots, and so on. Eighty words per scan line means 80 x 16 /2 bits = 640 dots per line. Two hundred scan lines means screen memory takes 200 x 80 (16K) words, or 32K bytes.
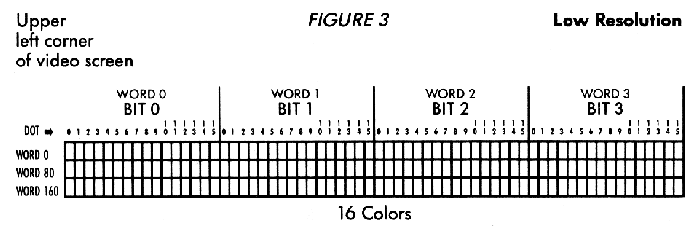
Examine Figure 3. For low resolution to show 16 colors, we need to save four bits for each dot on the screen. With four bits we can count from 0-15. The same type of word stacking used for medium resolution is also used here, but for four words instead of two.
In the top line, word zero holds the first color bit for dots 0-15, word one holds the second color bit for dots 0-15, word two holds the third color bit, and word three holds the fourth color bit. Word four holds the first color bit for dots 16-31, word five holds the second color bit for dots 16-31, and so on. Eighty words per scan line means 80 x 16/4 bits = 320 dots per line. Two hundred scan lines means screen memory takes 200 x 80 (16K) words, or 32K bytes.
FIGURE 4
Bit Pafferns for Color Representation
High Resolution( 2 Color)
Color 0: 0
Color 1: 1
Medium Resolution( 4 Color)
Color 0: 00
Color 1: 01
Color 2: 10
Color 3: 11
Low Resolution( 16 Color)
Color 0 0000
Color 1 0001
Color 2 0010
Color 3 0011
Color 4 0100
Color 5 0101
Color 6 0110
Color 7 0111
Color 8 1000
Color 9 1001
Color 10 1010
Color 11 1011
Color 12 1100
Color 13 1101
Color 14 1110
Color 15 1111
So that's how the Atari arranges screen memory for each of the different resolutions. All we need to do is figure out how to swap 256,000 little tiny bits around from one format to another.
The program that actually does this for us is contained
in Listing 1, GRAFCON.C., written in Atari Developers' Alcyon C. When the
upcoming MegaMax C revison that allows text/data segments larger than 32K
is available, I see no reason why that product should not also work with
GrafConST Hippo-C owners should try this listing only if they have
the HippoXBIOS package-available for downloading from Data Library 3 in
the SIG * Atari 16-bit section on CompuServe. Even with Hippo-XBIOS you
will still need to do some extensive editing, such as declaring every Alcyon
integer as a Haba short.
TYPE IT IN
Examine Listing 1 carefully before you type it in. Save a copy to disk,
compile and assemble your source down into a .o file, then link
it with apstart at the head, and aesbind, vdibind,
osbind,
and libf trailing along behind. Relmod the resulting .68K
file into a .prg file and you're set.
IMPORTANT: As we said before, this long program is built up from many small parts (procedures). So if you feel you don't need all the features in GrafCon-ST, you don't need to type them all in! For example, if you personally have little need to convert a medium resolution picture to high resolution, when you get to the routine for converting medium to high-called medhi( )- just omit all lines between the begin and the end statement. The program will run fine; it just won't convert medium resolution to high resolution.
Feel free to omit as many conversion subroutines as you desire. If you only need a low-to-high resolution conversion, just type in the lohi() subroutine. This also applies to the RLE conversion section of the program. If you're not interested in uploading VIDTEX pictures online, simply omit every line between the end of condense() and the start of terminate(), and leave out the if( rle_able )then rle__conversion line in main(). Remember, to omit any conversion subroutine, leave out every line between the begin and the end statement lines of that subroutine.
PROGRAM WALK-THROUGH
From the desktop, double-click on the GrafCon-ST program icon. First
comes a welcome box, which gives the title and version date. Click on Perform.
An alert box pops up, and asks for the Source Picture Format. The Source
Picture is the one you want to convert from. Click either NEO, DEGAS,
or DOODLE. Next comes a box that asks for the Source Picture Resolution.
Click either LO, MED, or HI. The next two boxes ask for Format and Resolution
information for the Destination Picture, (the one you want to convert to).
If you desire to convert from high to low resolution, a fifth question, "Simple or Complex?", is asked. It covers a point that came up during the writing of this program. Normally, when converting from monochrome high resolution to color low resolution, you want as faithful a conversion as possible. Because each low resolution dot corresponds directly to a group of four dots on a high resolution screen, I included a routine that "squeezes" the two top and bottom dots (or no dots) together, then squeezes the resulting top and bottom dot together.
In effect, if any one of the four dots in the original cluster is showing, then a dot will show up in the low resolution picture. This is the Simple conversion, and it loses up to three bits of information.
FOLDING BITS
It is also possible to fold all four bits from the high resolution
cluster into the dot for the low resolution screen in such a way that no
information is lost. This is the Complex conversion. The result on the
low resolution screen is that a dot will show, but it may be a different
color than you want. Keep in mind: A high resolution picture which has
been Complex converted to low resolution may be completely restored to
high resolution later. A Simple conversion will not reconvert back
up.
Next comes a reminder to select the Source Picture from a file selector box. Click on Select, highlight the desired picture name in the resulting file selector box and click on OK. Another box shows up reminding you to press the mouse key at the end of conversion because the program will stop and wait to allow time for you to view the results. Click on Go, and the program will locate, read in, and convert the picture.
When you want to continue, press either mouse button. A box reminds you to select a filename for the just-converted picture. Click on Select. If you do not want to save this picture, click on the Cancel button in the file selector box. Otherwise select or type in a filename and save your newly-converted picture to disk. In either case, when you're finished an alert box comes up asking if you want to convert another picture. If you do, click on Yes. Or else just click No and then click out through the Thank-You box at the end of the program.
PROGRAM TAKE-APART
Examine Listing 1. The top has a remark block with the title and copyright.
The #include file which comes next is also found in the MegaMax
C package. Below that are defines, declarations, and constants,
such as the strings that create the alert boxes throughout the program.
The first block of code is main(), located right under the strings and long declarations. It's very short, and does just what it says. First we initialize(), then perform either the RLE conversion or a Graphic conversion. When finished, we terminate( ) this application.
The first function below main() is initialize(). Notice where we get the address of the three different TV screens we'll be using. Physbase() will return the address of the first byte of the video screen memory TOS sets up. The ST demands that TV screen memory starts on an even page boundary plus 256 bytes. So the mathematics first force a page boundary somewhere in the named 32K byte array ( 0xffff00&src_picture) and then adds 256 to it ( + 0x0l00). Before we exit, we are asked what type of conversion we want-RLE or Graphics.
Below lnltlalize() and wait_ for_mousepress() is select_ parameters(), where we quickly step through the four questions asked onscreen. Notice, however, that if we have asked for a high resolution to low resolution conversion, we ask the fifth question (explained earlier) about whether we want the Simple or Complex degree of conversion.
SEE THE LIGHT
The next function, read_the_ picture(), is almost an exact copy
of the File I/O Intro loader we published in ST Resource
last month. The logic is the same, but here we use it to decide whether
to load a NEO, DEGAS, or DOODLE picture file. Before we leave this function,
we transfer the just-loaded picture over to the destination picture memory
area. So, if no resolution conversion is performed, we'll still have an
image to write out.
Next is the master routine that diverts logic flow according to which resolution the Source Picture is in. Following that is the first of the sub-diversions, which will further divert program logic flow according to the Destination Picture type.
Now let's discuss the first of the actual picture conversion routines. This one is called lohi() and will convert a LOw resolution picture into a HIgh resolution picture. Since the logic for the rest of the conversion routines follow this one closely, we will examine this function in detail, and use it as a basis for the others. Remember, if you don't need the low to high lohi() conversion, omit every line between the begin and end statements.
LOHI()
We start off by declaring three local integer-sized pointers which
will eventually point to the source and destination words we will be moving.
Just think of pointers as "signposts" pointing to the memory location we're
interested in. The leading asterisk * denotes these three variables are
to be used as pointers.
Since all pointers in C language are 32 bits long-they are, after all, just addresses-we need to declare the amount that the pointers will be moved up (incremented) when we use the "+ +" operator. In our case, this means "increment to the next location." As long as we will be pointing to and PEEKing and POKEing integers (16 bits), we define our pointers as ints-or pointers to integers. Each time the pointers are incremented now, they will be moved up by 16 bits, or more simply 2 bytes.
Finish the local declarations by saving space for temporary pixel units and the current row and column counters. The first VDI call here is v_hide_c( handle );, which will hide the mouse cursor from view and disable it.
USING XBIOS
Next is an XBIOS call, Setscreen( );. This call sets the location
where we are currently drawing or looking, and provides a quick way to
change resolution on the fly. Here we point the video screen to des_pix,
which will flip the display to our destination picture.
Next is another XBIOS call, Setpallete( );. If you pass the address of a table of 16 color information words to this routine, the ST operating system will slip the new palette location into the palette pointer at the end of the next vertical blank. Presto! A new palette starts being used.
Next we initialize our two pointers, src and upper_dest, to point at src_pix and des_pix, which are the addresses of the first word in the upper-left corner of the screen.
Now we begin the two nested loops that will count through the bytes on the screen. We are going to convert from top to bottom, and from column 0 to column 20 (across the screen). First the line: hi0_ pixword = ( * src++ ); is just the same as saying: hi0_pixword=PEEK(src): src = src + 2;. Say to yourself, "hi0_pixword is assigned the value in the memory location the pointer src is pointing to. Then the pointer is incremented to point at the next location."
After we pick up the four source lores pixel words, the next line down will blend each pair of 16-bit words together into one 32-bit longword. This "blending" is described below. The result of the blend is returned inside hi_word and lo_word which we turn over to pixhi0 and pixlo0. The same operation is performed on the last two displayable words in low resolution, with the blended longword being turned over to pixhi1 and pixlo1.
The three lines below will insert the new blended values into the destination picture. The construct ( * upper _dest+ + )=pixhi0; means: POKE upper_dest,pixhi0: upper_dest = upper_dest +2. By the way, remember we add two because the pointers were defined as integers, not because the pointer has two plus-signs after it.
Finally, close the two nested loops, and v_show_c( handle ); will cause the mouse cursor to reappear.
BLENDABLE BITS
In order to convert two 16-bit words into a displayable 32-bit longword,
the individual bits must be "blended" together into Atari format. What
this routine does is OR alternate bits in both words together in alternate
sequence, with the final longword result being made up of bit 15 left,
bit 15 right, bit 14 left, bit 14 right, and so on. Later on, we need to
"separate" these bits back out into their original words when we convert
from a higher resolution down into a lower resolution. The function that
follows blend() does just that and is indeed called separate().
All you experienced C programmers out there may shake your heads when you see the blocks of if... then constructs inside blend(), separate(), and condense(). You may say to yourself, "He should have put that code into loops." I did that at first. However, the loops-two double nested loops each-wound up being one line shorter and bunches slower than multiple if... thens.
Now we get to write_the_ file(), which will do the format conversion as it writes the picture back to the disk. Notice each of the different formats has its own block of code that writes the picture information.
DON'T BE CONDENSE
Below the file-writing function is condense(), which is provided
to make the Simple conversion from high to low resolution. Each group of
four dots on the high resolution video screen correspond directly to a
single dot on the low resolution screen, so this function simply ORs the
two top dots together, then it ORs the bottom dots together, then it ORs
the resulting top and bottom single dot together. The result: If any
one single dot was set in the original high resolution group of four
dots, the corresponding single dot will be set in the low resolution conversion.
RUNNING THE LENGTH
Right after saving the picture we get to the RLE conversion section
of the program. Once again, if you don't need this section, you don't need
to type it in-just follow the special RLE omission instructions in the
article's TYPE IT IN segment
The first routine in the RLE section is rle__conversion(), which will first ask for the type and resolution of the picture to convert. Then it reads the picture in, allows you to find the area of the picture you wish to convert (because RLE wants a 256 x 192 grid), converts the picture to RLE format and saves the resulting file to disk.
The following function rle_ the_box(), performs the RLE conversion. Details of the conversion mechanics are explained in Charlie Jackson's VIDTEX Converter article elsewhere in this issue. This function follows his algorithm closely. blk_ handle(), wht_handle() and w_ record() are called from inside rle_the_box().
The last function for RLE conversion is find_area to_convert(), which will show a growing box outline, then place the "flattened" hand cursor onscreen. At this point it will wait for you to hold down the left mouse button. A rectangle the size of the needed RLE box will appear, and you can drag the box around the video screen to select the picture area you wish to convert. When selected, release the mouse button and a shrinking box will show. Then the requested box will be outlined and RLE conversion begins.
SARAN WRAP-UP
Finally, terminate() will present a "thank-you" box, close our
virtual workstation, and exit the application.
So here is a program to convert any format/resolution picture to any other format/resolution, along with conversion to CompuServe's RLE picture format. Remember, you don't need to type in the entire program if you don't need all the features. Pick and choose the routines you need, compile the rest and start converting.
(For details about the graphics software and hardware mentioned in this article, see the Graphics Products SourceList in this issue.)
Listing 1 GRAFCON.C Download / View
On Disk GRAFCON.PRG Download