DISK LABEL PRINTER
Epson/Graftrax Plus packs them in
Where did I put that program I just modified!" I asked myself.
I changed some of the statements to improve the performance and appearance of the output, saved it on disk and went away to do something else. Back at the computer, I was ready to use it and - it was lost! Thirty minutes later, after using DOS to search the directories of 40 disks, I found it.
"Is this any way to spend what little time I have to use my Atari?" I muttered under my breath. I decided right then to write a program to print labels for my disks so that I could find my programs at all times.
Thus was born the following program, though it went through many revisions afterwards. This version takes advantage of some features of the Epson/Graftrax Plus chip set. Learning to use these features with the Atari is an important part of this story.
Graftrax Plus is an enhanced version of the graphics chips for the Epson MX series of printers. It replaces some less useful features of the previous version with some very useful ones. The TRS-80 graphics characters are gone, and added are true underlining, superscript and subscript characters. Inverse-video letters are printed as italics.
My big interest was in using the superscript/subscript font to pack as many filenames on a label as I could. By combining the very small superscript font and condensed print with the ability to reduce the spacing between lines, I reasoned I could make labels with lots of filenames and still have them be readable. I would also have a practical excuse for learning how to use these features of the Epson with my Atari.
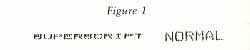
Let's look at the superscript/subscript font. It produces the same number of characters per line as the regular font does, but uses only four of the nine pins in the printhead. It does not create superscript characters that have portions printed above the level of the rest of the text, but there is no doubt that it is indeed a superscript font. Here's an example of how it looks:
To achieve such a nice appearance, the printer prints the superscript characters in two passes, picking up different parts of the letters on each pass. You activate this feature by using the command PRINT #3;CHR$(27);CHR$(83)CHR$(O). It is strongly recommended that you use commands in the form PRINT #N;, rather than LPRINT, because the LPRINT command can pad lines with extra spaces and mess up positioning. The PRINT #N; is preceded, of course, by an OPEN #N,8,0,"P:" to open a channel to the printer; it is followed, at the end of the program, by a CLOSE #N. CHR$(27) is the ESCAPE code, which is used with many printer commands to warn the Epson that a control code is on the way. CHR$(83);CHR$(0) then puts the printer in the superscript mode; CHR$(83);CHR$(1) puts it into the subscript mode. If you need to turn off the superscript/subscript mode, just use PRINT #N;CHR$(27);CHR$(84).
Next, we have the problem of line spacing. This, it turns out, really involves two questions: how close together we want the lines, and what spacing can we use to ensure that we print at the same place on each successive label.
This second question is very important. Adhesive labels are manufactured with a typical spacing of one inch from the top of one label to the top of the next. We are going to pack as much print as we can onto each label, and it's very annoying to have to manually readjust the head position. We do have to readjust, however, if the printing has worked its way off the labels. The Epson has a mode that allows you to control the line spacing in increments of 1/216 of an inch (how's that for fine control!). After playing around with the superscript printing for a while, I determined that using 14/216-of-an-inch line spacing would pack the absolute maximum of readable information on each label. My first attempt to use this spacing, however, revealed the need to consider label-to label spacing.
The problem comes down to this: we want to pack as much as we can onto a label (so spacing can't be less than 14/216) dnd we don't want to go to more than 36/216 (or 1/6, which is the "normal" line spacing). Also, whatever integer we choose must divide evenly into 216 so that the number of lines in one inch will be an integral number.
A little simple math shows that the only values we can use are18, 24 and 36, and I used 18 since it is the smallest of the possible integers. This gives us twelve lines from the top of the label to the top of the next (eleven on each label and one between labels). If you want one-dot spacing between lines, as in Figure 2, replace the 18 in line 33 with 24. I don't print on the top of each label, though, because it's too much of a bother to line up the printhead and the labels with the accuracy needed to use this space.
Each label has a title line, which leaves nine lines for filenames. I use 5" labels, because they fit nicely on disk envelopes and permit me to print names four across (in the condensed-print mode), for a total of 36 per label. Figure 2 is an example of this:
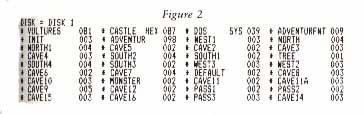
My program also moves to the next label if you have more than 36 files on a single disk, and continues to print. Since this second label needs no title, there is room for 40 more filenames on it.
If you don't like to stick labels on your disk envelopes (they are, after all, not that easy to peel off), you can use this program to print on plain paper, and then just tape the printout paper onto the envelope or disk. In this case, just change line 137 to read:
IF RECCTR = 40
THEN RECCTR = 0
If you don't have access to 5" labels, and can only get the more common 3 1/2" variety, make the following changes in the program: Change 4 to 3 lines 60, 135 and 312; change 40 to 32 in line 137. Also, change line 130 so that there is only one space between the first set of quotes. You will then get 27 names on the first label and 30 names on the second.
The program must keep track of where you are in the count (of labels and lines) to get properly positioned for the next label. It must count how many filenames it is sending for each line of print and how many lines it has printed. The variables CTR and RECCTR keep track of these values. They are reset to zero at the end of each line, and the end of each label respectively.
The program looks for the FREE SECTOR file, the last one on each disk, as an end signal. B$ is the string that contains the filenames as they are read off the disk directory. B$(4,5) will be "F" if, and only if, the FREE SECTOR file has been reached. At that point, the program goes on to determine how many blank lines it needs to print to get to the next label. It does this by using MARKER, which tells it how many lines have been printed.
I have used this program extensively to print labels for my disk envelopes and it has made finding programs much easier. An enterprising programmer might want to add a routine to alphabetize the names on each label, since there are still precious moments wasted in scanning a label with 30 or 40 names on it to find the particular filename of interest.
Download DISKLABL.BAS Download