THE BLOSSOMING OF COMPUTER ART
Create it with your Atari and a printer
This article is probably most meaningful for professional artists who are interested in using the Atari computers to create works of computer art. But it may also inspire young Atari artists to think along these lines. As a commercial artist, I've had an avid interest in computers for almost three years now, but I never really paid attention to the artistic potential of the home computer until ANTIC's Cover Art Contest came along (ANTIC August 1983). At that time, Jo Ann Brissenden, a close friend, convinced me to team up with her and enter the contest. The result was "The Blossoming of Computer Art."
Our objective was to create a work of computer art that would retain its integrity as computer art. That is why you can still see the dots in the finished piece. However, we also wanted to clearly conconvey to the viewer more detail than the simple "needle-point" look can provide.
One possible route would have been to either photograph a full-screen picture on the monitor, or produce a printout version of the picture that was created on the screen.
Unfortunately, either one of these methods usually results in a picture that is too crude, even when reduced, to meet our goal of clear visual communication. This is true with most, if not all, affordable microcomputers. We were able, however, to quadruple the amount of detail that is usually provided by such computers by using the Atari 800 along with Micro-Painter, Color Print and Graphic Master programs. A Gemini 10 printer was also used.

You'll notice that our drawing is very symmetrical. The top-right-hand quadrant is almost identical to the to left, and the lower-right-hand quadrant is very similar to the bottom left. In fact, we drew only two of the four segments to begin with. Final embellishments, such as the Atari logo, were added only after Graphic Master was used to mirror-image (or flop) the two original drawings and then to save the four resulting drawings. These embellishments gave the left and right hand sides of the final picture their individual differences.
Draw a line through the center of our picture horizontally, and then vertically, and you'll see the four Atari full-screen pictures that were used to create the final effect. Note that each rectangular screen is vertical in the final picture. We had to turn our monitor on its side to visualize how each screen-full would look as part of the completed drawing. (This can be confusing, though, because it changes the cursor-movement sequence. "Left becomes "Up" and so on.)
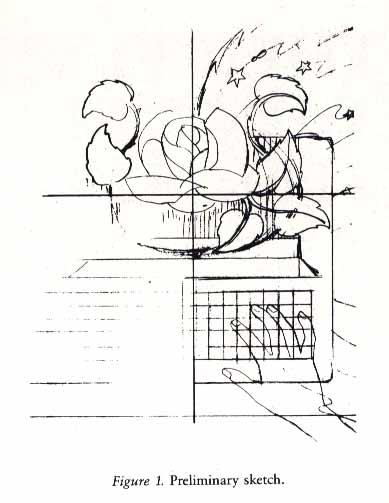
Our first step was to come up with a rough penciled sketch of the entire picture (see Figure 1). This was then enlarged, inked on acetate, and cut into four sections. Next, we taped the bottom-right quarter of the clear acetate drawing to our monitor's screen for quick layout reference (you can also draw directly on the glass with a washable marker).
Using Micro-Painter, we then drew this portion of the drawing electronically and saved it. At this stage, we also made a printout so we could ensure that the connecting lines from one full screen would align with those from the other (original) screen. Once this was accomplished, we created a mirror image ofthe screen with Graphic Master, saved it and then ran a printout.
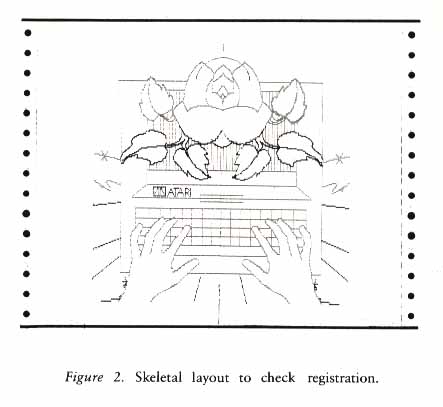
The opposite (top-right) section of the acetate drawing was handled in the same way. This gave us (after mirror-imaging or flopping the two original pictures) four separate full-screen pictures to print out and splice together. It's important to keep these drawings in outline or skeletal form, because it is difficult to get them to line up properly from top to bottom (see Figure 2). We found that we were usually a few cursor-dots off vertically, and this is something that needs to be checked for and corrected before you fill in the outlines with color.
Next, it was time to figure out a color scheme. We initially did this by marking up a thumbnail sketch on paper with color makers, because changing colors midway through a drawing can be much more time consuming than simply planning ahead. We decided, for example, that a red outline was needed to convey a sense of excitement and to identify the keys on the computer keyboard. The machine's light-mocha color also has red dots in it. If you try to draw a red through such a color-filled area, though, you'll find that your line will stop at every fifth pixel. It's this kind of frustration that can take a lot of the fun out of computer art, so plan ahead!
Next, we checked our work with the Color Print program, which gave colored carbon copy of our work in progress.
Once we had both (original) screens color-filled and mirror-imaged, and had printed out copies of the four resulting screens, we taped them together and checked for registration. Again, using the Color Print program and its colored carbons, each screen was then color separated and printed out. Because four color separations were needed for each of the four segments of the picture, this meant that sixteen different screens ( and printouts) were needed. This was the final testing phase before we got a "color key" and film negatives ready for the printer (more on this later).
Now, look even more closely at the original picture. You'll see the tiny dots that tell you it was computer-generated. They are much more detailed and much less blurry than in many examples of color computer art, because this picture was not photographed off a screen or reproduced in color using a dot-matrix printer and the color carbons supplied in the Color Print package. The colors in the finished Color Print version of the picture (used for testing purposes only) are darker than those in the original screen versions, because the color carbons do not provide accurate color representation. Also, the sheet used inthe Color Print test had to be run through the printer four separate times (once for each primary color). You have to be very careful to get exact registration on each run, and each one is a calculated risk-- frankly, you'd have better luck in Las Vegas! As a result, the carbon process won't do for reprinting your drawing, but it does give you a good, inexpensive preview of your finished work.
To create art with your Atari that can be professionally reproduced, you may need to learn something about the process that is used to produce full-color pictures for books, magazines and consumer packaging. It's a very different process from your color monitor's use of red, blue, and green to produce pictures on the screen. Professionally color-separated pictures (and photographs) are made up of four separate colors: red, yellow, blue and black. Each color is contained on a separate transparency; a set of four transparencies is combined to create a finished four-color picture. (The Color Print program, by the way, handles this color-separation phase for you.)
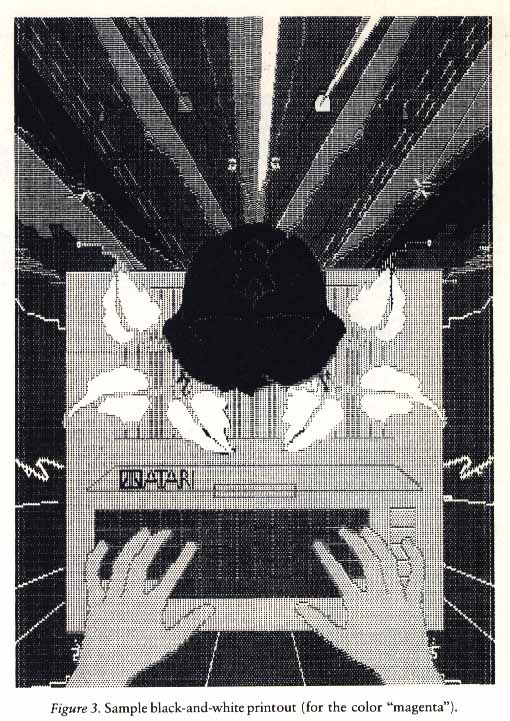
At this point, we spliced our 16 printouts together into four complete black-and-white pictures. We taped the pictures together very carefully, making sure to match up the dots that overlapped. We did this by taking the shade off a lamp, holding two printout sheets together over the naked light bulb, matching the overlapping dots, and then taping the two sheets together. Each sheet was then marked with one of the four appropriate colors: red (magenta), yellow, blue (cyan) and black. The result of all of this work was four complete black-and-white representations of the picture, one for each color (see Figure 3). These were the basis for the actual color separations. (Pre-separated artwork such as this can save between $75.00 and $300.00 - depending on the color separator -- at the printing stage. This can make your artwork even more competitive commercially.)
The next step was to get a "color key" of our drawings. At this stage of the process, a professional printer took the four pictures we'd created, made film negatives and then produced a color key. This involved the printing of four colors on four thin-acetate sheets. These were then carefully overlaid to attain exact registration. This gave us a chance to preview our work before the actual printing process began. The process is similar to that involving Color Print's carbon overlays, except that it is much more accurate.
This effort begins to seem much more worthwhile when you consider that our finished picture, created on a dot-matrix printer that retails for about $400.00, produced a commercially-printed color picture with better dot fidelity than that provided by Seiko's new 150-dot-per-inch thermal-transfer printer ($8950.00) or a standard ink-jet printer (approximately $600.00). No matter how fine a four-color computer printer is, artwork produced on it must be rescreened by the color seperator to be made ready for commercial printing. This Atari artwork, however, did not need to be rescreened.
Finally, I have several suggestions for those of you who are ready to try this new technique. First, make sure that you use a new printer ribbon when you print the final four pictures.
Second, explain the technique to the professional printers and color separators you deal with. Otherwise, they won't have the foggiest idea of what you're trying to do. Remember that this is a brand new category of art that very few people are even aware of; show them this article if they don't understand the technique.
One final note: Artistic accidents happen all the time, and often help the creative process. Be ready for them! Keep alot of diskettes handy, and always remember to back up your work. Backup diskettes are particularly helpful when you decide to change colors in a colorfilled area - it's usually easier to simply go back to a previously-saved disk file.