Anatomy of an ATARI
by Richard Herring
Have you ever wondered what the inside of your ATARI looks like? Just where is ANTIC anyway? If you are like me, you probably sit down in front of your computer nearly every day. You can find its power switch in the dark. The outside of your computer, like Picture 1, is very familiar. You see four controller jacks in front, side panel on the right, cartridge door on top and TV switch-box cable out back. But what about the inside-the anatomy?
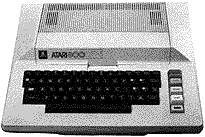
1) ATARI 800
We all know something about the anatomy of the human body. Even though we do not know all the names or understand all the processes. What little we do know helps us. Knowledge of the body's structure allows us to use it properly and abuse or damage it less often. The same is true for your computer. You will probably never need to take apart the ATARI, just as you will probably never have to perform surgery on a person. But if you have a mental picture of the physical object it can help you understand it better.
When you open the cartridge door of an ATARI 800, you find two cartridge slots. With few exceptions, all cartridges go in the left slot. Under the cartridge door and just above the break key, is a little slot which contains the ATARI's second on / off switch . As soon as you open the door, your computer is automatically turned off. This prevents you from inserting or removing cartridges with the power on, so no static charges can be sent through the computer's circuits to damage sensitive chips.
Once the cartridge door is open, you can access the memory bank by rotating the two black clamps and lifting the entire ribbed top cover toward you.
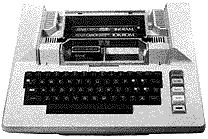
2) Top cover removed
Here (Picture 2) are the Operating System 10K ROM and whatever RAM modules you have installed. That is about as much disassembling as most people ever need to do. So, let's take an imaginary tour through the rest of the computer.
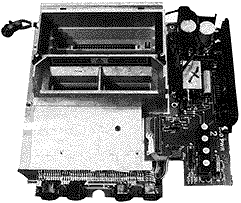
3) Bottom of case removed
When it's turned over and the screws are removed, the bottom of the case lifts off. The view (Picture 3) is not terribly revealing. Notice that one side, under the [ESCAPE] and [TAB] keys, is basically empty space. In the corner under the [CONTROL] key, you see the little speaker which is responsible for the beeps, as well as for other sounds. This speaker simply sits in a circular ridge formed in the top of the computer's case (Picture 4). The motherboard is shown (Picture 3) occupying the center half of the computer. Looking at its bottom is not very interesting, since most of it is covered with a metal plate. On the side opposite the speaker, you see the bottom of the power supply board.
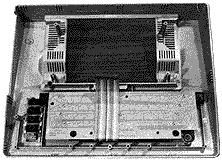
4) Top of case with keyboard
Removing more screws and unplugging one connection allows the boards to be lifted out as a unit. This leaves the case top with the keyboard still installed. The detached keyboard ribbon (Picture 4) can be seen with the bottom of the keyboard still visible in the otherwise empty top half of the ATARl's case. The four yellow keys are seen clipped into housings formed in the case top. The bottoms of these keys rest on switches located on the power-supply board.
5) Main circuitry
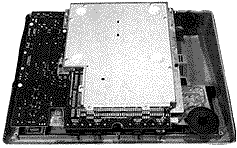
The ATARI 800's components reside primarily on three circuit boards. Lying horizontally under the keyboard and memory bank, is the motherboard. This is the largest circuit board in the computer. The motherboard runs from front to back and is about one half as wide as the 800's case. It is still covered (Picture 5) by the metal case which surrounds the memory bank, but we can see it completely exposed (Picture 7). Attached to the right side of the motherboard is the power-supply board 7 one side of which is the black side of the computer. That panel holds the on/off switch, power jack, etc.
The last board in the 800 is the personality board. It plugs vertically into the motherboard and stands behind the memory bank. It is still inside the metal case (Picture 5 ), but you can see its top (Picture 7) and how it looks when removed (Picture 8).

6) Power supply board
Here's a good view (Picture 6) for the powersupply board after it has been detached from the motherboard. Along the bottom of the picture is the black side panel of the 800. Among other functions, this board converts AC from the external power adapter to DC used by the computer. The four round white posts on the left side of Picture 6 are the [START], [SELECT], [OPTION] and [SYSTEM RESET] switches. The power-supply board connects electronically to the motherboard via the long twenty-two hole connector on the arm protruding toward the top of Picture 6 and by the four-pin connector just below the left end of the twenty-two hole connector.
7) Motherboard
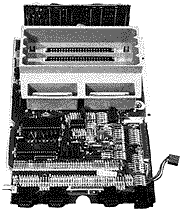
The motherboard is shown (Picture 7) with its metal case top removed. The four joystick controller jacks are at the bottom of the picture. The plug sticking out at the lower right connects to the power-supply board. Just above that plug is the twenty-two pin connector which also attaches to the power-supply board. The two pins protruding from the lower left of the board, just above the #1 controller jack connect to the 800's speaker.
Also on the motherboard are the two chips POKEY and PIA. POKEY, the higher of the two big rectangular chips is responsible for the four semi-independent ATARI audio channels. In other words, POKEY is the music expert chip. But its responsibilities do not stop there. In addition to scanning and controlling the keyboard, POKEY also serves as timer, random number generator, maskable interrupt control and serial communications port.
The PIA is the big chip just below POKEY. PIA means Peripheral Interface Adapter. Like POKEY, PIA acts as a maskable interrupt control for peripherals. Further, PIA is responsible for peripheral control and interrupt lines and, for all you game fans, reading from and writing to the joystick jacks.
The upper half of the motherboard (Picture 7), basically consists of slots for ROM and RAM boards. The rearmost slot, however, contains the ATARl's third circuit board, the personality board, also called the CPU board. The personality board plugs into the motherboard using the same type of connector as a RAM cartridge. Its chips face the rear of the computer so they are just above the hole where the TV switch box wire comes out of the back of the ATARI.

8) Personality (CPU) board
On the personality board (Picture 8) lie the three remaining major chips of the ATARI. To the left is ANTIC. ANTIC is responsible for controlling vertical and horizontal fine scrolling and light-pen registers. It is also a vertical line counter, direct memory access (DMA) control, nonmaskable interrupt control, and WSYNC. Do not worry if you do not know the purpose of all those functions, just know that ANTIC has a lot of responsibilities.
The big chip in the center is the CTIA or GTIA. Depending upon how old your ATARI is, you have one or the other, never both. The GTIA chip adds Graphics Modes 9, 10 and 11 to the CTIA's Modes 0 through 8. Although the GTIA is downward compatible (virtually all software designed for the CTIA will still run) the colors of the graphics displays for some software may change.
The GTIA is responsible for color luminance and Player/ Missile objects. With four players and four missiles available, GTIA must keep track of their individual sizes, horizontal positions, collisions and priority. By priority, I mean determining which of two overlapping objects will be visible. GTIA also controls miscellaneous input/ output functions like switches and triggers.
The last big chip, on the right side of the personality board, is the 6502 CPU. This is the brain around which the ATARI computer is designed. Since the 6502 is used in other personal computers, the ATARI has a number of peers. The use of the same CPU by two different computers does not mean that they are compatible or that software written for one will run on the other. It does mean that Assembly Language programmers may be able to convert software from one machine to the other with relative ease. This is because all versions of the same CPU will have similar sets of commands, or instruction sets, at the machine language level.
Now that we've looked at the inside of an ATARI 800, please do not take this little tour as a manual for disassembling your computer. All 800's are not put together in exactly the same fashion. But do use your new knowledge of machine anatomy when you try to make your computer do tricks.