ON DISK
PHA$AR V. 3.0
The Professional Home Accounting System and Register
PROGRAM BY TOM MARKS
ARTICLE BY STEPHEN G. ROQUEMORE
Keep tabs on your budget with the files PHASAR.ARC and PH_DATA.ARC on Side 1 of your START disk.
Tom Marks' PHA$AR is a friendly, GEM-based home and small-business accounting system that will make your financial life easier. It is also one of the most popular money management programs ever developed for the ST and START is pleased to present it on this month's disk. PHA$AR runs on any ST/Mega color or monochrome system.
The following documentation was condensed from the original PHA$AR version 3.0 manual and is intended to get you started in this powerful program. For an in-depth tour of PHA$AR's many capabilities, read "Be a Power PHA$AR User" elsewhere in this issue. And if you can, you should acquire the complete manual.
Getting Started
To run PHA$AR, boot this month's START disk; the START menu program runs automatically. At the main screen, click on Prepare, then select "PHA$AR version 3.0." The program will un-ARC directly onto the destination disk you specify. To access the PHA$AR datafiles, return to the START menu program and click on "PHA$AR Datafiles." The files will un-ARC directly onto the destination disk you specify. Be sure that the following datafiles are in the same folder:
|
PHASAR.NAR |
PHASAR.OCC |
With so many files, PHA$AR obviously takes up a lot of space, so you may have to separate the files onto different disks (unless, of course, you have a hard drive). However you configure your system, make sure that PHASAR.PRG, PHASAR.CFG and PHASAR.REG are in the same folder. PHA$AR will run on 512K, but a 1MB system is recommended.
Accounting for Your Accounts
Before you run the program, you need to plan and organize your financial records. Collect all of your bank statements, credit card statements, loan payment receipts, etc. You need all of this to decide what you'll enter into PHA$AR for Income and expense categories and for accounts. PHA$AR allows 97 expense categories, 29 income categories and 39 accounts. It supplies miscellaneous income and expense categories and a cash account with associated net cash and total cash expense categories for you.
Write down all of the income categories and all the expense categories you'll need. Then write down all of the accounts you'll need. Make one for each checking account, savings account and any other type of account that can receive or disburse money. Be sure you have the last confirmed balance for each of these items. Separate them into "assets" and "liabilities." (Assets are those accounts that are of value, like your house, car, boat, checking and savings accounts, etc. Liabilities are those accounts to which you make payments, like a mortgage, credit cards, etc.) Names for each entry must be 10 characters or less.
Some General Info
PHA$AR contains all the online help you'll need to get you through any rough spots. Along the top of the main screen, you'll see a standard GEM menu bar. Under any of the menu headings, click on HELP (pressing [F1] also calls up the help menu).
Press [Esc] or [F10] to exit from whatever you're doing in PHA$AR, but not from the program. [Return] or the left mouse button will do the same in most cases.
Before you run PHA$AR, make sure that the current time and date are correctly set, via the Control Panel or whatever means you normally use. PHA$AR uses this to determine the date of your transactions for a session and if it isn't correct, then neither will your register file be correct. PHA$AR provides an option in the File menu to set the date, but this is only for convenience in entering transactions later than the current date.
When you return to the main menu, always save the register file. Also, you can undelete a transaction by placing the cursor on the line where the transaction was displayed and pressing [Insert]. This must be done beforeexiling the function.
Setting Up PHA$AR
Run PHA$AR; it may present a dialog box asking where the PHA$AR.REG file is. If so, type in the correct location, including the drive ID and the folder name if necessary.
At the main menu, select Set User Preferences under Setup. Here you enter the choices you want PHA$AR to use whenever you run it.
You'll then be asked to decide if you want PHA$AR to force a unique category name when entering transactions. I recommend you select Yes, because it forces you to be specific about the account or category name you enter and reduces errors. Select No for Automatic Occasions. Select Yes for Verify Exit. Accept the default for now on Plotting Symbol and Standard Page. Enter the correct drive and path names for each of the file locations. Select Printer for Print Destination. Select the printer type that is consistent with your printer.
You may select Custom Printer which lets you specify six items regarding your printer, according to the type you selected. For now, just select Dot Matrix or Daisy-Wheel. Now press [Esc] and and click on Yes to save the values. Click on No when asked to test the printer.
You now have a PHA$AR.CFG file, which PHA$AR will use every time you run the program. You may change any of the values at any time.
Now select Create New Register File under Setup. (Be sure you have a separate backup of the PHA$AR.REG file that came with the program! This file contains the tutorial data, and you may want to use it later on.) You'll be asked whether you want a Calendar Year or Fiscal Year for the file. If you choose Fiscal Year, the "year" is the calendar year in which the fiscal year ends.
Next, select Set Up Accounts under Setup. It is here that you'll enter all the account names and balances you planned out earlier. First, tell PHA$AR how many accounts you want to allow for; if you have mapped out, say, 20, then allow for 30. You can always change this number later. This also applies to income and expense categories. As you enter asset accounts, remember to enter the balances as positivenumbers, and the balances for liability accounts as negativenumbers.
Enter all the asset accounts; your checking and savings accounts should probably be first in the list. Then leave a few blank entries before entering all of the liability accounts. This makes the info more readable on screen reports. For each account, enter the date of the last confirmedbalance .
When you've finished all the above, press [Esc] to return to the Main Menu. Press [Control]-[S] to save the register file.
Now return to the Setup Menu and select Set Up Incomes to enter your income categories. Your first entries should be your job(s); then any other sources of income you may have. At the end of the list, enter any income source that is non-taxable.
When you've finished, save the register file as you did for accounts; then select Set Up Expenses in the Setup menu. Proceed as you did for incomes. Group related expense categories together, e.g., paycheck deduction categories for each job, basic household expenses, etc. This makes your screen reports easier to read. Note: once you have entered a transaction for an account or category you cannotchange its name.
Now return to the Main Menu and save the register file as before. Press [Control]-[A] to display your account structure; study it carefully for any mistakes or changes you want to make and jot them down. Follow the prompts. When you're finished, press [Control]-[C] to display your expense and income structure; you'll want to see the "actual" so just press [Return] at the prompt; do the same as you did for accounts, jotting down any changes you wish to make. Follow the prompts. When you return to the Main Menu, select whichever Setup sub-menu you wish to make your changes in.
(To change the order of entries, place the cursor on the number of the item you wish to be first then type 1 and press [Return]. The item will now be first on the list. You may rearrange the list any way you like using this method; if you want the 27th item to be 26th, just place the cursor on 27 and type 26 and press [Return]. If you wish to change names and/or balances, just place the cursor on the field and enter the new name or balance and press [Return].)
You have now initialized the basic information PHA$AR needs to properly process your transactions.
Save Your Work!
Whenever you end a PHA$AR session, exit the program and copy the PHA$AR.0CC and PHA$AR.NAM files to your backup disk. Also, of course, copy the PHA$AR.CFG file if you changed any preferences and the PHA$AR.REG file if you entered any transactions or did anything that affects your account/category structure.
THE MAIN MENU
Desk
Lets you access whatever desk accessories you've installed; also provides PHA$AR copyright information. A word of warning: PHA$AR does not work properly with MultiDesk from Codehead Software�it locks up the program.
File
Help: Click here for special online help for the File menu only.
Change System Date: Lets you change the date of your transactions. Particularly useful if you enter a large amount of transactions with dates earlier than today's date. Isn't necessary if you have a clock card.
Save Register File: Saves work file to specified destination disk. Keyboard equivalent is [Control]-[S]. Periodically save the register file so that a random power glitch or computer error doesn't destroy your data.
Validate Register File: Reads all transactions in a file and rebuilds the current balances.of all accounts and categories from that data. Also, resets the account status according to whether or not it has been reconciled. Warning: Validate Register File is very important but dangerous! Do not use it unless you have a current backup of your register file! Choose this option only if a major computer or power glitch has trashed your balances.
Quit: Click here to return to the ST Desktop. Keyboard equivalent is [Control]-[Q].
Transactions
Help: Click here for special online help for the Transactions menu only.
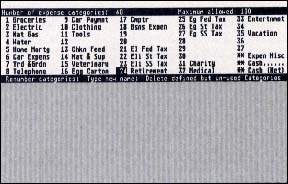 |
| PHA$AR lets you organize your assets and liabilities by setting them up into Incomes and Expense categories. |
Enter New Transactions: Select this option to display a list of your accounts and their current balances, in the top half; and a header line that describes each section of a transaction and a prompt for which account to use on the the bottom half. The keyboard equivalent is [Control]-[E].
After the first transaction, PHA$AR will use the account you select as the default. Select the account and press [Return]. The account name now appears above the column labeled Account.
The Date field defaults to current date. Press [Return] to accept the default or type the date you wish. You can spell out the month and day, or use the MM/DD/YY or DD/ MM/YY formats, depending on your specification in User Preferences. This entry is now displayed under the header line for date. If you make a mistake, press [Tab] at the appropriate field.
In the Payee field, type in the recipient of the payment; if you type in the name or number of a PHA$AR account, the program thinks you want a transfer from this account to the one named in the payee field. This is OK if you're making a payment to a liability account; otherwise, if it's for an expense account, make sure the spelling is different enough that PHA$AR won't think it's a transfer.
The next field is either the expense category or the income category, depending on whether you're depositing or paying out funds. Press [Control]-[L] to get a list of choices, then enter the name or number of the category. If the category doesn't exist, PHA$AR will ask you if you want to create it now. If yes, you'll be taken to the setup screen and allowed to define the category. Then you will be returned to complete your transaction entry.
If you're transferring between accounts, this field is supplied by PHA$AR. On transfers, when you finish entering the fields, the transaction is displayed in the list above as a "XFER out"; then, PHA$AR displays an automatically-generated "XFER in" transaction for the receiving account, with the cursor placed in its comment field. Press [Return] to complete the transfer.
The next field is ChkNum. Enter the actual check number or type a blank, or type a zero (0) if you want PHA$AR to quit supplying numbers for this account. Select the zero option if the account is a credit card or savings account which doesn't require check numbers. Now enter the actual amount.
The last field is called Comment. Here you may enter any text you like or nothing at all. Press [Return]. This field can be printed on checks if you desire.
The PHA$AR cash account is shown at the bottom of the account list in the top half of the screen. It also gives you two expense categories for cash. Press [Control]-[L] to call up a list of expense categories. The only one shown will be Cash... This is a special kind of expense category; think of it as total cash. The one that isn't shown here, think of as net cash. Total cash is what you started out with; net cash is what's left after all your recorded transactions from the cash account.
To issue a check that covers more than one expense category or to make a deposit that covers more than one income category, type "multi" or "split" at the expense or income prompt. Continue entering the transaction normally. Enter the correct full amount and any comment you wish. When you press [Return], PHA$AR generates a second transaction line for you, with the cursor positioned in the expense (or income) field. Enter each category and its partial amount. Do this until each required expense (or income) category required has been entered.
Each time PHA$AR positions the cursor on the amount field, it displays a default amount which is the total amount minus the sum of the partials entered so far. When you reach the last partial entry, the amount shown should be the correct partial amount for the last entry you wish to make. These partial entries do not affect your account balance and are automatically confirmed, so they never show up when reconciling accounts.
Use Standard Transactions: Lets you to call up one of various transactions you've set up. It presents the list which you then modify and/or delete the entries you wish to change, supply correct amounts if different than the supplied value, specify correct check numbers. When you've made all the appropriate changes, press [Esc]. A box of choices is then presented. Accept the default to record them on disk.
Edit Standard Transactions: Lets you set up up to 17 groups of up to 20 transactions which can be called up by the Use Standard Transaction function. A great time-saver if you have a fair amount of repetitive transactions you enter regularly.
View/Edit Transactions: Lets you display a list of transactions based on specified selection criteria. The keyboard equivalent is [Control]-[V]. A screen is displayed for you to enter your criteria. Specify All or a list of one or more accounts, by name or number. Then specify the same for income and expense categories; you may also specify None for either. Then specify All or the payee string to search for, followed by the start and end dates to include in the search. Finally, specify whether or not to print the results.
Confirm With Statement: Choose this option to periodically reconcile all of your accounts. First, enter the name or number of the account to reconcile. The beginning balance is supplied by PHA$AR from the last confirmed balance. You then supply the ending date and balance from your bank statement (or use whatever date is appropriate for the other accounts); you can usually accept the PHA$AR-supplied default for Confirmation string. Now, strike any key. PHA$AR displays messages to inform you of the search; then a screen of unconfirmed transactions is displayed. Move the cursor to the Confirm column and press [Return] for each transaction that appears on your statement. If one doesn't appear, use the down-arrow key to space over it. If there is more than one page, press [Shift]-[Down-Arrow] to scroll to the next page and continue confirming transactions. When a message is displayed that the balances match, press [Esc] and follow the prompts.
If you run out of transactions and the balances are incorrect, you are given six choices to remedy the situation: Re-examine Transactions, Enter Missing Transactions, Change Ending Balance, Accept Statement Balance, Sort Transactions or Revert To Original State. Select the appropriate option.
 |
| PHA$AR's Tax Advantage Statement lets you calculate your total net worth based on your assets and liabilities. |
If you select Revert To Original State, there are several consequences. First, PHA$AR will unconfirm all transactions you just confirmed; all other edits you performed will be left unchanged. The last confirmed balance and date will be reinstated. Newly entered transactions will be left intact but unconfirmed; finally, all transactions you marked for deletion will be deleted.
Reports
Help: Click here for special online help for the Reports menu only.
View Account Summary: Displays a screen listing each account, its last confirmed balance and date, last unconfirmed balance and date and how many debit and credit transactions and their totals are in the file for that account. They represent the current unconfirmed transactions for that account. If there are more than 20, the rest are displayed when you strike any key to go to the next screen. At the end, the total number of unconfirmed balances is shown. The keyboard equivalent is [Control]-[A].
View Category Summary: Produces a two-screen display of your expense and income category data. You're presented with a box that lets you choose Actual, Budget or Difference. Select one with the mouse or cursor key; you're then presented with a box letting you choose which month or a composite total-to-date display; the current month will be automatically highlighted. Make your choice; the first page, Expenses, is displayed. If you have more than 30 expense categories, the rest will be on subsequent screen(s). Follow the prompts for the next screen. When you're finished with expenses, the income categories are displayed. At the bottom, a net-cash-flow calculation is shown for the period shown. Follow the prompts to return to the Main Menu. The keyboard equivalent for this option is [Control]-[C].
Print Account Summary: Lets you print out data from the View Account Summary option.
Print Category Summary: Prints the same data from the View Category Summary option. Note that it always prints all 12 months' worth of data, regardless of the current month.
Sort/Unsort Categories: Sort the categories for display or printing in one of three ways: Ascending by Name, Ascending by Amount or Descending by Amount. Select whichever you desire, then select the type of data and the month or total. After the sort is completed, when you select View Category Summary, the data will be displayed, sorted as you requested. Select Original Order to return the categories to their original order.
 |
| PHA$AR lets you assess your loans by analyzing the spec- ific terms of each debt. |
Net Worth: Sets up a tailored Net Worth Statement for your financial structure. It provides up to 40 lines of asset information and up to 40 lines of liability information, plus a final line showing the current Net Worth. When you select this option you are presented with a box letting you choose to Edit Assets, Edit Liabilities, View Statement, Print Statement, Clear Statement or Exit. Exit returns you to the Main Menu.
Analysis
Help Click here for special online help for the Analysis option only.
View/Edit Budget: Keyboard equivalent is [Control]-[B]. Sets up budgets for any or all of your categories. You're presented with a line asking which category you want. Then a screen is presented to let you enter budget amounts by month or for all months. Follow the prompts. When finished, press [Esc] to return to the "which category" prompt. If you select nothing here, the line is automatically filled with the next category name. Press [Esc] to return to the Main Menu.
Plot Trend vs. Budget: Displays graphs of your category data. Keyboard equivalent is [Control]-[P]. You're asked which category to plot; enter the appropriate name. Here, the List command also offers several "composite" categories from which to choose, which allows comparative graphs to be drawn. If you want to print the graph, press [Control]-[M]. Follow the prompts to see a table of data displayed or press [Esc] to return to the "which category" prompt. Another [Esc] will return you to the Main Menu.
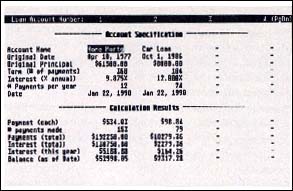
Loan Analysis and Savings Analysis work much the same way. They let you define up to eight loans or savings accounts to analyze the different sets of terms. Loan Analysis is also useful at tax time to estimate the total interest paid on a loan. When you select Loan Analysis, you are presented with a screen allowing room for four columns of loan data; press [Shift]-[Down-Arrow] key to scroll to the next page of four loans.
Enter the account name ( not an account you have defined to PHA$AR; it's just a name for this column of data), the origination date, original principal, number of payments, the interest rate, number of payments per year and the termination date for which you want the loan calculated. PHA$AR will then calculate and display the amount of the required payment, number of payments made, total of payments, total of interest paid, the interest paid this year and the balance of the loan as of the date you entered. Note: you must enter a name or PHA$AR won't display the calculation results.
Savings Analysis works the same way except that you give the amount of payments you plan to make instead of the number of payments.
Setup
Help: Click here for special online help for the Setup menu only.
Set User Preferences ([Control]-[U]), Setup Accounts, Setup Expenses, Setup Incomes: See page 52 under "Setting Up PHA$AR."
Set Up Check Printing: Lets you configure PHA$AR to print your checks instead of you writing them manually. I recommend you ignore this option unless you use preprinted check forms; for a normal household, it just isn't worth it.
New Year Carry Over: Re-initializes your register file and places any uncleared transactions in month "zero" to make your next reconciliation easy. You will be asked if you wish to carry over any Standard Transaction pages you may have; choose whichever you wish. If you carry them over, you won't have to redo them. If you don't, you will have to redo all of them; if you plan on a major restructuring of your accounts and/or categories, this is the way to go.
Create New Register File: Use this option to start a new file from scratch for the next year (covered above under "Setting Up PHA$AR"). Be sure you have a separate backup of the files for the year just ending!
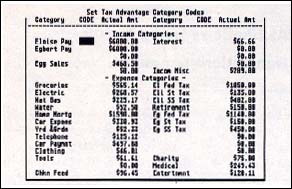
Tax Advantage Codes: Choose this only if you use the Tax Advantage program to do your taxes. The Tax Advantage manual contains the codes you need to enter here. If you use it, PHA$AR displays a screen with your income and expense categories listed; just enter the correct code for each category you want to track for tax processing. Any category you do not wish to track, leave blank. Just move the cursor past it; if you enter anything but the correct three-digit code, even backspacing will cause The Tax Advantage to flag that category as invalid and you'll have to re-enter the total to The Tax Advantage manually. This is also true if you enter an incorrect number.
Lists
Help: Click here for special online help for the Lists menu only.
View/Edit Names & Addresses: Lets you view or edit any names, addresses and telephone numbers that you've entered under View/Edit Names & Addresses. You are asked which name to search for; enter at least two characters of the name. The program then displays the entry in a template. If there is no match, it will display up to three near choices. You may then use [Shift]-[Up-Arrow] or [Shift]-[Down-Arrow] to scroll through the list. If you wish to enter a new name, press [Insert] at the search-for prompt and the template will be displayed to enter the data. The keyboard equivalent is [Control]-[N].
Now the template for the remaining data is displayed. Enter telephone numbers on the first line. Enter up to three phone numbers on this line. The remaining four lines are for address information and any other data you wish to add. Edit existing entries the same way; type over the data and press [Return]. As you enter each line, press [Return] to move to the next line. If you wish to delete a line, place the cursor on the desired line and press [Delete]. You can move the cursor by using the arrow keys. When you are finished entering or editing data, press [Esc] to return to the main menu.
Print Names & Addresses: PHA$AR prints all five lines of data you entered for each name. If you print checks with PHA$AR, it will look in this file for any name and address information you want printed on the checks or you can provide it via the keyboard.
Print Telephone Directory: Prints all stored phone numbers. PHA$AR looks for the phone numbers in the first line; it will print whatever you have entered there, however.
View/Edit Special Occasions: PHA$AR can store up to 250 dates and a one-line description for each. It only pays attention to the day and month, so it's geared toward annual events. Though it's primarily for birthdays and the like, you can add any special event or appointment you wish. Press [Esc] to return to the Main Menu.
PHA$AR guru Stephen Roquemore lives in Scottsdale, Arizona.
|