ON DISK
Programming In BASIC
GDOS Printer Drivers in GFA BASIC
By Jim Burton
Use GDOS for high-quality output with GFAGDOS.ARC on Side 1 of your START disk.
When you think of graphics printouts on the ST, you probably think of blocky, low-resolution screen dumps. But now you can create those incredible high resolution printouts created by such programs as Easy-Draw and CAD-3D. The "secret" of these programs is that they use GDOS, the ST's Graphics Device Operating System.
GDOS is a part of GEM that lets you access other output devices besides the screen. Atari didn't include GDOS with the rest of the ST's operating system so it needs to be loaded from disk.
To run the program in this tutorial, you'll need GFA BASIC 2.0 from the January 1989 issue of START, GDOS.PRG and a .SYS printer driver (such as FX80.SYS). Due to the special licensing agreement necessary to distribute GDOS, we cannot provide these files on the START disk. However, if you own Easy-Draw, DEGAS Elite, CAD-3D 2.0 or one of many other ST programs that provide GDOS then you already have it. (Although these routines will work with GFA BASIC 3.0, if you're using that language you already have built-in GDOS routines available. See the GFA BASIC 3.0 manual for details.)
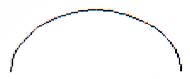 |
| Figure 1: This arc was drawn on the screen and printed out on a dot-matrix printer via the ST's built-in screen-dump function. |
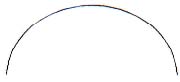 |
| Figure 2: This arc was printed on the some printer using GDOS, an Epson compatible GDOS driver and the GFA BASIC routines on your START disk. |
One of Many
The ST's monitor screen is simply one of the many output devices capable of showing graphics such as circles, text, lines and fill patterns. With GDOS, it's possible to "open" a device, such as the printer, and draw graphics to it at a much higher resolution than the screen. Figure 1 shows a screen dump of an arc, and Figure 2 shows a GDOS printout of an arc. The GDOS version looks much better because the medium resolution screen measures 640-by-200 pixels, while the printer driver's resolution is 960 by 1488!
To use GDOS printer drivers in your own programs, boot this month's START disk; the START menu program runs automatically. Click on Prepare, then select "Using GDOS in GFA BASIC." The sample GDOS listings and ASSIGN.SYS files will un-ARC directly onto the destination drive you specify. Create a new GDOS boot disk with GDOS.PRG in the AUTO folder. Copy your printer driver (FX80.SYS for Epson-compatible printers), ASSIGN.SYS, GDOSPROC.LST, GFAGDOS.BAS and GFABASIC.PRG to the root directory of the boot disk.
That's all you need to access the high-quality printing capabilities of GDOS! But before we go any further, we need to discuss the concept of "ASSIGN.SYS."
ASSIGN.SYS
Any ASCII file that gives GDOS information as the ST boots up is called ASSIGN.SYS. Run your favorite word processor or text editor and load ASSIGN.SYS from your GDOS boot disk. You'll see the following:
01p screen.sys
02p screen.sys
03p screen.sys
04p screen.sys
21r fx80.sys
This is simply a list of device drivers for GDOS. On each line is a device number, followed by a single-character descriptor, followed by a filename. The first four lines are the built-in screen drivers; the descriptor "p" indicates that these are permanent. The last line, with device number 21, is your printer driver. The "r" stands for resident, which tells GDOS to load the printer driver into memory at boot time and keep it there. If you're using a printer driver other than FX80.SYS you should change fx80.sys to the name of your driver--be sure to keep 21r in front of the filename. If you make any changes, save the ASSIGN.SYS file to disk as an ASCII file.
Now, turn off your machine and reboot using the GDOS boot disk. You should first see a message telling you that GDOS is resident, then the GEM desktop. Run GFABASIC.PRG, then load GFAGDOS.BAS. (Note: if you have a hard disk it's best to experiment with your hard disk turned off, since an incorrect ASSIGN.SYS file can hang up your hard disk at boot time. When you're sure GDOS is working properly, copy the files onto your boot drive.)
GDOS Printer-Drivers Program
GFAGDOS.BAS is a program that prints three high-resolution graphics to the printer: an elliptical arc, a circle and a box with rounded corners. Before you run the program, let's take a look at it.
@Openwork(21) calls a procedure that prepares or "opens" the device. In this case the device number is 21, which is defined in the ASSIGN.SYS file as the printer driver. @Openwork returns a number in the variable Handle%, which helps GEM keep track of the current device. @Openwork also returns the maximum X and Y coordinates of your printer in the variables Devicewidth% and Deviceheight%. For the FX80.SYS printer driver, these values are 0 to 959 across the top of the page and 0 to 1,487 from the top to bottom.
@Set_writemode(Handle%,1) tells GEM how to draw the graphics. The variable Handle% must be passed to the procedure first, then a value that represents the drawing style we want. In this case, the 1 means to draw in replace mode, which is the normal drawing mode.
The next seven lines set the various attributes for the graphics, such as line thickness and fill pattern. These attributes must be given a value or they'll default to 0, which in most cases isn't what you want.
@Drawcircle(Handle%,200,300,100) draws a circle. The X and Y coordinates are 200 and 300 and the radius is 100. This will put the circle in the upper left area of your paper.
@Drawfill(Handle%,200,300,1) fills in an area with the fill pattern defined by the attribute functions. The values 200 and 300 are the starting point of the fill and the 1 means the fill will stop when the color 1 is encountered. This will fill in the circle, starting in the middle and stopping at the border.
@Drawellarc(Handle%,500,100,50,75,0,1800) draws an elliptical segment. The center is at 500, 100. The X radius is 50 and the Y radius is 75. The 0 is the starting angle of the arc, which is to the right of the center point. Angles are passed in degrees times ten, so a value of 1800 will cause this procedure to draw the arc from 0 to 180 degrees. Since the arc is drawn counter-clockwise, the top half of an ellipse is drawn.
@Set_fillindex(Handle%,10) changes the fill pattern for the next graphic and @Fillroundrect(Handle%,450,300,800,600) draws a filled rectangle with rounded corners. The top-left-hand corner rectangle will be at 450, 300 and the opposite corner is at 800,600.
The page will be sent to a temporary disk file; it won't actually be printed out until the procedure @Printwork(Handle%) is called.
Before the program ends @Closework(Handle%) closes the printer workstation, deletes the temporary file and frees the memory buffer.
 |
 |
Figure 3: This output from the sample GDOS program has a resolution of 960 by 1488 even though the screen resolution is only 640 by 200. |
Making it Work
Before this program will work, you need to merge the actual GDOS procedures. Position the cursor at the end of the program, click on Merge and select GDOSPROC.LST from the Item Selector. Running the program should give you a printout similar to Figure 3.
There are many more GDOS procedures in the file GDOSPROC.LST. They're fully documented so you can begin using them immediately in your own programs--study them and experiment! Remember to close the device with @Closework() when you're finished.
Jim Burton lives in Great Falls, Montana, where he is television news production director for KRTV. This is his first program for START.