ON DISK
MIDI MASTER DRUMMER
MIDI Drum Sequencer
BY DAVID SNOW
Drum - machine programming is an often daunting and tedious process that consists mainly of abstract pattern shuffling and button pushing. Wouldn't it be nice to have a graphic, music-friendly environment in which to create, edit and organize drum patterns? Look no further. MIDI Master Drummer is here.
| AT A GLANCE | ||
|
||
MIDI Master Drummer is a specialized sequencer for drum programming that lets you graphically construct up to 99 different patterns in any meter and edit them in real time. Patterns can be linked into phrases and phrases chained together into songs. Patterns, phrases and songs can be saved to disk, and songs also can be converted to standard MIDI files that load into any commercial sequencer that reads them. MIDI Master Drummer also generates randomized patterns and offers a variety of MIDI synchronization options.
Connect the MIDI Out of your ST to the MIDI In of your drum machine or synthesizer. To run MIDI Master Drummer, double-click on the archive file MIDIDRUM.PRG and choose Extract when the dialog box appears. Select a destination disk and the files will be un-ARCed directly onto that disk. Make sure that MSTRDRUM.BIN and MSTRDRUM.PRG are in the same folder. To start the program, double-click on MSTRDRUM.PRG.
Drum Roll, Please
The first screen that appears is the pattern programming window. The Instrument column to the left lists drum names. For the purposes of this tutorial, change Drum #1, #2, #3, and #4 to Bass Drum, Snare Drum, Low Tomtom and High Tomtom respectively.
To the right of the Instrument column is the Note column, which assigns a MIDI note to each drum sound. To set a note, left-click on the one that you want to change and click on a key in the keyboard icon at the bottom of the screen. The note assignments depend upon your drum machine or synthesizer. For our tutorial, assign appropriate drum sounds for the Bass Drum, Snare Drum, Low Tomtom and High Tomtom.
Next to the Note column is the MIDI-Channel column, labeled Ch. If you're using just one drum machine or a synthesizer with a drum patch consisting of multiple drum sounds, leave all the Instrument entries assigned to the same channel. If you're using several drum machines or synthesizers, or a multitimbral synthesizer with drum sounds on different channels, assign the channels accordingly.
To the right of the Channel column is the Enable column, labeled En, which controls the playback and editing status of each drum sound. Left-clicking in the column enables the drum which is indicated by a check mark. Right-clicking replaces the check mark with an M for mute. Clicking both mouse buttons at once changes the status to S, which means the drum is selected for global editing.
The Instrument, Note, Channel and Enable settings constitute a custom configuration for your drum machine or synthesizer setup. Click on Default Configuration in the title bar, enter your configuration name and save it. Then click on the Configuration button and enter a file name in the selector box (configuration files are automatically given a .CFG extender). If you want the configuration to load automatically, name it DEFAULT.CFG and save it in the same directory as the program.
To the right of the Enable column is the Pattern Grid, which represents one or more measures of music. Each measure consists of one or more beats and each beat consists of one or more pulses (subdivisions of the beat). On top of the grid are the Pattern settings: Pulses/Beat, Beats/ Measure and Measures. By changing the values of these measures, you can change the pattern.
To enter a note in the pattern left-click on your desired point in the grid. Right-clicking enters an accented note, and clicking both buttons at once, erases a note. Click on the PLAY button to both stop and start your pattern. When you play the pattern, only notes within the grid will sound.
You can change pattern settings without disturbing the notes you have already entered. You can also enter and delete notes while the pattern plays, and change tempo by dragging the arrow in the TEMPO bar. Any combination of pulses, beats and measures is legal as long as the total number of pulses does not exceed 48.
The Grand Pattern of Things
MIDI Master Drummer lets you create up to 9 different patterns, each with its own arrangement of measures, beats and pulses. The up and down arrows take you to the next or previous pattern. You can go to any pattern by entering the pattern number.
If you create a song, you'll probably want most or all of its patterns to be in the same meter. You can either set the Pulse, Beat and Measure parameters for each individual pattern accordingly, or you can copy the settings from one pattern to another with the Copy meter option under Edit. A dialog box will ask you for a range of patterns. For example, if you're working on pattern number one and want to copy its parameters to patterns number two to 32, enter two in the left edit field, 32 in the right, and left-click on the Copy button. Entering the number two in both fields copies your pattern to only the second pattern.
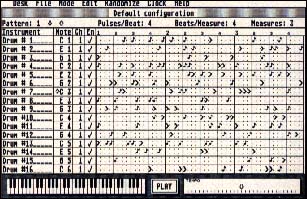 |
| Pattern programming window. |
To copy one drum part to another, click on its name in the Instrument column and drag it up or down to its destination. To delete a drum part, click on its name and drag it up to where the column reads "Instrument ."
If you make a mistake during editing and wish to start over, Backup pattern under the Edit menu copies your current pattern into a buffer. The buffer only holds one pattern at a time.
Instant Rhythm
MIDI Master Drummer automatically generates individual drum parts or entire patterns. The randomizing process for each drum part is controlled by four interactive parameters: note density, accent probability, quantization probability and quantization value. All are expressed as percentages ranging from zero to 99. Note density identifies the probability of notes appearing in any particular pulse. Accent probability defines the likelihood of notes becoming accented. Quantization probability identifies the nearest quantization block to which the note position is likely to shift. Quantization value is the number of pulses in each block of the quantization grid. Set Parameters under the Randomize menu option, lets you edit these values.
Randomization parameters are saved to disk as part of a configuration file. You can create and save several configuration files with multiple settings to produce different rhythmic effects. A song will commonly employ 8- or 16-bar phrases made up of repeating 1- or 2 - bar patterns. To add variation to a repeating pattern, make several copies of it and randomize one or more drum parts within each copy. This is a slick way to generate interesting drum tracks that have a solid bottom groove offset by complex, evolving counter rhythms.
You can also modify a drum part by rotating its notes left or right. Select Shift pulses from the Edit menu. The Select button in the dialog box rotates those parts that have been selected in the Enable column; the All button, obviously, rotates all parts of the pattern. The Left and Right buttons in the next dialog box determine the direction of the shift.
Saved Pattern files are automatically given a .PAT file extension. If you want a pattern to load automatically, name it DEFAULT.PAT when you save it.
Going Through a Phrase
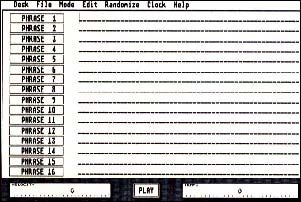
Once you've composed several patterns, it's time to put them into musically useful phrases. Click on Phrase under the Mode menu. The phrase window consists of 16 PHRASE buttons and their associated edit lines. In the phrase edit line, enter the numbers of the patterns you want included in the phrase.
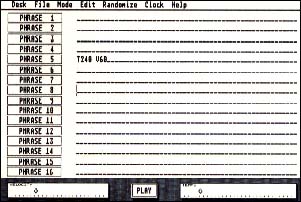
You can include tempo and velocity information within the phrase itself. Identify tempo by the letter T, and enter the tempo in beats per minute. Master Drummer lets you have tempos between one and 240 bpm. You can have velocity (or V) values between one and 99.
If you want a sequence of patterns in a phrase to repeat, enter the phrase numbers, the letter R and the number of repeats. The rest of the phrase plays after the last repeat. You can have only one repeat figure per phrase.
To copy phrases to different edit lines, drag the PHRASE button to another. [Esc] deletes the currently selected phrase; Erase phrases under the Edit menu deletes all phrases.
|
|||
|
Song Mode
The Song option under the Mode menu operates almost identically to the Phrase mode. A song consists of up to 16 parts which are composed of phrases. There are 16 PART buttons and their associated part edit lines in the Song mode window. You can include tempo and velocity data in each part line. If there is a conflict between the tempo or velocity values in a part and one of its phrases, the value of the phrase takes precedence.
You cannot edit phrases and song parts while they're playing, but you can jump from one phrase to another, or from one part to another, by clicking on their respective buttons. This way you can control song form in realtime. If you jump around with the arrow keys, you won't have to wait for any current pattern to end.
Save a song and its phrases in a single disk file with the Save file option under the File menu. Click on the PHRASES/SONG button in the dialog box. A song file is automatically given a .SNG file extension. If you want a particular song file to load automatically, name it DEFAULT.SNG.
To save a Master Drummer song as a standard MIDI file (format 0), select Save file under the File menu and click on the MIDI FILE button in the dialog box. The MIDI file and the currently selected MIDI clock resolution are saved together. MIDI files are automatically given an .MID extension. [Esc] aborts the conversion process at any time.
More Neat Stuff
There are other functions you may wish to explore once you're more familiar with MIDI Master Drummer.
Select Auto-set tempo under the Clock menu. Tap zero (0) twice on the numeric keypad to set the tempo. This sets the value automatically into the edit line in phrase and song modes.
If you wish to create more subtle gradations of dynamics, you can set a new loudness value for accented notes by selecting Accent velocity from the Edit menu. Loudness values range from one to nine. Accented notes with a loudness value between one and eight are represented in the Pattern Grid by the numeral itself, instead of the accent sign (>).
MIDI Master Drummer defaults to an internal clock which acts as a master MIDI clock source to drive other sequencers in sync. External sequencers might require MIDI start, stop and continue messages in order to synchronize properly. Select the MIDI start option under the Clock menu to output these messages. An external clock might require MIDI start, stop, and continue messages in order to sync properly. Select MIDI start under the Clock menu to receive these messages.
 |
| Graduated accent values in a pattern |
MIDI Master Drummer calculates tempo based on the equal duration of pulses (Pulse = pulse mode), or beats (Beat = beat mode). Each mode requires different allocations of MIDI clocks per pulse. To change the number of MIDI clocks per beat, select Resolution under the Clock menu and enter a value between 24 and 120. It's important to remember that in Beat= Beat mode, the number of MIDI clocks per beat must be evenly divisible by the number of pulses per beat in any pattern.
The Metronome option under the Clock menu activates MIDI Master Drummer's audible metronome. To set the number of MIDI clocks per metronome click, select Clocks/click from the Clock menu and enter the appropriate value in the dialog box. Generally, the number of MIDI clocks per metronome click should equal the number of clocks per beat. Desk accessories are deactivated in MIDI Master Drummer. They cause conflicts over the mouse in the program's editing modes. You can reactivate them with the Desk Accessory option under the Edit menu.
David Snow holds degrees in music composition from the Eastman School of Music and Yale University, and is the recipient of numerous commissions, awards, and grants, including those from BMI, ASCAP, and the National Endowment for the Arts.