ON DISK!
SEURAT
by Sterling K. Webb
You may think that you don't need another paint program. Well, take a look at SEURAT! It's an amazing painting, drawing, and all-around pixel-bashing program written in (are you ready?) GFA BASIC 2.0. Even if you have a library full of graphics programs, you need SEURAT. It runs in all resolutions on any ST/Mega with one megabyte of memory or more!
Look out, DEGAS Elite! Move over Cyber Paint! Now there's SEURAT--file SEURAT.ARC on your START disk.
In the beginning, there were DEGAS and NEOchrome 0.6. Then, DEGAS begat DEGAS Elite and NEOchrome 0.6 begat NEOchrome 1.0. And the graphics programs for the ST have kept on coming for three years. And now there's SEURAT, inspired by Georges Pierre Seurat (1859-1891), the French pointillist artist and "Father of the Pixel."
If you've worked with other ST graphics programs, like DEGAS Elite or NEOchrome, you'll find SEURAT's user interface very intuitive. If you haven't, you'll have fun exploring SEURAT's myriad functions. There are even a couple things you haven't seen before.
Getting Started
Because of SEURAT's size and the need for a full manual, it took a bit of doing to fit all of the files on the START disk. Before you read on, please read the sidebar accompanying this article for specific instructions on how to handle the various files. And if you're unfamiliar with un-ARCing programs, be sure to read the general Disk Instructions elsewhere in this issue.
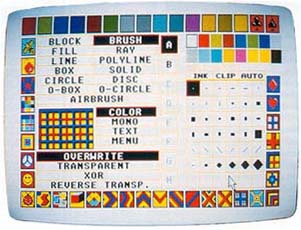
After loading SEURAT, the title screen appears followed by the main menu from which you select the paint functions.
Diving In
Like other graphics programs, SEURAT contains the usual "primitives" - basic shapes and lines. On the left side of the main menu there is a series of function buttons. Looking down the stack of buttons on the left of the main menu, you can see that SEURAT has graphic primitives, like line, polyline (which also produces polygons), circle and disk (which can be ellipses), boxes and solids (square and round-cornered), ray drawing, plus the O-Box and O-Circle functions. There is also an area fill and a multi-function airbrush, that stipples as well as sprays.
The most basic function of a drawing program is free-hand drawing. Looking at the main menu, you'll notice that the BRUSH button is highlighted, and that the one-pixel brush box on the right side of the screen is outlined. That means you're almost ready to start drawing.
First, click on the INK button; this specifies that you want to draw with a solid color rather than a fill pattern. Now, select a color by clicking on one of the palette display boxes just above the INK button. Try a few other colors. Notice that the cursor changes color to remind you of your color selection.
You'll be using right mouse clicks to flip from the main menu to a paint screen and back again. (You can also use the Escape key.) So, let's flip over to an empty paint screen.
On the paint screen, you won't see the arrow cursor anymore, nor the brush you selected. What you will see is a big "register mark," four arms that point to a common center. Press the left mouse button and move the mouse; the brush cursor disappears and the brush paints. Release the left mouse button and the register mark cursor returns.
This "register mark" cursor is large enough to let you position even single pixels with accuracy, and, because it's xor'ed to the screen, it remains visible regardless of the color of the screen beneath it.
Before we flip back to the main menu, press the Help key. The palette display pops up on the paint screen and the arrow cursor reappears, letting you select another color. Click the right mouse button to remove the palette display from the screen and you can then resume drawing.
Assuming that you're satisfied with what you've drawn so far, press the Insert key to "fix" your work to the screen. Now, as an experiment, make one more stroke with the brush, then press the Undo key. SEURAT's Undo function will remove all work done on a screen since the last fix was done with the Insert key. Any time you want to keep your work as you progress through a drawing, simply press the Insert key.
Now, let's flip back to the main menu and look at some of those other functions.
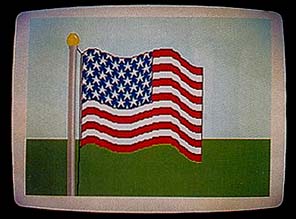 |
| SEURAT lets you make a flag rippling in the breeze more easily than Betsy Ross. The block manipulation function in SEURAT are extensive. |
SEURAT's Functions
Besides the one-pixel brush we've just doodled with, SEURAT has 35 other brushes. All 36 work in both solid (ink) colors and fill patterns. You can also have up to six simultaneous user-defined multi-colored brushes, that can be composed of any or all available colors in the palette. (These can be saved and loaded to/from disk by double-clicking on any brush box.)
Around the boundary of the Menu Screen, you'll see that SEURAT provides 92 fill patterns (46 each in color and monochrome). The selected fill pattern is shown on the left side of the screen just below the functions buttons. Double-click on the COLOR or MONO buttons and the fill editor will appear letting you modify existing fills in a variety of ways or create your own. Fills can also be stored to and loaded from disk from the fill editor.
SEURAT provides up to eight paint screens (the exact number depends on the available memory) and each screen has its own color palette. Paint screens (or just their palettes) can be copied between screens, and a palette editor allows you to alter your palette, swap colors, and load or save palettes.
SEURAT lets you carry out all graphic operations in the four write modes available on the ST overwrite, transparent, xor, or reverse transparent. Block operations can also be performed in reverse transparent, not transparent, and in any of the 16 logical combination modes of GEM, making a total of 21 block copying modes. You can also make a mask from a block and modify and copy it, also in 21 modes.
The text function allows for resizeable type in a variety of text styles in all four write modes and gives you access to the full ST 256-character ASCII set.
You can set and unset GEM's clipping function, creating (invisible) windows which put a boundary on your graphic operations. Updating and undoing the screen is totally in your control, although you can put it on automatic if you want.
Besides merely copying blocks, you can also manipulate them. They can be resized, rotated, skewed, arced to a cylindrical shape, distorted to any contour you draw, or distorted trapezoidally, even folded over or wrapped to hyperbolic sheets, if that's what you want. Blocks can also be stored to and loaded from disk.
SEURAT performs geometrical transformations on entire screens: flipping or inverting them, rotating portions of them, with four-way mirror operations and four scrolling shifts.
SEURAT can remap the color assignment of pixels over an entire screen or only over a portion of a screen, for any number of colors at once.
SEURAT has a specialized Zoomscreen that functions at 4X to 10X (20X in monochrome). The Zoomscreen has a wide variety of specialized features, including the capability to zoom a screen area in two modes: with pixels merged (solid) or separated (mosaic), as well as gridded (like electronic graphpaper) or non-gridded. On the Zoomscreen, you can draw with both right and left mouse buttons in different colors. (Very handy in monochrome!) SEURAT loads images in the original DEGAS (PI?) or NEOCHROME (.NEO) formats and saves them in DEGAS format. You can get a file directory, change drives, delete files, or format disks from within the program. SEURAT allows access to desk accessories and even maintains a logbook of which filenames were loaded into which paint screens or were last copied to other screens, in case you get lost like I do.
Button by Button: What SEURAT Can Do
The command structure of a large and complex program like SEURAT can be a little overwhelming at first, but take heart! The SEURAT.DOC file on your START disk contains a complete user's manual that explains in detail each function of the program and how to use them all. For quick reference, the following is a button-by-button list of SEURAT's many features.
Main Menu, Primary Controls
- Click the right mouse button or press Escape to toggle back and forth between the main menu and the paint screen.
- Click on OVERWRITE, TRANSPARENT, XOR or REVERSE TRANS. buttons to select the write mode.
- Click on function buttons to select paint or text function.
- Click on brush box to select brush shape and brush paint function.
- Click on INK to switch between solid color and fill. (INK On = solid drawing color; INK off = draw using fill pattern)
- Single-click on CLIP to limit paint functions to clipped area.(CLIP On = Draw only in clip area (except block functions); CLIP Off = draw anywhere--no clipping)
- Double-click on CLIP to set dip area. Click on AUTO to "fix" paint screens automatically.(AUTO On = automatic screen fixing when flipping back to main menu)
- Click on paint screen boxes (A through H) to switch paint screens.
- Click on fill patterns in border to select fill.
- Click on COLOR to select color fill patterns (on color monitor).
- Click on MONO to select mono fill patterns.
- Single-click on palette display to select drawing color.
- Double-click on palette display to call palette editor.
- Press Clr/Home to flip to Zoom-screen.
- Move sliders and arrows to shift view window(high and medium resolution only)
- Click on MENU to call pop-up men (See below).
- Double-click on MENU to access desk accessories.
Other Main Menu Commands
- Double-click on BLOCK to use a block as a brush.(select brush first, then double-click on block)
- Double-click on TEXT to call text dialog.
- Double-click on user-defined brush to call brush editor.
- Double-click on current paint screen selector box to copy screen.
- Double-click on current paint screen selector box with Alternate key held down to import palette.
- Double-click on highest paint screen selector box with control key held down to deactivate screen and free memory.
- Double-click on left color palette box to swap colors and reverse the paint screen colors (MONO only).
- Double-click on left color palette box with Alternate key held down to swap colors without reversing the paint screen colors (MONO only).
Pop-up Menu
- Erase erases the currently selected paint screen.
- Zoom flips to Zoomscreen (same as the Clr/Home key).
- File calls the file dialog box.(Load image, Save image, Delete file, Set drive, Format disk)
- Block Menu calls the block manipulation menu.
- Transforms calls the transforms screen.
- Color Map calls the color map dialog box.
- Quit exits SEURAT(Always quit SEURAT by way of the Quit option!)
- Escape changes frame color while mouse is on menu.
Paint Screen Commands
Note: The following applies to all paint functions unless otherwise noted.
- Cursor shape: up arrow shows drawing color, down arrow to define Zoomscreen area, register mark if using a brush, box for text.
- Press Help key to bring up palette display to select color; click right mouse button to resume.
- Press 1 (overwrite), 2 (transparent), 3 (xor), or 4 (reverse trans.) to set write mode.
- Press C or c to show clipping area; click right mouse button to resume.
- Press insert to update ("fix") paint screen.
- Press Undo to undo screen back to last update.
- Press F1 (paint screen A), F2 (paint screen B), etc. to switch paint screens.
- Press Clr/Home to zoom.
- Click right mouse button or press Escape key to flip to main menu and back again.
Block Functions
Note: The mouse cursor will be the block if one has been selected or a full screen crosshair when selecting a block. If you have defined a block, be sure to use the right mouse button rather than the Escape key to flip back to the main menu.
- Press Escape to select new block; define a block by dragging a box around it.
- Click left mouse button to place a block.
- Click left mouse button with Control key held down to place a block mask only.
- Press Undo to remove placed blocks in reverse order in which they were placed.
- Press Backspace to clear block undo stack.
- Press 1, 2, 3, or 4 to select write mode (overwrite, transparent, xor, or reverse transparent).
- In Mode 4, click left mouse button with Alternate key held down to select not transparent mode.
- Press A, B, C, D through P to select GEM Modes 0-15 for next block placement only.
- Press Help key to toggle "floater" overwrite/transparent display (MONO only).
Text Functions
Note: write mode must be selected on menu screen, not with the keyboard. Flip back to main menu with the right mouse button, not the Escape key.
- Input text with keyboard.
- When in text mode over a paint screen, press the cursor up arrow key to call the text dialog.
- When in text mode over a paint screen, press the cursor down arrow key to call full ASCII character set.
- Press Escape to clear a line of text.
- Press Backspace to delete character to left of cursor.
- Click left mouse button to place text and then clear text from cursor.
- Click left mouse button with Alternate key held down to place text without clearing it.
- Press Undo to undo paint screen back to last update.
- Press Insert to "fix" screen.
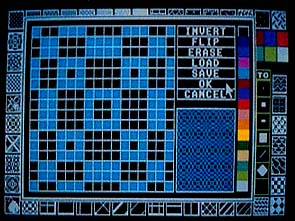 |
| You can load, save and edit blocks, brushes, fills and pal- ettes in SEURAT. This is the fill editor with one of the 92 included fills shown. |
Fill
- Click left button to fill area.
- Click right mouse button or press the Escape key to flip to main menu.
Ray
- Click left mouse button to set center.
- Subsequent left mouse button clicks or drag will draw rays.
- Click the right mouse button to cancel current center; click the left mouse button to set a new center.
- Click right mouse button twice to return to main menu (or press Escape key).
Line
- Click left mouse button to set starting point.
- Click again to set ending point and draw line.
- Click right mouse button to cancel starting point.
- Click right mouse button twice to return to main menu (or press Escape key).
Polyline
- Click left mouse button to set starting point.
- Click again to set additional points.
- Click right mouse button to connect last set point to starting point.
- Click left mouse button with Alternate key held down to set starting point and draw filled figure.
- Click right mouse button twice to return to main menu (or press Escape key).
Box and Solid
Note: A box is an outline figure and a solid is a filled figure.
- Click left mouse button to set starting point.
- Drag box to desired size or click right mouse button to cancel.
- Click left mouse button again to print box or solid figure.
- Click left mouse button while holding down Alternate key to set starting point and draw round-cornered figure.
- Click right mouse button twice to return to main menu (or press Escape key).
Ellipse, Circle and Disk
Note: A circle is an outline figure and a disk is a filled figure.
- Click left mouse button to set starting point.
- Drag circle/box to desired size or click right mouse button to cancel.
- Click left mouse button again to print ellipse, circle or disk.
- Click right mouse button to terminate.
- Click left mouse button while holding down Alternate key to set starting point and repeat figures with same center and shape but different size.
- Click left mouse button while holding down Control key to set starting point and repeat figures with same size and shape but different centers.
- Click right mouse button to terminate. Right mouse-click terminates, signals a repeat operation.
- Press escape to return to main menu.
O-Box and O-Circle
Note: These figures erase the screen area within them as they are drawn.
- Press and hold the left mouse button down and drag to make the figure; release button to fix size.
- Click right mouse button twice to return to main menu (or press Escape key).
Airbrush
- Press and hold left mouse button down to paint with the airbrush.
- Press and hold Control key and left mouse button, then drag mouse to size the airbrush
- Press and hold Alternate key and left mouse button to produce random exchange of pixels within brush area (stipple).
- Click right mouse button twice to return to main menu (or press Escape key).
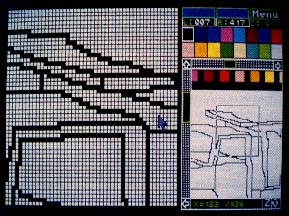 |
| The zoom function is variable from 4X to 20X magnifica- tion with a raft of well-designed features, like using the left mouse button with one color and the right for a second. |
Zoomscreen Commands
Note: The cursor arrow shows the drawing color or takes the shape of a crosshair when the cursor is off the zoom display.
- Draw with either left or right mouse buttons.
- Click the left mouse button on the palette display to set left mouse button color.
- Click the right mouse button on the palette display to set right mouse color.
- Hold the Alternate key down while drawing with the left mouse button to change left mouse color pixels to right mouse color.
- Hold the Alternate key down while drawing with the right mouse button to change right mouse color pixels to left mouse color.
- Press Undo to restore work area.
- Press Insert to update restore to current work area.
- Press Clr/Home to return to main menu.
- Press Escape to flip to the set-work screen to set new work area.
- Press F1 to toggle grid on and off.
- Press F2 when the cursor is a register mark to read absolute coordinates; click the right mouse button to resume.
- Press F3 to toggle 20 X 20 Mode On and Off. (20 x 20 Mode allows only 20 x 20-pixel work area modular to screen origin.)
- Press F4 to flood work area with left mouse color (Also, by double-clicking on any color in palette display.)
- Press F5 to call the palette editor.
- Press F6 to call the dialog box to set mouse parameters for flicker and double click.
- Press F7 to view paint screen; press right mouse button or Escape key to return to Zoomscreen. (Also, you can click the right mouse button in the view window to view the paint screen.)
- Press F9 to call the file function dialog box.
- Press the Shift and F1 keys to set grid color with the left mouse button; click the right mouse button to resume.
- Press the Shift and F4 keys to call the screen transforms routines.
- Press the Shift and F5 keys to erase the entire paint screen.
- Press the Shift and F8 keys to switch to another paint screen.
- Press the Shift and F9 keys to call the color map routines.
- Press the F or f key (in low resolution only) to show free memory.
- Press the Z or z key (in low resolution only) to show zoom magnification ratio.
- Click on MENU button to call Zoom screen pop-up menu.
Zoomscreen View Window Commands
- Drag on the view window sliders to shift to new work area to be zoomed.
- Click on the corner arrows to shift new work area one pixel at a time.
- Press the cursor up arrow key to enlarge new work area to be zoomed.
- Press the cursor down arrow key to shrink new work area to be zoomed.
- Click on Z-Box to perform mosaic zoom.
- Click on Z-Box with Alternate key pressed to perform solid zoom.
- (Note: You must click on highlighted Z-Box to perform a zoom.)
Set Work Screen Commands
- Click the left mouse button key to select minimum work area.
- Drag the mouse with the left mouse button held down to resize workarea selected.
- Click or drag with right mouse button to position work area selector (Both operations must be performed the first time on the set work screen; subsequently only the right mouse button operations are necessary, unless you are resizing the work area.)
- Press Escape to return to the Zoomscreen.
Color or Mono Fill Editor and Brush Editor
- Click left mouse button in palette display to select color.
- Use the left mouse button to draw in the selected color.
- Use the right mouse button to erase (draw in color 0).
- Press the cursor arrow keys to shift the fill pattern one pixel.
- Click on FLIP to flip pattern left for-right.
- Click on INVERT to turn pattern upside-down.
- Click on LOAD or SAVE to load or save patterns to currently selected disk drive.
- Double-click on a color to change all pixels of the selected color to that color.
Palette Editor
Note: the cursor will have the shape of an artist's palette.
- Click on a color box to select color.
- Click on the RGB or CMY buttons to select the Red-Green-Blue or Cyan-Magenta-Yellow color systems.
- Click on the color intensity numbers to set colors.
- Click on VIEW to show paint screen; right-click to return.
- Click on LOAD and SAVE to load and save palettes from and to the Disk.
- Click on RESTORE to restore the current palette to the one that existed when you entered the palette editor.
- Double-click on a non-selected color to exchange it with the selected color.
- Click right mouse button twice to return to main menu (or press Escape key).
File Function Dialog
(Note: the cursor will have the shape of a floppy disk)
- Load Image File: An image must be assigned to a paint screen in assignment dialog after selection of the file.
- Any Image File named PICTURE.Pl? is automatically loaded when SEURAT loads.
- Save Image File saves currently selected paint screen in DEGAS format (.P1?).
- Delete Any File deletes any file you choose on the selected drive.
- Set Drive selects the drive.
- Format Disk formats a disk in Drive A only.
Block Menu
The options for the manipulation of blocks are: a) Rotate Block, b) Resize Block, c) Vertical Freeform Distort, d) Vertical Arc Distort, e) Vertical Skew Distort, f) Vertical Trapezoidal Distort, g) Horizontal Freeform Distort, h) Horizontal Arc Distort, i) Horizontal Skew Distort, j) Horizontal Trapezoidal Distort, k) All-Way Distort, l) Save Block, and m) Load Block.
- Click the left mouse button to set the parameters (see below).
- Click with the right mouse button to commence an operation.
- After an operation, left-click to repeat the operation.
- Click the right mouse button to confirm operation and pull the block.
- Press the Undo key to abort and exit the routine.
- To rotate a block, click on the ROTATION selector box arrows.
- To resize a block: grab lower-right hand corner of block with left mouse button, drag it to a new position, and release the left button.
- Press and hold the Alternate key while resizing a block to keep the same proportions as original.
- Press and hold the Control key while resizing a block to keep the same scale as the last resize.
- To perform a freeform manipulation, drag the mouse while holding the left mouse button down. Be careful not to drag the orientation line into the block.
- To map a block to an arc, drag the mouse until the curve between the points is the desired shape and then click the left mouse button.
- To skew a block, move the mouse until the orientation line is as you desire, then click the left mouse button.
- To perform a trapezoidal distort, grab and drag the corners of the orientation box with the left mouse button. Press the Alternate key and the right mouse button to fill in holes.
- To perform a distort, grab and drag the four corners of the orientation box. Press the Alternate key and the right mouse button to fill in holes.
- Click on LOAD or SAVE to load a block from or save a block to disk.
Screen Transforms
- Click the right mouse button to toggle on and off the menu bar.
- When highlighted, chain is on; each transform is performed on the result of previous operation. When chain is off, each operation is performed on original screen. You can abort a series of chained operations by toggling chain off and on again.
- Click on FLIP to reverse the screen from left to right.
- Click on INVERT to turn the screen upside-down.
- To rotate a screen or portion 90 degrees clockwise (or counter-clockwise), use the full-screen crosshair cursor to locate the top-left corner, then drag the mouse, holding the left mouse button down, to select an area. Holding the Alternate key down when selecting from the menu will prevent correction for aspect ratio.
- Use the single-line cursor to select the reflection point for all mirror operations
- Press the Escape key to perform mirror operations around the mid-point of the screen.
- Use the cursor arrow keys to shift the screen in all scrolling operations. You may set the scroll step from one to eight pixels.
- You may leave the screen transforms routines by selecting EXIT and then choosing whether to return with the transformed screen ("New Image') or abort all changes ("Old Image").
Color Map
Click on SOURCE ROW color, then on DESTINATION ROW color to remap for any or all colors.
The RESET Button cancels and redraws the color map dialog box.
The WHOLE SCREEN button remaps the entire paint screen.
You may select an area to re-map by clicking and holding the left mouse button while dragging a box around the desired area.
SELECT AREA may be repeated with same settings.
Low Memory Warning
Note: A musical noise will alert you when the free memory is below 64 kbytes. To recover memory, clear the block undo stack and/or deactivate the highest paint screen.
Though I wrote SEURAT on a one drive 1040ST (never again!), running it on a Mega 4 shows that it needs about 1.2 to 1.4 megabytes of elbow-room with eight screens operational.
The End!
Whew! That should be sufficient to get you started experimenting with SEURAT's many features. Consult SEURAT.DOC for a full explanation of how each feature functions.
Sterling Webb lives and works in Bunker Hill, Illinois, a town he describes as so small that "the Rotary Club's sign 1 says 'Welcome to Bunker Hill' on both sides!" This is his first program for START.
|