ON DISK!
TALKIES
by Jim Kent
START presents a full-blown editing suite for your Cyber Paint animated masterpieces! The Audio-Video Sequencer by graphics guru Jim Kent is more than just a dubbing program--it's a full-fledged editing system that lets you control the speed and timing of up to 256 tracks of low-res color video and sound information files.
Turn your ST into a mixing studio with AVS.ARC on your START disk!
Many people enjoy creating their own computer animations with Cyber Paint, sold by The Catalog. (I wrote Cyber Paint as an extension of the "Flicker" program, published in the Summer 1987 START.) With Cyber Paint you can create your own ST cartoons or do post-production touch-ups on CAD-3D animations.
But even Cyber Paint needs more bells and whistles. For instance, what would cartoons be without crashes and bangs as coyotes fall off cliffs and refrigerators fall on rabbits' heads? What would science fiction films be without the pulse of laser beams and the roar of rockets as spaceships swoop over alien planets?
Yep--what Cyber Paint needs is sound. You need the ability to add music and sound effects to your animations.
Well, now you have it.
Enter AVS!
With the Audio-Video Sequencer (AVS) you can add digitized sound tracks to your Cyber animated sequences. Not only can you have bells and whistles, you can have music, voices and even things-that-go-bump-in-the-night. Anything you can record on tape can be played back with a Cyber Paint animation file. Your only constraint is the memory available in your ST--and you'll find that sound tracks generally take up considerably less RAM than video tracks.
There is a catch: AVS is just an editing program. It won't create video or sound; it just organizes tracks and mixes them together. You can find many video (.SEQ) and sound (.SPL) files on CompuServe, GEnie, at users groups and elsewhere, but to create your own you'll need Cyber Paint for video and MichTron's ST Replay for sound. There are also a number of.SND files available on the same online services; these are .SPL files with a minor modification. If you change their filename extenders to .SPL, AVS will have no trouble loading and playing them. You can also play Aegis Animator ST .STR files, but they must first be converted to .SEQ files with Cyber Paint.
Getting Started
Copy the files AVS.ARC and ARCX.TTP onto a blank, formatted disk and un-ARC the file following the Disk Instructions elsewhere in this issue. Because Audio-Video Sequencer works with low resolution animation sequences only, it requires a color monitor. Double-click on AVS.PRG in either low or medium resolution. A medium-resolution screen will appear with a menu bar at the top and fourteen track lines below. This is AVS's Edit Decision List screen.
To get some idea of the power of AVS, load the demo that came on your START disk (in AVSDEMO.ARC) by clicking on Load under the AVS Menu and selecting DEMO.AVS. Be sure that the three files, LASER.SPL, ENGINE.SPL and LASER.SEQ are on the disk in your A: drive with AVS.PRG. After it's finished loading, you'll see that there are entries in the first three tracks. In the Filename space on the left, you'll see the names of all three component files. The sound tracks, LASER.SPL and ENGINE.SPL, are shown in red and the video track, LASER.SEQ in green. The three associated tracks together are called a scene. Two or more scenes make a movie, (even though it's video). Press the P key to play (or select Play Once from the AVS Menu).
The animated LASER demo was created by Associate Editor Jon A. Bell and began as DEGAS artwork. The ship is the "Narcissus" shuttlecraft from the movies ALIEN and ALIENS; the deepspace background was created with Tom Hudson's Anti-aliaser desk accessory. (Editor's Note: Watch Cyber Corner in upcoming issues of START for Jon Bell's tips on creating the effects in the LASER demo. Also, more demos are available on Antic/START Online in CompuServe; log onto CompuServe and type GO ANTIC.)
Putting It Together
Let's take a look at DEMO.AVS; it should still be loaded into AVS. On the left side of each track are the filenames for all tracks. The next columns show the StartTime and StopTime points for each track in ticks (a tick is one-sixtieth of a second). The Track Bars next to the StopTime column represent visually where each track occurs in your scene. You can rearrange audio and video tracks by pointing and left-clicking on a Track Bar and dragging it left or right, or by left-clicking once where you want the track to start. You'll see the StartTime and StopTime numbers change as you move a track.
Although there are only 14 tracks visible on a single page of the Edit Decision List, there are actually 256 tracks available on twelve pages. To change to a different page or to scroll the Edit Decision List window up or down, use the movement options on the Window Menu.
You may find that the sound tracks in DEMO.AVS play too fast or too slowly (Unfortunately, .SPL files don't save any speed information.) You can adjust their speed from the Examine Track screen. To access the Examine Track screen, right-click in the Track Bar area for that track. (Don't worry if you don't remember all the places to right and left-click; these are shortcuts which you'll come to appreciate later. All of the functions are available on the dropdown menus and most also have mnemonic keyboard equivalents as well. The Examine Track screen, for example, is accessed by clicking on Examine on the Tracks Menu or by pressing the X key--eXamine-- while the mouse cursor is over the Track Bar area.)
The Examine Track screen has two sliders: the top one controls the speed (1 is slowest) and the bottom one controls how many times to loop (repeat) the track. To preview a sound track (prehear it?) while in the Examine Track screen, left-click anywhere on the heading bar of the Examine Track screen.
You can Examine a video track as well. Just call up the Examine Track screen in the same manner as for a sound track. You can adjust the playback speed and the looping of a video track just as with a sound track--and preview it by left-clicking on the heading bar.
Once you have the sound tracks timed correctly, you just need to set their StartTimes (or StopTimes) so that they will synchronize with the action on the video tracks. Slide the Track Bars to where you think they belong and select Play Once from the AVS Menu (or press P). To make fine timing adjustments, you can click on the StartTime and StopTime boxes for that track. A left-click on the StartTime box will move the StartTime one tick earlier; a right-click there will move it ten ticks earlier. Similarly, a left-click on the StopTime box will move the track one tick later and a right-click will move it ten ticks later.
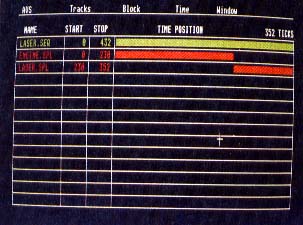 |
| START's AudioVideo Sequencer. Although there are only 14 tracks visible on a single page of the Edit Decision List, there are actually 256 tracks available on twelve pages. |
To save your work press S or select Save from the AVS Menu. Type ALIENZAP.AVS in the file selector (or whatever name you choose; the .AVS extender is for convenience only). The Audio-Video Sequencer saves a short ASCII file with one line for each track on the Edit Decision List, with the full pathname for each .SEQ and .SPL file including the disk and folder from which it loaded the track. However, when loading an AVS file, AVS will look in the current folder as well as that specified in the file. Thus you can create an AVS movie on your A: drive and play it back on your B: drive, as long as all the tracks are together in the same folder. If you are creating a movie to show on another computer, be sure that all of the component tracks are in the same folder as the .AVS file when you load and save the tracks.
AVS And The Basic Space Epic Opening Sequence
Now that you've played with the demo, let's try a Mega-sized project. (Unfortunately, all of this just wouldn't fit on your START disk, so you're on your own here!) Select Clear All from the AVS Menu to clear the Edit Decision List and buffer. Then, to keep perspective on the overall movie, select Duration from the Time Menu and move the seconds slider to 30. This sets your overall movie length to 30 seconds. Let's begin with your Basic Space Epic Opening Sequence. The Aliens are invading! You'll need a spaceship zooming across a starfield shooting a blue force ray (CAD-3D animation with Cyber Paint opticals), a closeup of an oozing, quivering green alien with tentacles, a few animations of explosions and a rotating earth (try CLRGLOBE.SEQ on CompuServe). For sounds, let's use some laser sounds digitized from your favorite science fiction thriller, some digitized explosions from the same source, maybe an alien voice delivering an invitation to surrender and, of course, lots of cackles and mush sounds. And don't forget the Wicked Witch of the West's cackle from The Wizard of Oz (which is actually available on GEnie) and the sound of wet oatmeal dropping three feet onto a linoleum floor. All in all, the perfect ingredients for our space thriller!
Perhaps you want to open with six seconds of an animation called, say, SHIP.SEQ showing a clunky spaceship wobbling through space and then cut to the laser-firing alien ship. Load all of your component files for the SHIP scene: SHIP.SEQ and perhaps a low whoosh (WHOOSH.SPL) followed by a clank synchronized with the wobble (CLANK.SPL). Left-click in the first Filename space and select SHIP.SEQ. Loading a sound track is just as easy--just right-click in the Filename space where you want the sound file to go.
If your original SHIP.SEQ animation is half as long as you want, right-click over the SHIP.SEQ Track Bar and set it for two loops in the Examine Track screen. When you return to the Edit Decision List, the SHIP.SEQ Track Bar will be twice as wide and the track duration (StopTime--StartTime) will be twice as long.
Adjust the whoosh and clank sound tracks to be in synch with the first loop of SHIP.SEQ. This is largely a trial-and-error process. Set the .SPL Track Bars where you think they should go and Play Once. If it's right, go on to the next step; if not, re-adjust the timing and Play Once again. Do this until you have it to your satisfaction.
Now select capture from the Block menu, click on the WHOOSH.SPL track and then on the CLANK.SPL track to set the range of the block to capture. AVS will store a copy of this block in its capture buffer. Select Paste from the Block Menu and left-click on the first empty track below CLANK.SPL--about where the second loop of SHIP.SEQ starts (about halfway down the Track Bar). Voila! Your first scene is completed.
Now you need to see the alien ship firing its lasers; load the Demo we were working on earlier, by selecting Load Block from the Block Menu and choosing ALIENZAP.AVS (or whatever you called it). Then paste it into the first open track by selecting Paste from the Block Menu (or by pressing the + key) and left-clicking in the Track Bar area of the next open track. Check how it fits with your earlier scene by pressing P for Play Once.
A quick cut back to the wobble ship followed by a few explosions should tell the tale nicely. Capture the first three tracks (SHIP.SEQ, WHOOSH.SPL and CLANK.SPL) into the Block buffer and then Paste them into the first open track. Once again, check out the overall effect and adjust the track positions and timing where necessary. For example, you may not want to loop the second ship scene twice; once may be enough.
Ah, it's time for some explosions! Just as you did with the other tracks, left-click in the Filename area to load video tracks and right-click in the same area to load sound tracks. A couple of loops of the spinning globe in the silence of space should be good for another few seconds of animation and make a strong contrast to the explosions. Then perhaps make a quick cut to the cackling alien and then cut back to the spinning earth with your alien ultimatum .SPL as a voiceover. If you position the second globe track to begin before the end of the cackling alien scene, AVS will cut to the globe before the alien is quite finished cackling. This technique is called an audio bridge, since it bridges between the scenes.
I leave the conclusion of your space epic--and the mush sound--to you, but I think you'll find the Audio-Video Sequencer to be a flexible editing tool for the job.
How It's Done
I used the sound playback assembly language source code that comes with MichTron's ST Replay as a starting point. It sets a timer to interrupt the processor at the sampling rate. The interrupt routine simply takes the next byte of the sample and uses it as an index into a table to drive the volume registers of the Yamaha sound chip. The 68000 is free to do other tasks when not processing the interrupt.
To keep the interrupt routine as fast as possible I devote half of the 68000 registers to the interrupt and use the other half to play back the animation. With a little massaging of the sound samples and the video updates to get them to take less real-time processing, I've managed to get 30Khz sound playing over 60Hz video. Large video updates are slower, but even in the worst case 20Khz sound over 20Hz video is possible.
The hardest part of this was synchronizing the video to the monitor. The sound shuts off the vertical blank interrupt, but palette changes need to be done during that time. Fortunately the ST has a video beam position register. The code to check this (in LISTEN.ASM) while doing video delta updates is twisted, but it works (though it'd be nice if it processed keyboard events too). There's a "pseudo-vblank" routine that is called whenever the beam position register points off-screen that keeps a clock, updates the palette and decides when to start and stop sound or video tracks. Well, that's about it. Have fun with your talkies! (And we'd like to see--and hear--your best work, so send it in!)
Jim Kent studied mathematics and art at UC Santa Cruz before he joined Island Graphics in 1983. There he worked on a Micro-lllustrator on the Tandy Color Computer and parts of several paint systems including TARGA Tips and Aegis Images. While at Island, he authored Aegis Animator on the Amiga. In 1986 Jim left Island to form Dancing Flame, which has produced Animator ST for Aegis, Flicker for START and Cyber Paint for the Catalog.
Products Mentioned
The Anti-aliaser, $19.95 plus $2 shipping. Tom Hudson, P.O. Box 3374, Shawnee-Mission, KS 66203.
Cyber Paint Ver. 2.0, $79.95. Antic Software, 544 Second St., San Francisco, CA 94107, (415) 957-0886.
DEGAS Elite, $49 95. Electronic Arts, 1820 Gateway drive, San Mateo, CA 94404, (415) 571-7171.
ST Replay Ver 3.0, $99.95. 2 Bits Software, distributed by MichTron, 576 S Telegraph, Pontiac, MI 48053, (313) 334-5700.
|