Mac and PC On the ST
Setting Up pc-ditto
by Jim Pierson-Perry
START Contributing Editor
Welcome back to our column on running Macintosh and PC software on the ST. This issue well discuss how to set up Avant Garde System's IBM emulator program, pc-ditto. For this month's column, keep in mind that I'm basing my comments on version 3.01 of pcditto, the latest major revision as of press time. If you have a later version be sure to read any included document files to cover any significant changes.
In order to make optimal use of pc-ditto, you must tailor it to fit your particular system. There are three reasons for this: to meet the system requirements of certain software (e.g. it may expect a mouse driver or boot from a 5 1/2 inch disk drive), make use of additional hardware (hard disk) and to cater to user aesthetics (color schemes, key repeat rate). Most of these are taken care of by the PC_DMENU.PRG program, included with pc-ditto.
Environmental Control
You can set and change the pc-ditto customizing options at any time by running PC_DMENU.PRG. The program runs under GEM, not DOS, and is fully menu-driven with various context-sensitive help messages. (I'll refer in this column to "DOS" to include Microsoft MS-DOS, IBM PC-DOS and the various DOS clones; where a specific version is required, I will specify it.) The options are grouped under sub-menus for disk, video, keyboard, colors and mouse--just click on the desired sub-menu button and all the related options are displayed (see Figure 1). After making any changes, either click on the Save Changes or Cancel Changes button to return to the main menu.
The Disk options determine the startup DOS disk drive, type of external drive, if a hard disk will be used and if non-GEM partitions will be accessed. You would typically want the DOS startup disk (A:) to be the ST drive A (first drive option). Some IBM programs, however, are copy protected on 5 1/2-inch floppy disks. In that case, an extemal 5 1/2-inch drive connected to the ST must act as the startup disk (second drive option). If you have a second floppy disk drive you must also specify the format (3 1/2-inch or 5 1/2-inch) for pc-ditto to recognize it. (I'll discuss hard drives in a moment. For now, note that if you're going to use a hard drive, set the Hard Drive Attached option to Yes.) A final option lets you set if non-GEM hard drive partitions can be read. For normal PC emulation, these special formats (such as Magic Sac) should be ignored.
The Video options select the IBM monitor type to emulate and compensate for Atari ST monitors not having the hardware for certain IBM monochrome monitor special effects. IBM programs may require a specific monitor type in order to run properly (consult the respective manual). All Atari monitors support both IBM color and monochrome displays through pc-ditto (color display on an Atari monochrome screen is done by shading). You can use reverse video on Atari monitors to represent text highlighting, blinking, underlining or any combination of the three.
The Keyboard options let you adjust key response to match your typing. Controls are provided for the number of repeat key strokes sent per second and the delay in seconds before they start after a key is held down. You can use the Colors options to change the display palette to match your taste, and can select 16 hues via RGB controls, similar to the GEM Control Panel. From these, the four colors used in 80-column text mode and two colors used in the medium/high resolution mode are selected.
The final sub-menu describes the Mouse options. Many, but not all, PC programs are able to use a mouse as a control device. The pc-ditto program supports two different implementations: a serial (compatible with the Microsoft mouse) and a generic mode. To use the Atari mouse as a Microsoft mouse (assuming the PC program you want to run supports it), you must select the serial option in this menu and run a driver program (PC_DMOUS.COM, supplied with pc-ditto) under MS-DOS prior to running the application. In generic mode, the mouse can send a send a series of arrow keystrokes corresponding to position changes and each button can be assigned to any of the PC keyboard keys (e.g. F1-F10, Page Down, Esc, etc.).
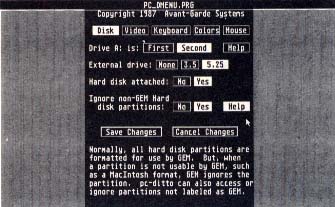 |
The PC_DMENU program runs under GEM, not DOS, and is fully menu-driven with context-sensitive help messages. |
Hard Drive Help
Installing a hard drive to work with pc-ditto isn't difficult. The only drawback is that you must use DOS 3.0 or higher. Earlier versions did not work with a hard drive and attempts to do so can corrupt your files. At this time, only IBM PC-DOS--no clones--can be installed to autoboot from a hard drive.
DOS is picky about how hard drives are set up. It expects that there will be one partition per hard drive. As most Atari hard drives use multiple partitions, a special driver comes with pc-ditto for accessing partitions beyond C:. The partition size is also regulated: partitions must be larger than 4.2 megabytes and less than 32 megabytes.
Since DOS can read standard GEM formatting, there's no need to reformat a hard drive for use with pc-ditto. The exception to that is when installing DOS to autoboot from partition C:. You can install DOS to autoboot from partition C:, even if that's also the GEM startup disk. Atari and IBM files can peacefully co-exist in the same partitions. The first step in bringing up a hard drive is to run the PC_DMENU.PRG customization program. Click on the Disk sub-menu button and select Yes next to the Hard Drive Attached option. Unless you have a very good reason, leave the Ignore Non-GEM Hard Drive Partitions option set to Yes. Save the change and exit back to the Desktop. Next, check your version of DOS. If it's earlier than 3.0, buy yourself a copy of the current DOS 3.3--the early versions do not support hard drives and you risk corrupting your files if you try.
Unless your entire hard drive is configured as partition C:, you need to install the PC_DHD.SYS device handler. To do this, boot pc-ditto and go into DOS, then type the command COPY CON+CONFIG.SYS and press Return. Type DEVICE=PC_DHD.SYS (careful, spelling does count!). then press the Return key, followed by the F6 function key, then press Return again. Reboot pc-ditto to activate the revised CONFIG.SYS file and your hard drive is ready for use.
You may elect to streamline operations and have DOS autoboot from the hard drive (partition C: only!). First, back up any existing programs in C: as the DOS installation process will clear the partition. Issue the FORMAT C:/S command from DOS then return to GEM and restore the original C: files. Depending on your particular hard drive, you may need to designate it for autobooting--just as if for GEM. For example, my Supra hard drive uses a utility program to do this. The next time you load pc-ditto, it will automatically boot from partition C:.
After you've used pc-ditto with a hard drive, you may wish to explore changing the Buffer specification in the DOS CONFIG.SYS file to improve performance speed. Appropriate values depend on your version of DOS and available memory. As a starting point, try values of 15 to 25 for a 520 ST and values of 25 to 35 for a 1040 ST.
Hello, I Must Be Going
Closing this month on a personal note, this will be my last installment for this column. Starting next issue, David Plotkin will be taking over and I will move over to start a new column called "The 3 ST/MIDI Connection." Dave is well-known throughout the Atari community and will be bringing his wealth of experience and new ideas to keep this column pushing ahead. Good luck to all of you with pc-ditto!
Jim Pierson-Perry is a research chemist and semi-projessional musician who lives in Elkton, Maryland.
Products Mentioned
pc-ditto, $89.95. Avant Garde Systems, 381 San Pablo Drive, Jacksonville, FL 32225, (904) 221-2904.