PROGRAMMING IN BASIC
Resourceful GFA BASIC Part Two
By John L. Hutchinson
You'll find the sample resource file in the file DIALOG.ARC on your START disk.
Last issue (START, Summer 1988) we examined how resource files are structured. Now let's get some practice using a resource construction set utility to actually create a working dialog box. All resource editors use the same basic user interface, because they are used to create the same type of file. I used the Kuma K-Resource utility to create the simple dialog box shown in Figure 1, but due to their similarities, users of other RCS utilities should have little trouble following the process. I've also included the finished resource file on your START disk for those who want to examine the finished product.
From either a medium or high resolution Desktop, execute K-Resource by double-clicking on the file named NRSC.PRG. Once the resource editor Desktop appears, click on File under the New menu. A small box will appear with two icons labeled Resource and Folder. Drag the Resource icon onto the Desktop and release the left mouse button. A small dialog box will appear asking you to provide a name for your new resource file. For this example, enter the name DEMO and press Return.
GETTING TO THE ROOT OF THE MATTER
Now that you've created the empty resource file, you need to add a tree which will represent the form of your dialog box. (Editor's note: for a detailed explanation of resource file structure, read last issue's GFA BASIC column in the Summer 1988 issue of START). Double-click on the resource icon to open its window, then move the mouse pointer back to the New drop-down menu and select Tree. A box will open consisting of several tree icons; these are menu, form, alert, string and image.
Since we want to create a dialog box, use the mouse to select the tree icon labeled Form and drag it into the DEMO resource window. A small dialog box will now open, asking you to give the tree a name. For our example, enter the name "BOX0." Since this is the first tree in the DEMO resource file, it is tree number 0 in your GFA BASIC program.
Once you have named your tree icon, click on the button labeled EDIT. Now another window, entitled BOX0, should appear with an outlined box automatically placed in the window. This box object represents the initial outer form of the dialog box you will create. Since it is the first object in the BOX0 tree, it becomes object number 0 and is known as the root object. You can move and resize the box shape to suit your preferences. For now, simply size the box to approximate the shape of the dialog box shown in Figure 1, as you can always make final adjustments later. You can also resize and move the BOX0 window with the standard corner window gadgets to make viewing it easier.
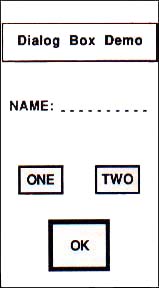 |
| Figure 1: An example dialog box. As you become comfortable with the resource editor your programs will look more and more professional. |
OBJECT TYPES
Now we'll add the next object, the "Dialog Box Demo" text. To keep things simple for our GFA BASIC program, we want to add additional objects to our tree from top to bottom, left to right, ending with the exit ("OK") button. Click on Objects under the New menu and a toolbox will appear with icons representing all the different generic objects which may be used in a dialog box. I say generic here because some of these objects have multiple attributes which change their appearance.
For now, grab the text object icon and drag it into its approximate position in your dialog box's outline. Note that K-Resource will not allow you to add objects outside the boundaries of the root object itself. Once you have the text icon roughly positioned, double-click on it to open the K-Resource Text Edit Box shown in Figure 2. (Alternately, you can edit an object by clicking on it once and then clicking on Edit.) The Text Edit Box shows the optional attributes and states which may be applied to your box objects. For now, simply enter "Dialog Box Demo" on the text input line, and select BOXTEXT and C (for center) justification. When you are finished editing press Return.
As your dialog box reappears, note that the text icon has been replaced with the boxed-in text, "Dialog Box Demo." Size and center your new "Dialog Box Demo" text object to approximate the appearance of its counterpart in the example shown in Figure 1. This boxed-in text now becomes object number 1 in the BOX0 tree.
Now let's add an editable text object to our dialog box. Select the New pull down menu and click on Object again. This time, drag the Edit:____ icon into position just below the "Dialog Box Demo" boxed-text object. Double-click on the edit icon to bring up the KResource Text Edit Box again. From the options, select Editable and FTEXT. In the text field, use the backspace or Escape key to clear the field and then enter ten underscore characters. Move to the template field and enter "NAME: " Then, while holding down the Alternate key, enter 10 lowercase a's ("aaaaaaaaaa"). Due to a minor bug in AES, you must have at least as many characters in the text field as you have in the template field. These "a's" indicate that you'll be permitted to type in only upper and lowercase letters or spaces in this field. This is appropriate since we will be wanting a name to be entered here, but other applications may require the user to enter other characters. Fortunately, there are several other templates available by holding down the ALT key while entering the validation characters shown below:
X: All characters allowed.
9: Only digits 0-9 allowed.
A: Only uppercase letters A-Z or spaces allowed.
a: Only upper and lowercase letters or spaces allowed.
N: Only digits 0-9 and uppercase letters A-Z or spaces allowed.
n: Only digits 0-9 and upper and lowercase letters A-Z or spaces allowed.
F: All valid TOS filename characters and "? * :" allowed.
P: All valid TOS filename characters and "\:" allowed.
p: All valid TOS filename characters and "\:?*" allowed.
Click on OK to return to your draft dialog box and fine-tune the position of the editable text object as needed. This editable text has now become object number 2 in the BOX0 tree.
BUTTON, BUTTON, WHO'S GOT THE BUTTON?
Now you'll add a radio button, object number 3, by choosing and dragging a button object into place. Radio buttons are used to limit input; if the user selects one of them, all other radio buttons in the same group become deselected. After positioning it in your dialog box, double-click on it to bring up the KResource Button Edit Box. It is similar to the Text Edit Box, but with fewer options. On the text line, type in "ONE" and select the parameters of "Selectable" and "Radio Butn." Retum to your dialog box by selecting OK (or by pressing Return), then size and shape the button as needed.
In a similar fashion, you might add a second radio button to the right of the first one. Or, you may want to try the special copy function of K-Resource. While pointing to the ONE radio button, hold down the Shift key or right mouse button and drag a copy of button ONE to the position for the second button. Now open the Button Edit Box by double-clicking on the copied radio button and change the ONE text to TWO. Click on OK and you have completed the second radio button, object number 4.
Finally, add object number 5 in our BOX0 dialog box tree by dragging another button object into position near the bottom of the box. In the KResource Button Edit Box, label it "OK" on the text line, and give it the Selectable, Default and Exit parameters. (A dialog box must always have at least one exit button.) Upon exiting the Edit Box, you can fine-tune the position of the objects in your dialog box as desired.
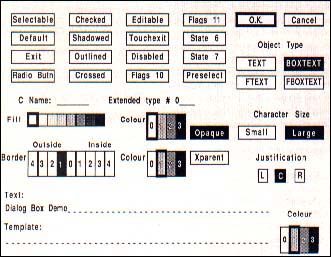 |
| Figure 2: This K-Resource text edit box is similar to those found on other RCS utilities. |
Make sure you don't change their top to bottom, left to right order, so you can easily identify the objects' index numbers later on in your GFA BASIC program.
While K-Resource does provide the ability to re-sort objects, a little prior planning in the construction of custom dialog boxes will save you time in the long run. I also recommend you keep a written log of your trees and their objects, as well as their index numbers.
TESTING THE DIALOG BOX
Once your dialog box looks like our example in Figure 1, you are ready to test it. Close the BOX0 window, then highlight the BOX0 icon by clicking on it once. Choose the Test option and your dialog box should appear, centered on your screen, exactly the way it will look in your GFA BASIC application. Clear the editable field by pressing the Escape key, then enter some text from the keyboard. Note that because of the "aaaaaaaaaa" template, you are restricted to a maximum of ten upper and lowercase letters or spaces. Also experiment by trying out the two radio buttons. When finished, click on your OK exit button or simply press Return.
When you select an exit object in KResource's test mode, a small alert box pops up which tells you the exit object's number (in this case it should be 5). You then have the opportunity to exit the test mode or continue. Go ahead and select Exit to close your dialog box. At this point you may re-edit your box to make any corrections, change colors, add fill patterns, etc.
When you are satisfied that your dialog box looks and performs as intended, close the DEMO resource file window and open a disk drive window by double-clicking on a disk drive icon. Drag the DEMO resource file icon to the disk drive window and it will be saved to that disk as DEMO.RSC.
If you wish to load a completed version of the sample dialog box into your Resource editor to study, it is on your START disk under the name DIALOG.ARC. Un-ARC this file, following the instructions found elsewhere in this issue. Then run K-Resource and load the file by double-clicking on the disk with the demo file and then dragging DEMO.RSC onto the Desktop.
Voila! You have just created your first resource file! It wasn't really that hard, was it?
Major John L. Hutchinson is an Operations Research/Systems Analyst for the Army, an Atari user since 1975 and cofounder of the Fort Leavenworth Atari Group.PRODUCTS MENTIONED
K-Resource, $39.95. Kuma Computers Ltd., Pangbourne, Berkshire, England 07357-4335
GFA BASIC Ver. 2.0, $79.95. MichTron, 576 Telegraph, Pontiac, MI 48503, (313) 334-5700.