THE CYBER CORNER
Fear Of Splining
By Andrew Reese
START Editor
Don't be afraidŃyou'll find SPLINE.ARC on your START disk!
Welcome back! This is our second column designed to help you with the fine points of using the Cyber Studio family of graphics programs. In this issue, we'll discuss splines, those sometimes troublesome but always powerful invisible lines through Cyberspace.
WHAT'S A SPIINE?
Splines are pathways, nothing more. Tom Hudson included splining in Cyber Control to make camera and object movement easier; no longer do you have to move each object painstakingly to its next recording position from within CAD-3D. With splines, you just specify a few control points and Cyber Control (CC) interpolates the points along a path between them, allowing you to move an object or camera smoothly through space. I say "between them" with a grain of salt; there are three different types of splines in CC and only two of them, Linear and Spline, pass through the control points. The thiid, the B-Spline, smooths out the path between the first and last control point and may not pass through any intervening control points at all.
Cyber Control still has one small problem with splines, however. It was written to allow you to enter the coordinates of each control point numerically, such as defpt 1,200,-3499,1829. Specifying up to twenty control points for each of five splines in this manner is an exercise in patience, visualization and typing accuracy, to say the least. A visual solution was necessary and computer artist Darrel Anderson and I came to the same solution almost simultaneously (as usual, however, his genius took him far beyond this program's limits).
ENTER THE SPLINER
The Spliner is on your START disk under the name SPLINE.ARC. In that ARChive file, you'll find the Cyber Control file SPLINE.CTL, a collection of spline keypoints in the file SPLINE.3D2 and a "paper" airplane in the file AIRPLANE.3D2. You'll find the instructions on how to un-ARC (or extract) these files from SPLINE.ARC elsewhere in this issue. Go do that now and print out a copy of SPLINE.CTL so that you can follow along.
The Spliner loads in a collection of small cubes, each located at one of our desired spline control points, then finds the center of each cube and uses its coordinates to define a spline (See Figure 1.) Then it loads in the paper air plane and moves it smoothly along the spline, aligning its nose toward the next spline point, as shown in Figure 2. I tried to write this program to illustrate a few special features of CC that can make its usage much easier and more flexible. Let's see what those are.
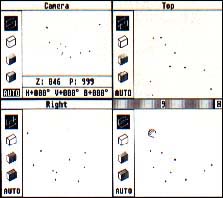 |
Figure 1: CAD-3D's windows, showing the spline key points for the paper plane animation. |
To begin with, I used the bearing command. This is a command not found in CC 1.0, but made available in version 1.1 in response to several requests, mine included. The bearing command takes the coordinates of any two points and returns the horizontal and vertical angle between them. This is a godsend, particularly if you ever tried to align objects along splines in CC 1.0 using a looped tangent command (I won't go into it any further now; it's not worth the space, but write me if you really want to know how it's done). If you have version 1.0 and want to make use of this command, all it costs to exchange your 1.0 disk for version 1.1 is $5 for shipping and handling to The Catalog at the address below.
The code in Spliner is heavily commented and easy to use. Just put all of the relevant files on an otherwise blank disk, put it in your A drive, start up CAD-3D with CC 1.1 installed and click on "Run" in CC. The rest is automatic. The presets in Spliner will produce sixty frames of recorded animation or allow you to view or preview every fourth frame, but you can change these to suit your needs.
To change the path of the plane, all you have to do is load SPLINE.3D2 into CAD-3D and drag any of the little cubes wherever you'd like. Only one caution: since CAD-3D usually moves objects by reference to their centers, don't get too close to the edges of the CAD-3D universe. Even if the control point is wholly inside the universe, if part of the plane would be placed outside, your animation will fail with a "CAD Command Failure" alert box.
NEEDLESS COMPIEXITIES?
Although it may seem needlessly complex in a short program such as this, I put as many preparatory routines in subroutines as I could. This makes it easy to locate a particular portion of the code for study or modification and easy to expand the program for other uses. These subroutines are presets, where variables are set, setcam, where the camera variables are set, modes, where the parameters for the View, Preview and Record modes are set and generate, where the actual spline generation takes place.
In another apparently needless complication, I used a single one-dimensional array, KP(), to store the x, y and z values of each of the spline control points.
 |
| Figure 2: The Spliner in action, in preview mode. The plane's progression along the spline is shown in increments of three frames. |
This helps if you're running into the limit on variable names or if you may have some other use for those values.
Still another complication: Since the bearing command requires that you always begin with the object to be rotated facing the front of the CAD-3D universe, Spliner loads the master object and clones it each time it's used, then kills it. This is not only necessary for the bearing command, it also is a good example of the use of the clone command to preserve unchanged an original reference object without resort to repeated disk access.
Finally, Spliner illustrates the use of alert boxes, input boxes, printouts for debugging and the bell--my personal favorite--to call attention to events. You can remove them or merely disable them by "commenting them out" by putting a semi-colon in front of the offending command. Note, however, that any commands after the semicolon will be ignored, even if separated by another colon.
STAY TUNED!
In the next installment of Cyber Corner, we'll discuss control of lights and cameras. If you have any questions about Cyber stuff that you haven't been able to find an answer for, write me at 544 Second Street, San Francisco, CA 94107 and I'll find out the answer for you. Or if you have any hot tips you'd like to share with other animation junkies, send them along.
PRODUCTS MENTIONED
Cyber Studio (containing CAD-3D Version 2.02), $89.95; and Cyber Control Version 1.1, $59.95. The Catalog, 544 Second Street, San Francisco, CA 94107, (800) 234-7001.