ON DISK!
Cyber Corner
Special Effects Part IV:
How To Use Traveling Mattes
BY JON A. BELL
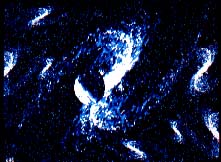
Cyber Paint goes to the matte to produce a space bubble. File CYBRCRNR.ARC on your START disk!
One of the most fascinating things you can do with Cyber Paint is use it to alter existing imagery--either a still DEGAS image or an animation sequence--and then composite it back with the original imagery.
This is what we're going to do in this installment of the Cyber Corner: we're going to use Cyber Paint to selectively alter portions of a complex image with traveling mattes--a striking and very useful visual technique.
What's a Matte?
Quite simply, a matte is a mask. In Cyber Paint, you can use mattes much as Hollywood special effects people use them to add spaceships, giant monsters or futuristic buildings to scenes. A matte can be used to cover or reveal selected portions of an image. When it's used to cover a portion of an image, then it's probably a "hold-out" matte--one which "knocks out" part of the background image and also serves as an opaque silhouette to hold another image within it, which may be added later. When it's used to reveal part of an image, it may serve as a "hole" or window onto that specific image.
The latter use is what we're going to experiment with in this issue. We're going to create an interesting deep space sequence using a complex galaxy background, a ball matte and a sprinkling of ADO/APM effects.
 |
With traveling mattes, you can assemble several layers of images for unique visual effects. If you'd like to experiment with them--and dupli- cate this unique ani- mation at the same time--all you'll need is Cyber Paint and the file CYBRCRNR.ARC on your START disk. |
A Galaxy on Your Disk
On your START disk you'll find a file called CYBRCRNR.ARC. Un-ARC this file, following the Disk Instructions elsewhere in this issue. In the un-ARCed file are three additional files: GALAXY.PI1, SPHERE.PI1 and ZOOM.ADO. You'll need all three files to create the Space Sphere sequence. Once you've un-ARCed the files and transferred them to disk, make sure you have a second disk available--preferably doublesided--to save your finished animation sequence. If not, format a fresh disk and set it aside.
At this point, load Cyber Paint (either version 1.0 or 2.0) into your ST, then go up to Menu and select Load/Save. When the Load/Save menu appears, click on .ADO (or .APM) to load ZOOM.ADO file from your unARCed files disk. This will set the .ADO/.APM menu with the matte movement parameters we want.
Soap Bubbles in Space
The effect we're going to create is that of a refractive sphere flying through space. As it zooms from offscreen, far left, to the bottom right of your screen, it will look like a crystal ball distorting its background. My inspiration for this effect came from the Joe Dante film Explorers, in which a group of young boys (assisted by some goofy extraterrestrials) create a forcefield bubble that enables them to travel into space. The bubble is a blue sphere which encases the boys' tiny spaceship. As presented in the film, the bubble optical effect (courtesy of George Lucas's Industrial Light and Magic) distorted whatever background it moved across, just as a real glass bubble would if you held it up to your eye and looked at your surroundings.
To create the effect in the film, ILM first filmed background plates of whatever scenery the bubble was to pass in front of, then they matted in the bubble imagery, which consisted of airbrushed artwork, reflective lighting highlights and a slightly smaller version of whatever background was behind it on any particular frame. The result was a three-dimensional-looking moving sphere. The .ADO/.APM parameters will make our bubble move in our Cyberspace.
Now, go back to the Load/Save menu and load SPHERE.PI1. This is the matte ball we'll use to create our sphere. Place the ball in the Clip buffer by pressing the Tab key, then erase the ball on frame 1 by pressing the Clr/Home key. Next, press Return six times to create 61 blank frames.
Go back to the .ADO/.APM menu, set Frame Mode to All, and then select Preview. You'll see the clip buffer box come in from the left side of your screen and disappear off into the distance on the right. This is how your crystal sphere is going to fly through the scene. Now, click on Render. Cyber Paint will then render the blue ball across all 61 frames. (When it's finished rendering, you can leave the .ADO/.APM menu and play the animation once or twice to get an idea how the final effect is going to look.) When you've finished playing the animation, save it to your freshly formatted disk under the title MATTEBAL.SEQ. (You'll want to save all your work files to disk so you can use them in the future, if you desire.)
Next, go to the first frame of the sequence you've just saved, make sure Frame Mode is set to To All, then go up to the Load/Save menu. Select.PI1, then select Under (or Underlay). Load the picture GALAXY.PI1 underneath the flying ball sequence. A menu box will appear, asking if you want to do this under all frames, starting with this frame; click on Yes. Cyber Paint will then load this DEGAS Elite picture underneath your flying ball animation. Now when you play the sequence, the flat blue ball will fly over this deepspace galaxy background.
Go up to the Color menu and select color 1 (the background color, or black)--the first color on the left, top-most row of the color palette. Next, make sure that you're still in To All, then go to the Frame menu and select Separate Then, on any frame of your animation, left-click anywhere inside the ball image. A menu box will appear, asking if you want to separate across all frames. Click on Yes. Cyber Paint will then fill the blue color of the sphere with black. (It will also fill other occurrences of this dark blue where they appear on the galaxy picture, but don't worry about this.) When Cyber Paint has finished Separating the sphere image, save this sequence to your fresh disk, calling it BACKGRND.SEQ. The "black hole" flying across the Galaxy picture will serve as the "holdout matte" for your replacement imagery.
Now, Kill this sequence from your memory, and load MATTEBAL.SEQ back into Cyber Paint. Go up to the Color menu, and select color 2 from the palette--it's a dark blue, almost black. Then select Separate from the Frame menu and left-click anywhere outside the ball image, making sure you're still in To All mode. Cyber Paint will Separate out the black background and render it as the dark blue (to make it opaque). Go back to the Color menu, select color 1 (black), and Separate the ball across every frame just as you did before. When it's done, go to the first frame of your animation, then go to the Load/Save menu. Select.PI1 and Underlay, then load the GALAXY.PI1 picture underneath all the frames of your sequence.
As you can see when you play the sequence, the black ball acts as a moving "window," revealing the untouched galaxy picture. Now, go back up to the frame menu, select Separate once more, and select color one (black) from the color menu. Separate everything outside the moving window imagery. You now have a moving window on the galaxy--and nothing else. Save this animation sequence to your workdisk as GALSPHERE.SEQ.
Now you're ready to create your traveling matte.
Space/Time Distortions and Other Fun Things
Now the going gets somewhat tricky--and forgive me, but to produce the effect we want, the going also gets a little tedious. Don't worry--the results should be worth it.
First, set your Frame Mode to To Frame, then go to the first frame of your sequence where the background imagery appears. Now, in this exact order, do the following across the next 60 frames:
1. Press Tab. This will Clip the image and save it to the Clip buffer.
2. Press Clr/Home This will clear the current image from the frame.
3. Press 1. This will invert the image in your Clip buffer.
4. Left-click your mouse button to invert the image. (Note: Before you do this, make sure your mouse cursor is below the galaxy image.)
5. Right-click your mouse button to set the inverted image on the frame.
6. Press the right arrow key on your keyboard to advance to the next frame.
7. Repeat the above procedure on the frame, and continue until you've finished the entire sequence.
(If you're groaning in pain at the thought of all this repetitive work, don't--it's actually quite easy to get a rhythm going if you're using the keyboard to enter your commands. Tab, Clear 1, left-click, right-click, right arrow, repeat. Pretty soon you'll be doing it like an automaton, but don't get going too fast--you want to make sure you get every frame.)
Now, when you've finished inverting all of the circular Galaxy images, save this to disk as GALSPINV.SEQ. Set the Frame Modes to To All, go to the first frame of your inverted galaxy animation, then go to the Load/Save menu. Select Underlay, then load BACKGRND.SEQ--the holdout matte sequence--into your inverted imagery. When it's done, play the animation.
Fascinating, isn't it? You see the sphere effect mainly by how it distorts and alters the background--one of my favorite Cyber Paint techniques.
Wrapping Up
There are ways to simplify these procedures, of course, and the results will look different. You can Defocus, Crystalize or Antialias a copy of the Galaxy picture, save the altered image to disk, load that as an Underlay into your MATTEBAL.SEQ then load your original BACKGRND.SEQ under that. Experiment with the features in Cyber Paint 2.0's Pixel f/x menu and see what you can come up with. Try adding more frames (when I originally did this sequence, it ran 100 frames long), random sparkling highlights or flashes of light on the sphere every dozen frames or so. And don't forget to try out these techniques with other Cyber animations (including CAD-3D 2.0 objects).
That's it for this issue. In the future, we'll talk about miscellaneous lighting effects such as sparkles, and how to use the classic START program Pixel-Pro with Cyber Paint.
Jon A. Bell is the former Associate Editor of START, and is now Managing Editor of ORACLE, The SQL Database Journal.
PRODUCTS MENTIONED
Cyber Paint 2.0, $79.95. Antic Software, 544 Second Street, San Francisco, CA 94107, (800) 234-7001.