Connecting a Printer to Your ST
By Carol Ann Brimeyer
Well, you did it. You went to the computer store, put your money down and came home with a printer for your ST. It's sleek, it's trim, it's powerful-and the only problem now is getting it to work with your computer. Here's how to make your printer investment return big dividends!
One of the first peripherals most ST owners buy is a printer. That makes sense, when you stop to think about it. Whether you use your ST for writing a letter, drawing a picture or calculating the Gross National Product, a printer lets you communicate with the non-computing world.
A good printer will last a long time, so it's worth investing some time in choosing your printer. If it's your first printer, you want it to be fairly uncomplicated and reasonably inexpensive. You want to depend on it for a continual stream of sharp, clean printing. You also hope to avoid the demons of printer frustration- snagged ribbons, chewed paper and flashing trouble lights.
The ST generally uses a parallel (or "Centronics-compatible") printer. That refers to the kind of cable that connects your printer and computer However, the ST can also use a serial printer Be sure to shop for a printer that will connect to your ST (One easy way to tell: if it's IBM PC-compatible, it'll work with your ST.)
Next, look at the features of dot-matrix, daisy-wheel and laser printers. A dot-matrix printer uses a row of pins that dot the paper individually again and again, very fast. Dot-matrix printers are best for graphics, plotting, mechanical drawing, and fast, draft-quality text printing. The more expensive ones can use different type faces and sizes.

The print head on a daisy-wheel printer looks like a mutant bicycle wheel. It radiates a crown of spokes ending in tiny, perfectly formed characters that print when struck against the paper. Daisy wheels are best at producing letter-quality text printing-you can't tell the difference between the output of a daisy-wheel printer and a typewriter. To change the type face or size, you simply change the daisy wheel.
If you're buying a printer for a business, a laser printer may be just what you need. A laser printer dots the paper like a dot-matrix printer, but uses a laser instead of a row of mechanical pins, so it's faster and looks as good as a daisy-wheel printer. You can get the best of both worlds: graphics, high-quality text, lots of type faces and high speed. However, laser printers are very expensive compared to other printers. You'll find samples of all three kinds of printers in Figure 1.
OK-you chose a printer and brought it home, carrying it triumphantly over the threshold. Now what do you do?
For starters, unpack your printer. Besides the printer itself, look for a number of smaller items in the carton. There's usually an interface cable, a ribbon cartridge, paper separator and owners manual. Set out all the items in a clear working space, then check the contents list included in the carton or flip to the unpacking instructions in the owner's manual. Make sure you received everything that's supposed to come with your printer; if anything is missing, your dealer should supply it at no charge. Occasionally the printer won't include an interface cable. If that's the case, make a quick trip back to the store to buy one-you can't connect the printer without it.
Remove all the plastic wrapping and foam packing, and put them back in the carton. Now follow the unpacking instructions in your manual. Don't skip any steps, or you may miss something important.
Be sure to inspect your printer for shipping screws. They hold the larger components of the printer together during the jostle of shipping. Your owners manual should tell you if your printer has them and where they are. Once you've found them, carefully upend the printer and remove them.
Also, check around the moving parts of your printer (print head, platen and paper bail). Look for and remove tiny foam pillows or straps of tape (sometimes transparent) that hold the parts in place during shipping. If you don't find any, double-check. If they're not removed, these little packing aids will keep your printer from working and drive you crazy.
With the printer unpacked, don't throw away the carton. Instead, stash it somewhere out of the way, in case you need to store or ship your printer later.
Now decide where you'll set up your printer. Stretch out the interface cable. Its length tells you how far from your ST you can put the printer. If your printer uses pin-feed perforated paper, figure out where to stack the paper. You'll want it to feed easily into the printer and fall freely without landing back on top of itself. A printer stand is a great solution. You can also set the printer on a shelf above the computer or on a low floor stand. (Single-sheet printers don't pose this problem.)
Once your printer's in position, follow the instructions in its owner's manual, step by step, to hook it up. The steps will be in this general order:
1. Turn off your ST, disk drives and monitor Make sure your printer's on/off switch is in the off position.
2. Prepare the interface cable ends by partially unscrewing the side-screws or moving aside the wire retainer clips.
3. Plug one end of the interface cable into the printer Look at the manual illustrations, if you need to, to locate the connector. The two cable ends, one going to the printer and one to the ST, are often different sizes. If the cable end doesn't fit easily into the port, don't force it. Turn it over in your hand and try again. If that doesn't work, try the other end.
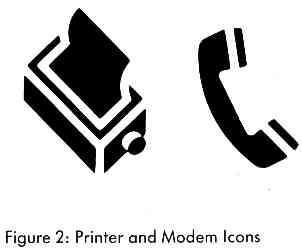
4. Plug the interface cable into the ST. Check your ST's manual to find the printer port; it's the one that has the printer icon in Figure 2. If you've got a less-common serial printer, connect the cable to the modem port; it has the modem icon in Figure 2.
5. Screw in the side-screws or snap the retainer clips into place. Gently jiggle both cable connections to make sure they're now tight and secure.
6. Plug the printer's power cable into a grounded electrical outlet or a power strip. Test your connections by turning on the printer. If you did everything right so far the power light will come on.
When you get to the manual's section on loading the ribbon, be sure to turn your printer off first, and keep these hints in mind:
- Move the paper bail out of your way by raising it up off the platen.
- Be sure to slip the ribbon between the print head and the ribbon mask (the metal or plastic part that holds the ribbon off the platen).
- Look for an arrow on the ribbon cartridge that tells you what direction to turn the take-up knob. Turn the knob to make the ribbon taut but not too tight.
- Slip the cartridge guide arms into their slots. Gently press the cartridge down and snap it into place. Don't force it-the cartridge is designed to fit. If it doesn't go into place easily, something's wrong. Take it out, check for obstructions and try again.
Your manual will have instructions for loading paper into your printer. For best results, follow these step by step. On some printers, the pin-sprocket wheels feed blank paper to the platen; on others, the wheels pull the printed paper away from the platen.
Follow this checklist to avoid paper-threading madness:
- Have a clean, straight edge of paper to insert into the printer. Tears or wrinkles will catch in places you can't get to.
- Line up the pin holes on one side of the paper with the same pin holes on the other side. Then slip them over the pins at the same time. If holes are even one pin off, the paper will tear and jam.
- Set the sprocket wheels at a distance that keeps the paper taut but not tight. Tight paper will tear; loose paper will slip off the pins, wrinkle and jam.
- Make sure the paper separator is in place correctly. Check your manual illustrations to find out how the paper should thread under and over the separator, and always do it that way.
- When you do a long printout, check the paper after the first few sheets are printed. Arrange those sheets so the rest of the printing can fall neatly on top. Otherwise, the first sheet will sometimes curl back around the roller, tangle up and ruin the whole printout.
- If you are using self-adhesive labels, never turn the printer roller backward to remove the labels. That's the easiest way to get a label stuck to the internal rollers of your printer, which can jam or seriously damage your printer.
Most printers have at least three function buttons: on-line, linefeed (often labelled LF) and form feed (FF). When you're ready to print, if the online light isn't already on, press the online button. The on-line light should come on. If it doesn't, check your cable connections and turn the power switch off and on.
When you want to advance your paper without printing, first take your printer off-line by pressing the on-line button again. Then press the linefeed button to advance the paper one line at a time. This lets you set your paper to where you want printing to start. Press the form feed button to advance the paper by a full sheet. You usually won't be able to put the printer back on-line while the paper is advancing.
It's always a good idea to use the function keys rather than roll the paper by hand. This helps keep the paper from slipping out of adjustment. If you want to roll the paper by hand, it's best to turn the printer off first.
If your printer has a self-test, now's the time to use it; your manual will tell you how. A self-test lets you know that the ribbon is correctly in place and that all characters print cleanly and evenly. If your paper's going to Jam, it'll do so during the self-test and not while you're printing something important.
If your printer uses Epson-compatible graphics commands, you can use the ST's Print Screen option. Atari's SMM804 printer and many of the printers advertised as "IBM-compatible" use Epson-compatible graphics.
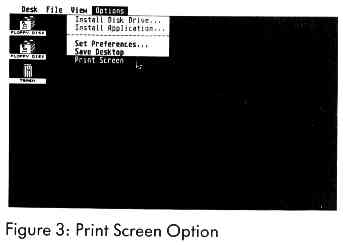
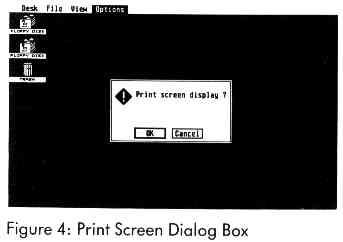
From the Desktop, you can print the screen by dropping down the Options menu and clicking on Print Screen (see Figure 3). In the dialog box that pops up, click on OK (see Figure 4). Your printer will remove the dialog box and then print your screen display to paper To stop the printing, press the Alternate and Help keys at the same time.
For a shortcut, you can press the Alternate and Help keys to start printing the screen display. That's very handy when you want to print the screen but you're not on the Desktop. To stop printing, just press Alternate and Help again.
If your printout doesn't look much like your ST'S screen, maybe you need to make some adjustments. Boot from the system disk that came with your computer and on the Desk drop-down menu on the Desktop you'll find desk accessories for installing the printer and configuring the serial port. For parallel printers, you'll just want to click on install Printer; if you have a serial printer, you'll need both. Check your ST's manual for a complete explanation of what each of the options means.
Once your printer is connected and running, you'll start looking at all kinds of software you can print with. Check the software manual for instructions on how to print for each program. Many programs require special "configuration" or "installation" for your printer; before you buy, make sure the software will work with your printer.
Often, computer printers are available at large discounts when they're discontinued. But a printer's not a bargain if it's nonstandard or won't work with your software without custom printer drivers. The easiest solution for an ST owner is to buy an Epson-compatible printer, since virtually all ST software will work with that style of printer.
Happy honeymooning with your new printer. It's just another smart way to use your ST.
If you'd like more articles like this, circle 202 on the Reader Service Card.
Carol Ann Brimeyer is Senior Publications Editor for Epyx.