Not Megabucks
An inexpensive upgrade for your hard disk
BY DAVE SMALL CONTRIBUTING EDITOR
You're in the ranks of the big boys now-you own a hard disk. You've got total memory superiority, and can store mondo amounts of massive files. But what if you actually need another hard disk? Can you satisfy your lust for megabytes without breaking your bank? Let START Contributing Editor Dave Small show you how.
So your hard disk is getting full.
It happens to all of us. One day you have 20 megabytes open, and it seems like the next, you have to delete something you'd like to save. And wasn't it only yesterday that 20 megabytes seemed like all the storage in the world. Sure would be nice to stretch that space, wouldn't it?
Well, how about another 20 megabytes for under $300? No, I'm not kidding. If you're willing to open up your hard disk's case, you can double your disk storage easily with a few tools and a little bit of work. Interested? Read on.
Warning: Modifying your hard disk will void the hard disk's warranty. Before you begin work on this project, be sure you've read and understood all the instructions. There's always potential for trouble in any project, and neither START nor David Small can be responsible if something goes wrong. This article provides the basic knowledge on how to add a second hard drive mechanism to your current hard disk. The rest is up to you.
THE SYSTEM
Before you start tearing into your hard disk, let's make sure we know
what we're doing. We'll start by outlining the parts of hard disk system
on the Atari ST.

A: The Atari ST. It connects to the hard disk system by way of the hard disk port on the back, using a DB-19 connector. ("DB" means the kind of connector, and 19 indicates the number of pins in the connector. For more samples of DB-type connectors, look at your printer and modem ports, both of which are DB-25 connectors. The ones with pins are called male connectors; the ones with holes are female connectors.)
B: The hard disk cable. It connects the ST to the ACSI-SCSI converter, with a DB-19 connector on each end. The short cable that comes with the Atari hard disk is not very good; mine broke fairly quickly. This may be the first thing you replace in your hard disk system; with the cable as short as it is, it gets a lot of flexing and abuse, and the wires inside break easily. If it breaks, you can build your own cable with ribbon cable (available from Radio Shack) and DB-19 connectors (available from mail-order companies such as JDR Microdevices).
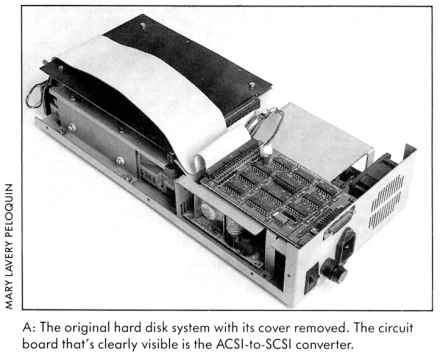
C: The ACSI to SCSI converter. The signals coming out of the hard disk port form the Atari Computer Systems Interface, or ACSI. This is a mix of hardware and software that only Atari uses. The industry standard for talking to peripherals is the Small Computer Systems Interface, or SCSI (pronounced "scuzzy"). ACSI is similar to SCSI, but definitely not identical. Hence, you need a little translator board to convert ACSI signals to SCSI.
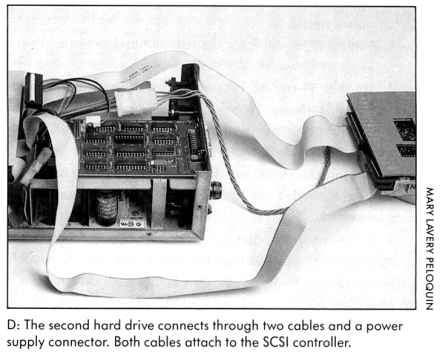
D: The converter to controller cable. This is almost always a ribbon cable with clamp-on 50-pin female pin connectors. It hooks the ACSI-SCSI card to the SCSI hard disk controller.
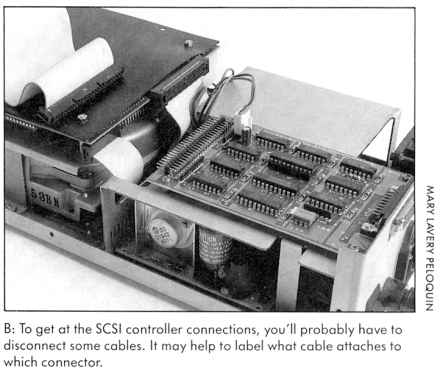
E: SCSI hard disk controller. It takes the 50-pin standard SCSI input, and hooks to the hard disk via two cables. This is a miniature computer, with a CPU all to itself, dedicated to running a hard disk. There are a number of different SCSI controllers; Atari uses an Adaptec 4000, and that's probably the one you'll see.
F: The two cables that connect the SCSI controller to the hard disk. One is a 34-line cable, with edge connectors on each end. The other is a 20-line cable, with a female pin connector on one end and an edge connector on the other.
G: The hard disk drive. This is the actual disk drive mechanism; it too has a built-in microprocessor. Typically Atari uses a Seagate 225 drive mechanism, but I've seen several different mechanisms in different drives, including mechanisms made by Microscience. Tulin, Miniscribe and Control Data.
Everything that isn't a cable requires power They all need +5 volts (ACSI to SCSI), and two need +5 and +12 volts: the SCSI controller and hard disk. The hard disk and SCSI controller get theirs through a standard, polarized "floppy disk" power connector The interface is nonstandard, but don't worry- it's already powered.
DIVING IN
Now, if you open up your Atari hard disk, you should see all this stuff
wedged in there.
Note: A Supra hard dish may use a funny hard disk that has the SCSI controller and hard disk integrated into one piece, and which has the 50-pin connector directly hooked into the ACSI-SCSI board Supra makes. If that's what you see when you open it up, close up your disk drive and forget the remainder of this article; you haven't got a place to hook in a second drive.
Now looking more closely at the controller to disk drive connections, we have:
However, a little examination of the manuals reveals that the controller Atari uses, the Adaptec 4000, can run two drives. They hook in like this:
Basically, the 34-pin cable daisy-chains between both drives and the controllers. it has the usual signals to run a disk drive that you see on a floppy disk. However, none of the read-write data goes through this cable-it's sent on the 20-pin cable, which is specific to each drive.
WHAT YOU'LL NEED
Now, let's assume we want to add another drive mechanism to our Atari
hard disk. It's got an Adaptec 4000 controller. What do we need?
1 A new 20-pin cable for the read/write data to the new drive.
2. Another 34-pin edge connector for the new drive, off the main cable. (Note: If the main cable is too short, you'll need to build a new main cable 34-pin edge connectors on either side.) You also have the option of running the 34-pin from the controller to an internal drive, then out the back to an external drive. Try not to make it over three or four feet long, okay?
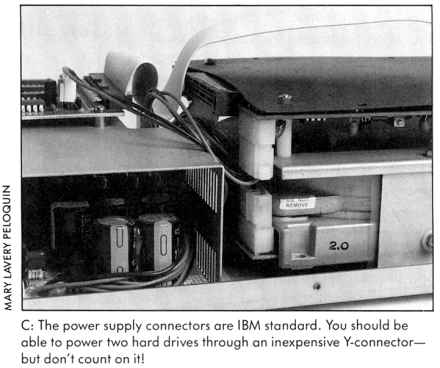
3. A power supply. These use the same connectors as IBM-compatible floppy power supplies. If you have a hefty enough power supply for your first hard disk, you can power your second drive with a Y-connector, available from Jameco Electronics and other mail-order houses; this plugs into your power supply, and provides two plugs to plug in two hard disks. I've had no problems running two full-height hard disks off my standard Atari power supply; it seems quite able to handle them, but I can't guarantee this for your drive.
4. Software. You've got to have software that will look for the second "unit" of the first "device." to use SCSI-speak. The only source I know of for this at present is Supra; their driver software, beginning with revision 2.4-B (not 2.4 regular) has this built in. The most recent version, as START went to press, was 2.72. By the way, this driver is up on CompuServe; you should get permission from Supra to use it with your hard disk. since they wrote it for use on their drives.
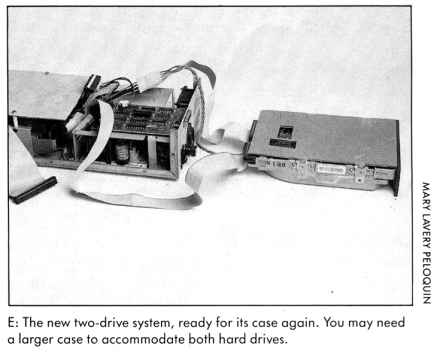
5. Some place to put all this, because it's going to be a mighty tight fit inside the Atari SH204 case. I can't guarantee it will fit: It depends on your drive's size and faceplate, and your own ingenuity. You may want to put everything in a separate box, like the IBM external hard disk cases now selling everywhere at a huge discount. They'll easily hold two half-height disk drives, power supply, and they even have a cooling fan.
Another possibility is to run the three cables (one power, one 34-pin, one 20-pin) out the back of the drive, near the ACSI connector, and hook up the new drive separately. This works fine, and you can then unplug the drive (with power off, of course) as a removable backup.
A removable backup? Yes, think about it. You can back up your whole
drive to the external drive in about three minutes (20 meg) or six minutes
(my 40-megabyte drive). The cost is another drive mechanism, and the price
of those is falling daily. Give it some thought; with backups available
at great speed, you might find it a practical thing to do.
| Hard Disks For The ST
If you don't already own a hard disk, then you don't know what you're missing. Hook a hard disk to your ST and you'll be amazed at how fast programs scream off it and onto your screen. Disk files load and save much faster than with regular disks, and there's plenty of space for storing large files. Here's a list of the top hard drives for the Atari ST Atari SH204 (20 megabytes, $699.95.) Atari Corporation, 1196 Borregas
Avenue, Sunnyvale; CA 94088. (408) 745-2367.
Astra System HD+ (20 megabytes, with a 31/2-inch double-sided drive
built in, $995.) Astra Systems, 2500 S. Fairview, Unit L, Santa Ana, CA
92704. (714) 549-2141.
SupraDrive (20 megabytes, $699; 30 megabytes, $995; 60 megabytes,
$1995.) Supra Corporation, 1133 Commercial Way, Albany, OR 97321. (503)
967-9075.
ICD ST Hard Drive System. (20 megabytes, $699.95; 30 megabytes, $945.95;
dual 20 megabytes, $1149.95; dual 30 megabytes, $1349.95.) All drives include
a fan and a realtime clock. ICD, 1220 Rock Street, Rockford, IL 61101.
(815) 968-2228.
|
ASSEMBLY
Okay, if you've got all the parts, let's put it together. For simplicity,
we'll call your original hard disk Drive A and the new disk Drive B.
Step 1. Back up Drive A. your current hard disk. No. don't assume everything is safe-spend the time it takes to back it up. That's the best insurance you can have against accidentally reformatting your hard drive.
Step 2. Assemble the new 20-line cable. The parts for the cables are easily available at Radio Shack. For this one, use a length of 20-line ribbon cable and two clamp-on connectors-a female pin connector on one end and an edge connector on the other.
Use a vise, or vise-grip pliers, to clamp the connectors on the cable. You should protect the connectors while clamping, lest they get chewed up; a good way is to put a scrap of sheet metal on either side, then gently tighten. Be sure your drive connector is completely perpendicular to the cable and that the pins dig through the cable squarely. This is very important to avoid shorts.
Step 3. Next, build a new 34-line cable or modify the old one. To modify the old one, just clamp a second 34-pin edge connector on the existing cable. Remember to leave enough room between connectors for the drives, if the original cable is too short, you'll need to build a new one from 34-line ribbon cable, with a 34-pin edge connector on each end and one in the middle.
Step 4. With all the power off, disconnect the cables from your first drive (Drive A). Reconnect the cables to your new second drive (Drive B) and power up again. Now run your hard-disk formatting software, and format and partition it however you like; most likely, it's properly set up from the factory to do this. This will test the drive and your cabling. Now power down again, remove Drive B, and replace Drive A.
If you can't format Drive B, it may be set for self-test mode. If it is, when you power it up you'll hear it seeking back and forth. If that's the case, check the manual for your Drive B hard-disk mechanism. On Microscience drives, for example, you'll need to turn switch 10 off to turn off the self-test mode. Remember to turn the power off before changing any connections or switch settings.
Step 5. Drive B is set up to run as a single drive when you get it; we need to set it up as a second drive. To do this, you need to make sure the termination resistors are turned off or removed. How you do this depends on the style of drive.
On Microscience drives, switches 5-9 control the terminator, so turn them off for Drive B. On Shugart and Tulin drives, the terminator pack is a long, thin resistor with eight pins in a row, in a socket (and is about the only part in a socket); remove it on Drive B.
Step 6. Next, you need to set Drive B as drive #2. Again, it depends on the type of drive. On Microscience drives, it's a switch. On Tulin drives there's a 4-pin selection jumper. On Seagates there's a shunt/berg (Seagate). Whatever it takes, set Drive B as drive #2.
Step 7. Now you're all set to reconnect things. With power off, attach all the cables and hook up the power-but don't turn it on!
Step 8. Double-check all your work. It's really easy to get a cable reversed, so check twice; remember that pin 2 marked on the controller board goes to pin 2 marked on the drive. (A convention is that the marked side of a ribbon cable is pins 1 and 2 side). The pin 1 side of a connector is generally labeled on the circuit board-look for a "1" or "2" on one side, and "33" or "34" on the other.
another 20 megabytes
for under $300?
Check the ACSI-SCSI cable, the three drive cables, and if you've soldered the power. triple-check that-12 volts on the wrong line will ruin both your day and drive.
One more reason to check twice: If you get the 34-pin cable reversed, you'll ground all the control inputs to the drive. This means you'll turn on the read/write line, telling the drive to start writing. This is a very efficient way to blow away whatever track the disk is currently on. Reformat time!
Step 9. Now with the computer off, power up the drives. Both drives should spin and make clunking noises. Eventually they will settle down. A Microscience will have a solid red light, then flickering green, then solid green as the drive becomes ready. A Seagate or Tulin will just have a flickering red light for awhile, which will then go off.
If the Busy light stays on dimly, try powering on the Atari. Sometimes this resets the hard disk controller and wakes it up. If not, power off and check everything again.
Horribly gruesome warning: If you've changed the position of the Adaptec board and mounted it by its four mounting holes- the way any intelligent person would-you may short it out and destroy it by touching a trace with the mounting screw/nut head. For some reason, Adaptec ran traces within a hair's width of the mounting hole. You have to be very careful; use a rubber or plastic insulator under the screw,. nut to insulate it. Check four or five times with a good strong light; the clearances are extremely tight.
Don't let all these warnings scare you; you can do this modification with no tears. Just take as much care as you would with any electronics project, and you'll be fine. If you have any doubts, find a friend who's experienced with electronics to lend you a hand and moral support.
BOOTING UP
Now you're ready to use the second drive. Turn on your Atari, disable
any automatic boot program, and run the Supra booter. You should see both
hard disk drive lights blink on, then off-first Drive A, then Drive B.
Now you should be able to install up to four partitions for each drive-whatever
you selected at partition time. You can end up with eight disk icons (drives
C: through]:) if you wish. It gives you a nice feeling of power.
From here, the installation process (Save Desktop, etc.) remains the same. Treat your system as though you've got one huge drive and (up to) 8 partitions. All the basic considerations remain the same.
Okay, good - now you've got 40 megabytes online. But why stop at 40? You can just as easily plug in a 30-, 40- or 60-megabyte mechanism; the connections are identical. I replaced my Drive A with a half-height 40-megabyte Microscience mechanism inside my Atari hard drive's case. Then, when I found a full-height Miniscribe 40-megabyte mechanism, I added it outside the case. Bang-I had 80 megabytes online. I feel as if I'm running on a mainframe. Best of all, I took the original Atari 20-meg mechanism (a Seagate), and with some dedicated homebrewing hooked it up, using my own Adaptec, a spare Supra ACSI-SCSI and lots of cabling.
When I was developing the Magic Sac, Data Pacific's Macintosh emulator for the ST, I crashed my hard disk frequently. I expect this only to get worse as I add hard disk support to the Magic Sac, and work out the various bugs involved. I use the second 40-megabyte drive as an extremely fast backup to the first 40 megabytes, and have a short program which grabs all 40 megabytes off the first drive and writes it to the second, with an optional restore. I then unplug the backup drive, and put it on a shelf. With the Atari's transfer rates, this doesn't take much time at all, and it's much faster than dumping to floppy, or even tape backup.
HARD DISK TIPS
Check out the ads in the back of magazines such as Byte for good prices
on hard disks. You can use almost any IBM-compatible hard disk; the better
the size and access time, the better for you (20 milliseconds is excellent.
80 milliseconds is fairly slow). You shouldn't pay over $250 for a 20-megabyte
mechanism, and prices are going nowhere but down. By the way if you are
so inclined, 10-megabyte mechanisms are under $150, and five megabytes
are under S75. Computer Shopper and Micro Cornucopia magazines seem to
have the best prices for these mechanisms.
If you buy an obscure brand of hard-disk mechanism, you may need a specific formatting program for it. Supra's formatter is the best I've seen; it lets you plug in specific parameters, which you can pretty much read off the spec sheet that comes with the drive. (Remember, you'll have to format this as the second drive.)
By the way, if all you're after is more storage, without the added cabling headaches, just get a half-height drive of whatever size you want (40 megabytes seems popular). Swap it for your Atari's Seagate 225, and you're off and running. Beyond 64 megabytes per drive, you'll have a problem; the present partition software lets you have no more than 4 partitions, and 16 megabytes per partition. So, right now, two 64 megabyte drives is the limit. That's 128 megabytes of disk storage. (Limit? Ha!)
Anyway there you have it, the inside scoop on how to expand your ST's
hard disks. It really isn't very hard, as hardware projects go: There's
no soldering, only a little cable clamping and figuring a way to mount
the mechanisms. Maybe you can even put that old 10-megabyte IBM drive sitting
on the shelf at the office to work. I expect to see lots of multi-megabyte
ST systems in the near future!
| Hard Disk Troubleshooting
BY DAVE SMALL CONTRIBUTING EDITOR Having done several of these hard-disk upgrades, I've made lots of mistakes. When a problem shows up on this project, the usual troubleshooting principles apply. The first thing to do is check the modifications. If nothing is obviously wrong, remove everything you've done. and then add pieces one at a time until the problem shows up. Check all connections, then check them again. Don't take anything for granted -anyone can make a mistake, even you. Here are a few more specific hints you might find useful based on my experience. Problem: Drives don't spin up; power supply sits and clicks. You've got the system shorted out. Check the Adaptec board mounting holes. Check your wiring. Chances are, the main power supply is grounded-probably a wire rubbing against the chassis somewhere. Or maybe your new drive is totally shorted out. That's easy to check- disconnect it and power hack up. Problem: Drives spin up briefly spin down. Your second drive is placing too much load on the power supply, and the supply is shutting itself off when it gets too hot. Get a second supply for your second drive. Problem: Both drives don't work when second one attached. Make sure you've done the drive selects and terminators correctly-99 percent of the time, that's the cause of this sort of problem. Never tug on a clamp-on connector's cable; you may make it go intermittent. You may have shorted out the cable doing the clamp-on. so try a new cable. Problem: Both drives light up when I access the system. You have both drives strapped as drive #1. Check drive select. Warning: some Atari drives are strapped as drives #1 through #4. This means drive #1 will react to any command sent to drive #2, including a format command. (Sad experience speaking.) Check that Drive A is set only as drive #1! Don't assume Atari did... as I did. Remember, you should always he able to unhook the three connections to the second drive, and run your first drive without any problems. Problem: Both drives light up immediately when I power on. You've got the 34 pin cable upside down. Problem: I start my Atari up, it ignores the hard and floppy drives, and gives me a ''0 bytes in 0 items'' blank desktop. You've probably got a bad Atari-to-drive cable. Or perhaps you've forgotten to power up the ACSI-to-SCSI board- did you hook that connector back on? Worst case: You may have a blown DMA chip, in which case you'll need a trip to your local Atari repair center. |
REFERENCE
- Byte. One Phoenix Mill Lane, Peterborough, NH 03458. (603) 924-9281. Subscriptions: $22 per year for 12 issues, with additional issues in June and October
- Computer Shopper 407 South Washington Ave., Titusville, FL 32796. (305) 269-3211. Subscriptions: $21 per year for 12 issues.
- Jameco Electronics. 1355 Shoreway Road, Belmont, CA 94002. (415) 592-8121; for orders call (415) 592-8097. Send $1 for catalog.
- JDR Microdevices. 110 Knowles Drive, Los Gatos, CA 95030. (800) 538-500 or (408) 866-6200