From a Pro
Create your Fantasy with DEGAS*
BY DARREL ANDERSON
 Professional
graphics artist-and winner of the Antic DEGAS contest-Darrel Anderson reveals
his secrets and techniques for using DEGAS. This step-by-step creation
of a DEGAS masterpiece includes practical suggestions from a pro as well
as tips on how to take advantage of the new features in DEGAS Elite. Your
START disk includes the completed picture plus a special "start up" screen,
along with custom fills and brushes.
Professional
graphics artist-and winner of the Antic DEGAS contest-Darrel Anderson reveals
his secrets and techniques for using DEGAS. This step-by-step creation
of a DEGAS masterpiece includes practical suggestions from a pro as well
as tips on how to take advantage of the new features in DEGAS Elite. Your
START disk includes the completed picture plus a special "start up" screen,
along with custom fills and brushes.
*Tips may be used with other paint programs.
Michelangelo claimed that the incredible figures he liberated from marble blocks were present in the stone before he began. At first this might seem as helpful as the gag instructions for making a statue of an elephant: Take a big stone and chisel away everything that doesn't look like an elephant. The concept, however, is valid. It implies using the medium-stone, paint, or pixels-as a feedback device to tap the mind's visual library. During the course of this article, we will examine a lot of practical tricks and techniques. As useful as they are, you'll find them far more powerful when used in conjunction with what I call interactive visualization.
The creative process is neither as ethereal as some fine artists claim nor as cut and dried as typical how-to-books suggest. Most systematic approaches are good for little more than consistantly producing predictable results. It is foolish to apply rote methods to a medium as flexible as computer graphics. But the wide range of options and capabilities can make working without some kind of direction very disorienting. In this article, we'll examine an approach to thinking and seeing as well as a description of methods and techniques for drawing with the ST I'll be using DEGAS, the graphics paint program from Batteries Included, but many of the techniques illustrated here may he implemented on other graphics software, such as NeoChrome from Atari and Paint Works from Activision.
I've just received a preliminary version of DEGAS Elite for testing purposes. Its incredible array of enhanced features opens vast new realms of graphic magic. It will require many enjoyable hours of exploration to even begin comprehending Elite's capabilites. That's a task I look forward to. I hope for the opportunity to share my discoveries with you at some future date. For now, the basic tools common to both versions of DEGAS provide an excellent starting point for developing graphic talents and skills.
IN THE MIND'S EYE
We are dealing in illusion. Our ability to identify a small face in a newspaper photo or television picture is due to pattern recognition. Enlarged, such images reveal themselves to be little more than abstract arrangements of dots; it is our mind that blends those dots into a recognizable picture. We see what we want to see, and we are predisposed to see familiar images drawn from the visual libraries we've accumulated in our minds through years of observation. By employing the same mental imaging during the creative process, you'll tap this resource.
I've applied this technique to nearly all imaginable media over the years and the computer lends itself very well to art. In fact, the mutability of computer graphics makes it an ideal visual feedback device. Of course every media has it's limiting factors; with computers, a primary one is resolution. Even the relatively good resolution of the ST series is quite crude. The color pictures in this magazine (transformed by a process called color separation into very fine dot patterns in four colors) contain more dots in a square inch than an entire low-resolution DEGAS screen. Clearly, some clever manipulation of the medium is required for good results. Learn to work within the limits of your media and turn them to your advantage.
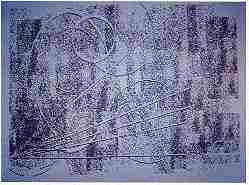
FIGURE 1
Working with limited resolution encourages you to suggest or imply imagery rather than define, In my opinion there is no duller image to look at or to draw, than one that leaves nothing to the imagination. If I attempt to draw every leaf on a tree with DEGAS, I'll soon run out of pixels, but by playing with colors and patterns that suggest "leafness" to my eye, I trigger the same response from the viewer, whose mind fills in the picture with greater accuracy and detail than I ever could. If I do a very good job I might even succeed in suggesting to the mind's eye such intangibiles as motion, heat, or sound.
This non-literal approach involves the viewer. Each person sees a slightly different picture based on their own visual library. This interaction makes every work a collaborative effort, expanding the scope and power of the art. I recommend studying the works of the late 19th and early 20th century impressionist painters: Van Gogh, Monet, Degas, and many others. Their bold, large brush strokes, and palettes of pure, bright colors produced images that are in many ways analogous to low-resolution computer graphics.
Vague or mystical as this may seem, just keep it in mind as we move on to the more practical techniques and tricks. What follows is just one approach to drawing with DEGAS.
PALETTE AND TOOLS
As in any medium, the first step in computer graphics is selecting and organizing your tools. We will be working with DEGAS in the four-color, medium-resolution mode which encourages concentration on the fundamentals of drawing, before complicating matters with lots of colors. It also provides a significant increase in resolution over the 16-color mode. As you'll see, we can get a lot more out of four colors than you might think. Additionally, if you're working with a monochrome monitor many of the techniques described here are applicable.
I will assume you've spent some time working with DEGAS and are familiar with most of its tools-have the DEGAS manual handy if you're not. Run DEGAS in the medium-resolution mode and we'll be ready to go. (Those without a START disk should stick with us. Much of this article may be understood without the disk examples.)
Turn the contrast on your monitor way up, and load the PALETTE.PI2 picture from your START disk (inside the DEGASART.STQ folder) and take a look at the color bars on the picture screen. The bar on the left shows the four colors, (numbered 0-3, corresponding to their left-to-right positions on the DEGAS menu), plus six additional shades composed of 50 percent mixes of two colors. The mixed colors were made by using the 50PERCNT.FIL included on your START disk. Load this fill pattern from MAKE FILL and you'll see that it is composed of alternating vertical lines. The tight vertical resolution -of medium-resolution mode makes this a very smooth, nearly invisible fill. It can also be combined with the 25PERCNT.FIL to produce additonal color mixes. The smaller boxes on the palette screen represent a variety of 50/25/25 percent and 75/25 percent mixes. Use the DEGAS fat bits (zoom) function to see their composition.
PALLETE.PI2 uses a very subdued palette (7,6,6; 5,4,4; 3,2,2; 1,0,0). To see the true potential of color mixing, change the colors (with SET COLORS) to pure blue (0,0,7), pure red (7,0,0), pure green (0,7,0), and black (0,0,0). Notice the full spectrum of colors now present in the palette. This screen is very helpful in exploring the art of mixing colors with light, an often confusing procedure for those accustomed to mixing pigments. The primary colors of light-from which all others can be mixed-are red, green, and blue. For pigments they are magenta, yellow, and cyan. Combining the three light primaries makes white, while the three pigments yield black.
Experiment with this palette using SET COLORS. Notice how changing the background color (far left color box on the DEGAS menu) dramatically changes the other colors' apparent value (relative darkness), and hue (color). A neutral grey (equal values of red, green, and blue) appears blueish or 'cool" against a red background, redish or "warm" when against blue.
Now set the colors to greys (7,7,7; 5,5,5; 3,3,3; 0,0,0). I prefer to start my pictures with these colors or some subtly tinted variation. This leaves subsequent color options open and lets me concentrate on defining the image as a light-and-shade value study. The shorter color bar now shows a transitional, seven-level grey scale composed of solid colors and 50/50 mixes.
The position of the colors on the DEGAS menu pallete is important. While there is no one best arrangement it is important to note that the far left position is the background color. It is transparent when using X-RAY COPY and will always be the color of your screen's border Maintaining reasonable contrast between far left and right positions keeps the menu readable.
SUGGESTIVE CHAOS/
DEVELOPING A GROUND
In painting, we speak of working from dark-to-light or light-to-dark . A prepared surface for drawing or painting is referred to as a ground . Starting with a medium-value ground allows you to work in both directions. I often work from this middle ground. I prefer one that offers some fuel for visual feedback. The amorphous pixels in the box to the right of the color bars on the PALETTE.PI2 screen are the start of such a ground.
There's nothing special about this particular smear of dots. In this case I started with a few square inches of looping AIRBRUSH strokes. By X-RAY COPYing differently sized and shaped sections 1 gradually expanded the pattern. Allowing the copies to overlap creates variations of the original pattern which are then copied, overlapped etc. With DEGAS Elite you can add further variety by rotating blocks of pixels during this process. Some diversity in the density of the pixels is a good thing. You may open up overly-clogged areas by replacing them with a BLOCK COPY from a less dense area.
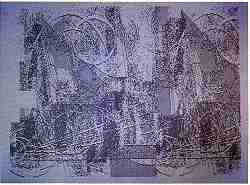
FIGURE 2
This is a satisfactory starting point but there are lots of fun ways to add to it's suggestive power. Start with this or clear the screen and create your own. Stick to one color, preferably one with low contrast against the background. Use the AIRBRUSH and COPY to fill the screen with random pixels. There are countless methods for creating suggestive patterns. Experiment with all of the DEGAS tools; try illogical and unusual applications, but limit it to the background and one low contrast ground color for now. I'm using the second color from the left on the DEGAS menu (5,4,4 in the original PALETTE.PI2; 5,5,5 in the grey palette). We'll refer to this as your ground color.
Here are a few tricks to try. Select SET SHADOW from the DEGAS menu. Set the shadow color to your ground color and the distance to 1 (any direction). Return to the menu, click on SHADOW to activate it, then select the background color (far left). Select one of the tools listed below (such as CIRCLE), and an interesting brush. Now try drawing over your random ground with this and various other tools: any wide brush with DRAW for a finger-painting effect, BOX/FRAME/CIRCLE or DISK for 3-D relief effects, AIRBRUSH for seamless blending. Take some time to get the feel of the AIRBRUSH. Try different rates of flow and speeds of hand movement. Good transitional blends can be made by slowly increasing the speed of mouse movement while drawing with the AIRBRUSH. Make multiple COPYs of narrow strips for vibration effects. Use RAYS to imply perspective grids.
With DEGAS Elite, the options for generating suggestive grounds are nearly endless. Stretching, squashing, rotating, or otherwise distorting blocks of pixels will give your ground unusual texture or "grain." STIPPLing with a small BLOCK of random pixels creates fascinating patterns very rapidly.
Figure 1 shows an early-state ground that well now follow through, step by step, to a finished piece. Don't mimic this piece. Experiment, explore, and don't set your mind on any particular image during these early stages. Any sort of garbage serves as a ground; try creating a ground entirely with lines, circles, or frames.
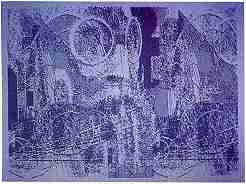
FIGURE 3
While exploring, keep your mind's-eye open for forms and objects suggested by the patterns. Try stepping back from the screen, or changing the value relationships (i.e. use SET COLOR to change the background color to something darker than the ground color, making your image light-on-dark). Take a break and look through any visual reference materials that relate to subjects you like to draw. Put away those materials before you start drawing; nothing kills the mental imaging process faster than copying.
You can influence the type of images by your choice of effects. Use linear, geometric effects for mechanical or architectural grounds; random, rounded patterns to suggest organic forms. Create several different types of grounds-keeping them vague and abstract-and save a few of the more interesting ones on disk. They provide fast starts whenever the creative urge hits.
In Figure 2, I'm adding some new elements to the ground. Most notably the 50PERCNT fill is being used (in the ground color) to break up the space and provide a third value (halfway between the ground and background shades). Using FILL and the [Undo] key alternately I test different areas for filling. When a fill leaks into undesired areas I UNDO it and dam up the fill using LINE, DRAW, CIRCLE, etc. Also, in Figure 2, I've BLOCK COPIED a large section from the left side of the screen and placed it far right. It looks very interesting to me. Although I've no firm idea of what to do with it, I'm concerned that it might be lost when I start developing an image on the left.
CHASING SPECTERS & DEFINING THE FORM
When I begin to see something worth pursuing, I sneak up on it. I'm often unsure of exactly what I'm seeing. If I see something that suggests an eye for example, I don't kill my options by drawing a line around an area that I think might define the head. Instead, I start "encouraging" the image, experimenting with subtle changes and checking the effect. At this point I may bring in a second color, still keeping the relative value differences small. Using the AIRBRUSH I start defining the form in a general way with light and shade. This is an ongoing feedback process. I'm constantly looking for new clues and pieces of the puzzle. Gradually, as the image begins to take form, I make more definitive moves.
I have established my light source (an imagined location of the light illuminating the elements in a drawing) quite early in this piece. I set the shadow to the lower left when I added circles to the ground. This implies a light source upper-right. This could easily be altered but in this case I stuck with it. The use of light and shade enhances the three dimensional illusion of a drawing.
The simplest form of shading arises when there is one point that is the source of all light. An astronaut floating alone in space provides a good example. The point-source of light (the sun) defines his shape with bright highlights, sharp shadow lines, and black shadows. If there are other objects in the area, however, sunlight reflects off of them, providing some lesser illumination to shaded areas, tending to soften the transition from light to shade. On earth we are subject to lots of reflected light: additional sources (i.e. electric lights), and diffuse sources (emanating from more than one point) like an overcast sky. It's a complicated study. Your best bet is to carefully observe. Photographs, drawings and paintings, and the real world are full of varied examples.
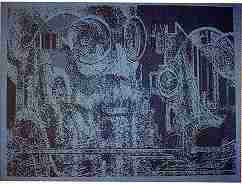
FIGURE 4
I often work with light and shade when I'm pursuing an image. My mind tends to "see" best in that mode. In some cases an image's outline is more apparent than its three-dimensional form. In any case, the method involves gradually emphasizing those aspects of the drawing that look right and subduing those that distract.
Often, during this process, images other than the particular one I'm chasing, suggest themselves. That's when one of the greatest advantages of computer graphics comes in. In most traditional media the artist is faced with lots of 'either/or" decisions. It can be a frustrating dilemma that often freezes the progress of a piece. Once a sculptor chisels away a chunk of stone, there is no turning back.
There are ways around this problem in most media hut few have the ease and flexibility of computer graphics. When an option presents itself the first thing I do is save the current picture. Now I'm free to explore this new option-perhaps just making a few visual notes or abandoning the original pursuit in favor of this new one. In any case I'm able to return to the starting point. If the exploration yields a dead-end, nothing has been lost. If it proves interesting there are now two pieces in the works.
DEGAS Elite with its multiple screens offers even greater freedom. By copying a drawing to several workscreens you are able to test options and even cut and paste from one screen to another.
Feel free to make bold decisive moves at any point, but if you're unsure of the results and like what's on the screen at the moment, save it. Don't depend too much on the [Undo] key. Though quite helpful, it has a very short memory. Keep plenty of disks on hand; graphics take up a lot of storage space. If something seems interesting but you don't know why save it. Another day it may he perfectly clear.
As an image begins to take form on the screen, some of the original ground becomes unnecessary and distracting. DISK, BOX, and POLYGON are good tools for eliminating unwanted areas and cutting out the desired shape. Working with a solid fill pattern, define the outline of the form. Other brushes or the AIRBRUSH can further refine the cutout.
In Figure 3, I've begun cutting out a head that's forming on the left side of the screen. l'm using small disks and boxes in the ground color with a solid fill pattern. Intentionally staying outside of what I imagine to be the true outline of the head, I begin roughly defining its form. This helps me to see the image and triggers new visual clues. Returning to the head itself, I further refine the features. This back and forth process continues throughout the development of the piece.
As the image becomes more definite you are likely to discover problems and incongruities. Fortunately, the computer makes certain adjustments easy If a nose is slightly misplaced you can pick it up and move it; if a figure's waist is too short you can stretch it out. In fact, if you happen to notice a very nose-like area that has unintentionally appeared in the middle of a forehead, grab it and use it. The advantage comes from not having to re-draw a particularly convincing group of pixels. This ability is greatly enhanced in DEGAS Elite by the ability to rotate and distort blocks, allowing you to change an area's orientation and size, as well as its location, to suit your needs.
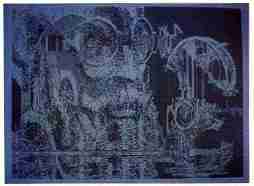
FIGURE 5
BLOCKCOPY is often the best tool for these adjustments. Its opaque nature keeps the underlying pixels from clogging up the moved area. Sometimes it's necessary to make a number of small incremental moves. This often results in distracting, repetitive patterns or edges. These can be smoothed out using the AIRBRUSH/SHADOW combination (see Developing a Ground, above) or working back and forth in different colors with the AIRBRUSH. With DEGAS Elite try SMEAR or STIPPLE. Sometimes it's possible to patch areas by covering them with a copy of another part of the drawing. The latter can also be used to add on to a form while retaining its textural continuity.
Some of these adjustments are shown in Figure 4 along with additional cutouts and clarifications. The ellipse representing the left lens of a pair of goggles has been moved slightly to the right, the shape and location of the nose has been altered, the mustache has been lowered and a lower lip added. You will notice in subsequent screens that the "damage" done by these moves and adjustments is often smoothed out. But note, for example, that the underlying circle left over from the lens move is saved and incorporated. Never assume that something is trash simply because you created it accidentally or as a by-product of a particular move. Keep an open mind and avoid automatically cleaning up your piece.
The advantages of limiting the drawing to one or two colors become apparent now. These adjusting, smoothing, and patching procedures are easier when the color mixes and textures are less complex. The drawing remains unified and congruous.
The head on the left definitely reminds me of a favorite fictional character of my imagination, Captain Nimrod. That odd thing on the right is taking the form of some kind of scientific instrument. Although I liked its form, it didn't tie in well with the rest of the picture. By moving the object to a lower position I've improved the composition and set up an opportunity to tie the two main elements of the picture together.
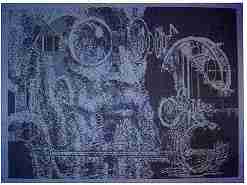
FIGURE 6
That tie-in is begining to take place in Figure 5. In addition to connecting the "scope" to the left goggle lens I've given the mechanism a more three-dimensional form by adding lines that evoke a three-quarters, rather than straight side, view.
Adjustments of composition and interrelation of picture elements reaches a new dimension in DEGAS Elite. The ability to alter the size and shape of any element, or even the entire picture, greatly expands the scope of those adjustments.
On reaching this point in a drawing, it's usually a good time to step
back, examine and rethink. Often, I'll see that I've missed a good option
at some earlier stage in the drawing. Such alternate paths are not always
apparent when you're at the right juncture for taking them. They only become
clear after exploration in other directions. In that case the best move
is to go back to an earlier version of the work and, armed with this new
knowledge, take another shot at it.
of computer graphics
makes it an ideal visual
feedback device.
In other cases a general overall reworking of the current image is called for. In traditional drawing this is often done by means of a trace-down, covering the original with tracing paper and re-drawing. It's also possible to knock-back a piece, i.e. use a translucent glaze over an entire painting to fog the image and reduce contrast. In all cases the object is to retain all of the preceding work in a subdued form that allows for refinement and adjustment.
We can use analogous techniques with DEGAS. If you've limited your work to one low contrast color over the background, the image is already knocked back. Re-draw the image with another color (greater value difference) using the original image as a guide. Now eliminate unwanted pixels of the first color by FILLing them with the background color or erasing them with DRAW or AIRBRUSH. It's usually not necessary to eliminate the underlying image entirely. In fact, it often adds to the overall picture. However, if you need to completely rid the screen of the ground color pixels, here's one trick that often saves you from lots of laborious and exacting work.
After completing the redraw, fill all of the background-colored areas with the original ground color now fill these newly created areas of ground color with the background color. Repeat the procedure as often as necessary to eventually absorb and eliminate all of the ground colored pixels. If you wish to go hunting for the few remaining pixels trapped by the redraw color it's often helpful to flush them our by temporarially changing their color to something loud like bright green. This entire process is wonderfully simplified by the CHANGE feature in DEGAS Elite that turns any background colored brush into a magic eraser that will eliminate only the color you select (just one of many uses for this tool). However users of either version will find that there are other interesting effects that come from the erosion caused by repeated fills in various colors, especially when used on multi-colored images.
Alternately after working the image up in a second color, FILL the entire background with the ground color and leave it at that. This will "absorb" the original drawing done in the ground color. Keep in mind that this fill does not change the true background color, the filled area that now surrounds the image is not transparent when using X-RAY COPY. On the other hand you have now freed up the original background color to be changed and used in further development of the piece.
Another approach is to change the background color using SET COLOR. This is useful for knocking back the work or changing the value arrangement and opening up new opportunities for highlighting and shading. I'm nearly ready to make those kind of value/color shifts with this piece. Before I do, there are a few more adjustments I'd like to make.
DEGAS Elite offers other interesting options for setting up a re-work. Among them are two very different ways to blur the image. SMEARing the image with a broad brush scrambles and softens detail and edges; shrinking, redefining, then stretching your image as a BLOCK results in an enlarged pixel effect.
The line between Defining the Form and Finishing & Detailing is more clearly drawn in this article than it is during the actual development of a picture. You'll notice that I've slipped quite a few little detailed touches into this piece already. They often help me to see the image I'm after and provide visual keypoints to aid in the placement and orientation of other elements. On the other hand there are cases where bringing in the above mentioned value/color shifts at an earlier stage provides clarification unattainable by strict adherence to a monochromatic work-up.
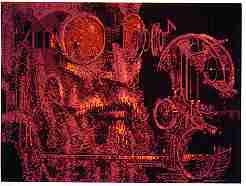
FIGURE 7
FINISHING/DETAlLING
All too often, in the course of a painting, I run into a sobering mistake. Upon adding the slick final touches to a difficult feature, say a small face, it suddenly becomes clear that it doesn't relate well with the shoulders and torso. Why didn't I see that earlier? The more vague and unfinished an image, the easier it is for our minds to correct flaws with our mental picture. Once you nail down the form with sharp contrast and definite lines, you're forced to see it for what it is. In traditional media this can spell disaster. While computer graphics allow you to make late changes with greater success, it's still advisable to keep them managable. Look over your image carefully before you start drawing in the rivets.
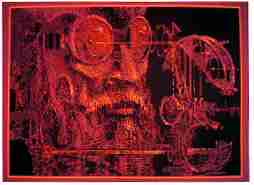
FIGURE 8
In Figure 6 I've made some last minute adjustments before trying my first color/value changes. Figure 7 shows those changes. The new colors are (left-to-right on the DEGAS menu): 4,2,2; 2,0,0; 7,3,2; 5,2,0. The background color now has a medium-level value (4,2,2) which allows the addition of highlights. Since I'm fairly satisfied with the image drawn with the ground color I've made it the darkest value (2,2,0). The previously unused third position is now the lightest or highlight color (7,3,2). With the remaining color I've given myself a mixing shade (5,2,0) that provides good medium-dark, and medium-light values when combined with the darkest and lighest colors respectively.
Figure 7 and Figure 8 show the application of these new colors. Notice how I've employed all of the possible color mixes. I imagine the location of my light source to be somewhere above and to the right. Using the two new light colors, I'm enhancing the three-dimensional illusion by highlighting those surface areas that would recieve the most light from such a source. Simultaneously I'm darkening those surfaces that are hidden or turned away from the imagined light source. Reflected light is implied by the brown orange mix on Nimrod's right cheek (his right, left side of screen).
I'm primarily working with the airbrush at this stage, switching colors and seeking out the light and shadow balance. The 50PERCNT fill is also being used to add color and distinguish forms (e.g., the goggles). The same fill/Undo/dam procedure described in Developing a Ground works here. Some of the most interesting and surprising changes have arisen in my work as the result of runaway fills. If this sort of happy accident occurs the best course is to: (1) Undo it, (2) Save the drawing as it appeared before the fill, and (3) Recreate the "error." This keeps your options open just in case you later decide that it truly was a mistake.
Detailed touches, like those showing up in Figure 8, snap a picture into focus. By carefully selecting the right areas to emphasize, you can make everything else fall into place. A variety of tools are used to refine the image: small brushes in POINT mode to spot in highlights and shadows, BOX and DlSK to trim edges, and zoom (Function key 1) for minute changes. I've also added a border to the drawing, using FRAME, which helps separate the image from the border area of the monitor display.
Avoid overworking your drawing. If something looks right, don't mess with it. Try to achieve the most with the least; define key points of objects and let your mind's eye fill in the blanks. Try locating the central "hot-spots" of highlights, the deepest recesses of shadow, and work outward from there. Pause and assess the effects frequently.
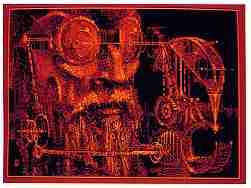
FIGURE 9
Included on your START disk are three brush designs I find useful in
the latter stages of a drawing. The first is called MINIAIR.BRU, load it
by selecting MAKE BRUSH from the
DEGAS menu. This brush comes in handy for reaching tight spots where
the AIRBRUSH won't fit. Because of its "checkered" design it's useful for
mixing colors in areas where working with the 50PERCNT fill is impractical
(similar brushes with alternating vertical lines are also handy). Use this
brush in the POINT drawing mode for accurate placement and to control the
mixing effect. The other two brushes, POINTUP.BRU and POINTDN.BRU, are
wedge-shaped sprays designed for tight spots.
I often create special brushes for specific applications. The ribbed effect on the bridge of Nimrod's goggles was created by repeating a special brush pattern. A similar effect-with a different tool-is seen on the grill (lower left portion of the instrument). Block copy was used to repeat a single bar of that grill.
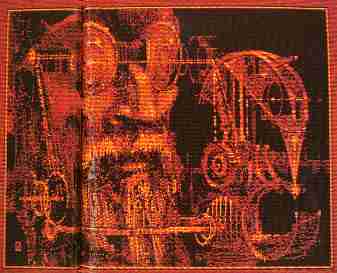
The final picture, Figure 9, is included on your START disk (NIMSCOPE.PI2)
so that you may load it and examine it in zoom mode to see how the brushes
and fills have been used.
Of course this isn't the end. I'll undoubtedly return to this piece
and try major and minor variations. Several spinoffs have been initiated
in the course of its creation that I'm following up on. With DEGAS Elite
I can load this picture into the low-resolution mode and, with some minor
loss of detail, have 16 colors to work with. DEGAS users can accomplish
the same thing with a graphics conversion program such as Patrick Bass'
GRAFCON ST (ANTIC July '86).
The DEGAS/ST combo forms a truly magic medium with limitless possibilities. What I've offered here is only one of many approaches that I use to create images. With DEGAS Elite the potential has taken a quantum leap. While I hope that you find these techniques helpful, I encourage you to incorporate them with new methods that you discover in the course of exploration.
PRODUCT INFORMATION
DEGAS and DEGAS Elite
Batteries Included
30 Mural Street
Richmond Hill, Ontario L4B 1B5, Canada
(416) 881-9941
Telex: 06-986-266
CIRCLE 289 ON READER SERVICE CARD