The Compukid Connection: Dot-to-Dots
LOW RESOLUTION
NOTE: Due to its large size, this program is available only on this month's disk or in the database of the ST-LOG ST users' group on DELPHI.
by D. A. Brumleve
Dot-2-Dots is a computerized version of the familiar dot-to-dot puzzle game. Designed for young children in the pre-school and early primary grades, this version allows the child to manipulate the characters in the dots so that a sequence of numbers, upper-case or lower-case letters may be followed when solving each puzzle.
Successful completion of a puzzle is rewarded: The child is offered a color palette from which to choose colors to paint the on-screen puzzle picture. If a dot-matrix printer is available, the child may print out a puzzle for solving on paper or for coloring and embellishing with crayons. Dot-to-dot puzzles can be great entertainment for young children, and the extra features of Dot-2-Dots enhance that enjoyment.
In addition to the dot-to-dot game for the very young, a puzzle editor is provided for use by an adult or an older child in creating additional puzzles. (Puzzle creation can be fun, too!) Both the game and editor programs will run in low-resolution on any color ST.
Getting started
To use the programs, first unarchive the DOT2DOTS.ARC file on your ST-Log disk (instructions for this are provided on the disk in the DEARC.DOC file) and copy DOT2DOTS.PRG, DOTMAKER.PRG and DOT2DOTS.DAT to a freshly formatted disk. The files DOT2DOTS.LST and DOTMAKER.LST contain the GFA BASIC listings of the programs; they are needed only if you want to examine the source code.
Your disk should remain in the same drive at all times during play so that new puzzles can be loaded. The programs will operate from a folder, provided all three files are present in that folder. The programs will also operate from a hard drive.
The game
Double-click on DOT2DOTS.PRG. After a brief wait, you will be presented with a title screen. Click CONTINUE and a dot-to-dot puzzle will be loaded automatically. A mouse arrow on the screen moves to each consecutive dot in the puzzle, demonstrating how to play the game. When the puzzle is complete, the arrow fills the puzzle box with color.
Following this on-screen tutorial, the main screen appears and a puzzle is automatically loaded for play. To play, simply click on the white dots in numerical order. If you click on the wrong dot or on no dot at all, you'll hear a low tone. If you click on the expected dot, the dot turns red. Upon successful completion of the puzzle, you are presented with an opportunity to fill the puzzle with color. When you are finished coloring, click DONE to return to the main screen and begin a new puzzle.
The main screen has seven options: EXIT allows you to leave the program gracefully; HELP provides a review of these main screen options.
PRINT allows you to print a puzzle in one of two ways. The "Dots Only" option will print unconnected numbered or lettered dots, while the "Lines Only" option prints the lines connecting the puzzle dots, but not the dots themselves. In either printing mode, any extra lines provided by the puzzlemaker (not necessarily connected to the dot points) will also be printed. Children enjoy printing out puzzles to be colored by hand with crayons. If you have trouble with your printout, please refer to the "Printer Problems" sidebar. To load a new puzzle, click on NEW. The computer selects a puzzle at random and displays it.
The last three white option boxes allow you to change the dot numbering/lettering system. For example, if you'd like to work a puzzle with uppercase letters inside the dots, just click the "A" icon. Upper- or lowercase letters, or the numbers 1-26, can be used. The letters are mostly in the standard Atari font, but some were changed because they were difficult for small children to identify. (Over 200 lines of source code are devoted to the redesign of these letters.)
All options are available at all times (except when you are coloring the puzzle). For example, if you begin work on a puzzle and decide not to finish it, just click on NEW to load a new puzzle. If you decide halfway through that you would rather work with the letters "a" through "z" than with numbers, just click on the "a" icon.
The editor
The key to enjoying Dot-2-Dots is, of course, in the quality of the puzzles; uninteresting puzzles will not challenge a child for long. Because the reward for successfully completing a puzzle is the fun of filling it with color afterward, puzzles should be divided into several fillable compartments whenever possible.
Puzzles must also be geared to the age and skills of the child. A child who can count no further than ten will be frustrated by a puzzle of 26 dots. It is a good idea to arrange the puzzle dots from left to right (or clockwise, if appropriate), providing important eye exercise for pre-readers. The interests and experiences of the child can suggest the subject matter; a child who loves dinosaurs will also love your brontosaur puzzle.
When completed, the puzzles should resemble something, not just be a mess of points and lines, because part of the fun of working with dot-to-dot puzzles is in guessing what each puzzle represents. A variety of puzzles is provided in DOT2DOTS.DAT on your ST-LOG disk, but after several plays, a bright child will be able to guess what each puzzle is on sight. New puzzles will be needed to maintain his/her interest. For this reason, DOTMAKER.PRG is offered to enable you to create additional puzzles for the amusement of your young one. The user-interface of this editor is suitable for use by children as young as eight, but offers enough features to satisfy the requirements of adult puzzlemakers as well.
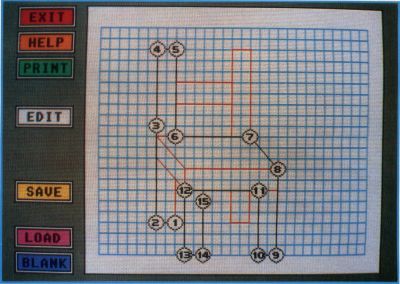
The main screen of DOTMAKER.PRG is very similar to that of the game itself. Instead of a blank white puzzle area, there is a blue design grid to help with the alignment of dots and lines. The EXIT, HELP and PRINT options function the same as in DOT2DOTS.PRG. In the game program, all the options are available at all times. In the editor, however, certain options will not function unless you have a puzzle in progress. For example, the PRINT option is not available when there are no puzzle dots to print; clicking on PRINT when the design grid is blank will result in no reaction from the computer.
SAVE allows you to add a puzzle to the DOT2DOTS.DAT file on your disk. When you click SAVE, you'll be asked whether or not you want the first and last dots of the puzzle to be connected by a line. A further alert will confirm that you want to save the puzzle and give you a chance to change your mind. Each puzzle adds 255 bytes to DOT2DOTS.DAT.
LOAD will load an existing puzzle from the puzzle file. If you click LOAD repeatedly, you can see all the puzzles in the file in the order in which they were saved. BLANK erases whatever puzzle is currently on the design grid. No alert boxes will caution you when you click LOAD or BLANK; I found that too many alerts made working with the program annoyingly slow. Instead, these options were placed at the bottom of the screen, where they are unlikely to be selected accidentally.
The actual editor screen, from which puzzles can be created or altered, is reached by clicking the EDIT option on the main screen. When the editing menu appears, the DOTS option is already selected. Your arrow cursor changes to a crosshair, which has a hole in the center so you can see the color of the pixel below it. If you click on the blue grid area, a puzzle dot will appear under your cursor. Clicking a second time places a second dot, and a line will connect the two dots.
Now choose the LINE option. This option is used to add extra lines to your puzzles—lines that will not be drawn automatically as puzzle dots are connected. Click on the grid and a tiny red dot will appear. This is the beginning point of a line. Click again to choose the end point of the line, and a red line will connect the points.
If you now click UNDO, the entire line will be erased. UNDO will erase the last drawing action unless you have changed from the DOT mode to the LINE mode (or vice versa), or have changed a dot using ALTER, or have returned to the main screen since that action. Clicking on SHOW does not interfere with the functioning of UNDO. If you click UNDO after drawing a puzzle dot, the dot and any connecting line will be erased. If you click on UNDO after drawing the beginning point of a line, only that point is erased.
Puzzles often need a bit of fine-tuning. If you want to adjust the position of a dot or remove it completely, click on ALTER. You will then be prompted to identify the dot to be changed. After clicking on the dot, choose "Replace" or "Remove." If you choose to replace the dot, you will be prompted to click on a new place on the grid for repositioning. (If you decide that you prefer the original position of the dot after all, simply "Replace" it in the same spot.)
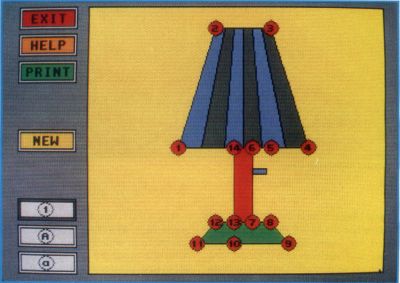
The grid and the colored lines serve a useful purpose, but they do not show you exactly how the puzzle will look when loaded into DOT2DOTS.PRG for play. In addition, the first and last dots are not connected on the design grid, but you may save your puzzle so that a line will appear between these two dots when the player chooses the final puzzle dot in the game program. To see the puzzle as it will look to the player, click SHOW. You may examine the puzzle with dots and added lines (these are the red ones you add while in LINE mode); this is the way the puzzle will be presented when the player clicks NEW in DOT2DOTS.PRG. You can also view the puzzle with the lines connecting the dot points, but with no dots. That is the way the puzzle will look when the player is rewarded with a chance to color it in DOT2DOTS.PRG.
There are some limitations on puzzle design. One of the most obvious is that only 26 dots can be used. This number was chosen because there are 26 letters in the alphabet. I considered for a time attempting to put double letters ("AA" or "aa") inside the dots, but the size of the screen would limit the number of dots anyway, and I have found that 26 dots are sufficient for most puzzles. When more points are needed, they can be obtained by adding extra lines. An example is provided in DOT2DOTS.DAT. I didn't have enough dots to make the teddy bear puzzle as I wanted it, so I added arms in the LINE mode.
There is also a limit on the number of lines—only 50 lines can be drawn (defining 100 points). I have found this to be generous; only in the apple tree puzzle did I use all 50 lines. There is also a limitation on the placement of dots so that they are not too close together. If you try to place a dot too close to an existing dot, the program will alert you. Children need large targets for the mouse, and the dots are relatively small. In the dot-to-dot game program, children are permitted to "miss" the dot by a pixel or two, so there must be some space allotted around each dot to allow for this. There is no limitation on the placement of extra lines. Dots and lines can be placed on the outer edges of the blue design grid, but not on the white area surrounding it.
Be sure to SHOW your puzzles before saving them. This often reveals deficiencies in a design that will not be noticed by looking at the design grid. When I prepared the chair puzzle, for example, I omitted one of the rear legs. If I hadn't viewed the picture with the "Lines Only" option, I wouldn't have noticed the error until the chair puzzle was used in a game. I've also found that it is a good idea to draw the extra lines after you are certain you have the dots exactly where you want them. I use two disks when I design. One is a temporary disk on which I save each puzzle with only dots—before I have added any lines. That way, if I'm dissatisfied with the placement of lines, I can always load the dots-only version back into the program and try to place the lines again. Don't be disappointed if your first few attempts look silly; puzzle creation taxes one's thinking, and a bit of practice will help tremendously. Your child will appreciate your efforts!
|
PRINTER PROBLEMS Both the editor and the game program use a command for a screen dump in order to print a puzzle. This procedure will provide an excellent copy of a puzzle from most dot-matrix printers. To test your printer's ability to accept a screen dump, first make sure your printer is on and connected (and loaded with paper!). Then, from your ST's desktop, press and hold the Alternate key and at the same time tap the Help key. (Just tap the Help key; if you hold it down, the printing process will keep cycling on and off.) Your printer should kick on and print out a picture of the screen. If the printout shows the entire screen, including the right edge, printouts can be made with DOT2DOTS.PRG and DOTMAKER.PRG without difficulty. If, however, the test printout omits the right edge of the screen, you will need to do the following:
Whenever you use DOT2DOTS.PRG or DOTMAKER.PRG, reboot your computer from the boot disk. Your printer will automatically be set up to print a full-view screen dump. You will not need to change the "Pixels/Line" setting again, as that has been saved in a DESKTOP.INF file on your disk. A common problem with printouts involves the left-to-right adjustment of the puzzle. It is my intention that the puzzle box be centered on the printed page. The program is designed to make this the most likely position, but if your printout is off-center, you may want to adjust the position of your paper before printing. |
The mother of five children, ages 2 to 10, D.A. Brumleve is involved with children and computers in a variety of ways. An avid programmer, she has developed a beginner's course in GFA BASIC and is the author of PreSchool KidProgs (MichTron) and numerous freely distributed programs for young ST users.