FEATURE
MicroCheck ST
BY CLAYTON WALNUM
It has been over four years since ANALOG Computing published the original version of my home-checking program, MicroCheck, and as amazing as it may seem, I still regularly get mail about it. It's not often that an author's first published work gets that kind of attention.
Of course, because of the original MicroCheck's popularity, nothing would do but that I sit down and write a version for the ST. "It'll only take about six months," I said to myself.
Two years later....
Note: Due to the large size of this program, it is available only on this month's disk version or from the databases of the ST-LOG ST user's group on DELPHI.
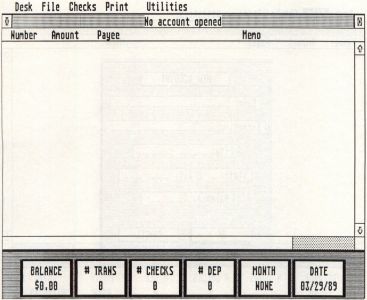
To run MicroCheck ST from the desktop, double-click on the file MICROCHK.PRG. (Make sure the file MICROCHK.RSC is in the same directory.) When the program has loaded, most of the screen will be filled with a window, and it is here that your check data will be displayed.
Getting started
To run MicroCheck ST from the desktop, double-click on the file MICROCHK.PRG. (Make sure the file MICROCHK.RSC is in the same directory.) When the program has loaded, most of the screen will be filled with a window (see Figure 1), and it is here that your check data will be displayed. Across the top of the screen is the menu bar. MicroCheck STs various functions can be accessed by selecting them from this menu or by pressing the equivalent keystroke commands. (The keystroke required is shown next to each item in the menu. Hold down Control and press the appropriate key.)
Across the bottom of the screen are six boxes that contain various information about your account. From left to right they are the account balance, the number of transactions, the number of checks and the number of deposits in the currently opened month, the month you're working on and the date. Before an account is opened, most of these boxes will contain zeroes.
The window contains scroll bars and arrows that will allow you to see information that doesn't fit in the window. You use these in the normal GEM fashion, clicking or dragging them with the mouse pointer. Scrolling the window to the right will allow you to see the dates on the checks. All other information fits in the window. Vertically, the window will hold 16 checks. If the window is fully opened by clicking on the full box in the upper right corner of the window, you can fit 20 checks, but you won't be able to see the information boxes at the bottom of the screen. If you have more than this number of checks in the current month's data, you can view them by moving the appropriate scroll bar or by clicking on the arrows.
Setting the date
MicroCheck ST uses the date shown in the date box for printing on reports. When the program is first run, it gets this date from the computer's system clock, so at the beginning of a MicroCheck ST session, you should make sure that the date shown in the date box is correct. If your ST has a battery-backed-up clock, or if you've already set the ST's date from the desktop, the date shown in the date box should be okay. Otherwise, you'll need to set it yourself.
To set the date, select the Date option from the Utilities drop-down menu or press Control-D on your keyboard. A small dialog box will appear. Enter the new date in the form mm/dd/yy, and then click on the OK button to install the new date.
If, after selecting the Date function, you decide not to change the date, you may cancel the operation by clicking on the dialog box's CANCEL button.
Starting a new account
The first thing you must do to use MicroCheck ST is create a new account. This procedure creates all of the files the program needs to keep track of your checking activity. You need to perform this process only once for each account you want to start.
Most of you will have only one account on your data disk; however, you can have as many accounts on your disk as will fit. Keep in mind, though, that as you add transactions to an account, its files will get larger. Make sure you have enough room on the disk. An average home checking account needs about 50K of data space, plus an additional 72K for the MicroCheck ST program and resource files.
To create an account, select New from the File drop-down menu or press Control-N. A dialog box will appear, prompting you for the personal information the program requires. (See Figure 2.) Fill in your name and address (this information will appear on the check-entry dialog box, simulating the appearance of an actual check) and the starting balance for your account. Note that you don't have to enter a full nine-digit zip code; the program will be perfectly happy with only the first five digits. You can move between the dialog box's various fields using the up and down arrows on the keyboard. (The Tab key will move you forward one field.) When you've entered all the information properly, click on the OK button to proceed. At any time, you may click on the CANCEL button to discontinue the creation of a new account.
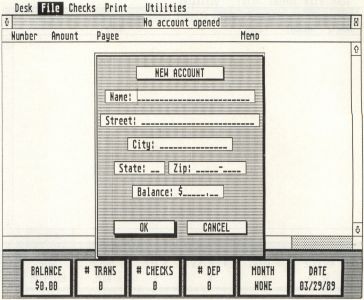
To create an account, select New from the File drop-down menu or press Control-N. A dialog box will appear, prompting you for the personal information the program requires. Fill in your name and address and the starting balance for your account.
When you click on the OK button, another dialog box will appear, asking for the account's base filename. The program will use this filename as the starting point for creating all the files needed for your account. For example, I might want to name my account WALNUM. When I enter this filename, MicroCheck ST will create a file for each month, named WALNUM1.DAT, WALNUM2.DAT, WALNUM3.DAT, etc. The program will also create a file named WALNUM.MCK, which will contain the information that I entered in the new-account dialog box.
Enter your account's base filename (you're limited to six characters), and then click on the OK button to finalize your entry. If you wish to discontinue the new-account process, click on the CANCEL button.
When you click the OK button, the program will create your on-disk account. After this process is completed, the program will display yet another dialog box, prompting you for the month you wish to open. (See Figure 3.) Select the month by clicking on the appropriate button and then on OK.
Because your newly created account contains no data, an alert box will appear informing you that the current month file is empty. Click on the YES button if you want to start entering transactions into your new account. Click on the NO button to leave the new account as it is.
If you have been using the 8-bit version of MicroCheck (published in the February and March 1985 issues of ANALOG Computing), it is possible to port the data for your account over to the ST version. For information on how to do this, see the section titled "Porting 8-bit files."
Opening an account
The account creation process described above need only be done once for each account that you wish to use However, every time you run MicroCheck ST, you must open the account that you want to work on.
To open an account, click on the Open selection of the File menu or press Control-O. A GEM file selector will appear. Double-click on the .MCK file for the account you wish to open, and you will then be presented with the month-selection dialog box. Click on the appropriate button; then click on OK to continue—or CANCEL to abort the Open function.
If the month you open contains no data, you will be asked if you wish to start a new month. Click on the YES button to open the month. If you click on YES, the new month will be opened, and any automatic transactions you have in your .AUT file will be added to the new month's data. (See the section titled "Automatic transactions" for more information.)
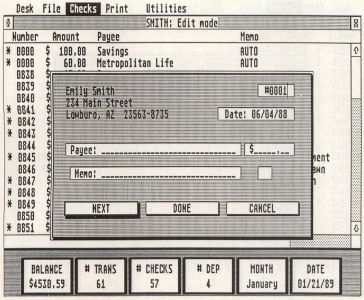
When a account is first opened, MicroCheck ST is in the edit mode as indicated in the window's title bar. (See Figure 4.) In the edit mode you may enter new transactions or modify previously entered transactions.
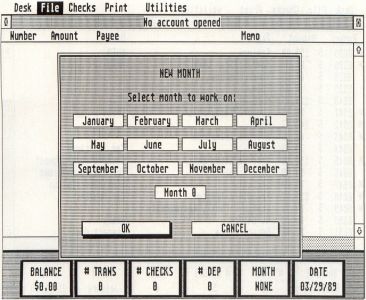
Enter your account's base filename (you're limited to six characters), and then click on the OK button to finalize your entry. When you click on the OK button, the program will create your on-disk account. After this process is completed, the program will display yet another dialog box, prompting you for the month you wish to open. Select the month by clicking on the appropriate button and then on OK.
Entering checks
Once you have an account opened, you'll want to begin entering checks. To do this, click on the Enter entry of the Checks menu or press Control-E. The check-entry form will appear. (See Figure 5.)
The check-entry form contains fields for all of your check's data, plus three buttons across the bottom. You can move between the check fields by using the up and down arrow keys. The tab key will also work, moving the cursor forward one field at a time. To jump quickly to a specific field, click on the field with the mouse.
The check number is, of course, the number of your check. This field will automatically advance by one each time you enter a check; so if you're processing your checks in order, you won't have to type anything in this field after the first check has been recorded. Note, however, that there are two reserved check numbers that you may not use for your normal checks: 0000 and 9999.
You should use a check number of 0000 for any transaction (other than a deposit) that was performed without a written check. For example, you might withdraw money from your checking account using an ATM (automatic teller machine). Even though you haven't actually written a check, you must nonetheless record this transaction.
The check number 9999 is reserved for deposits. Any time a transaction credits your account, this check number signals MicroCheck ST to add the amount of the transaction to your balance rather than subtracting it. Don't enter anything in the Payee field of a deposit (it won't hurt anything if you do, but you'll be wasting your time). MicroCheck ST automatically places the word "DEPOSIT" in this field when the checks are displayed in the check window. (Nothing will appear in the check-entry dialog box's payee field when you first enter the check.) If the credit comes from something other than an actual deposit (for instance, an interest payment), use the Memo field to note it.
When all of the information for a check has been entered, you must click one of the buttons along the bottom of the check form—or simply press Return to enter the current check and set up the form for the next. Clicking on the NEXT button has the same effect as pressing Return. Clicking on the DONE button enters the current check, then closes the check-entry form. Clicking on CANCEL closes the checkentry form without entering the current check.
Editing a check
If you find that you must edit a previously entered check, use the mouse to click on the check's entry in the window, and the check-edit form will appear. This form looks almost identical to the check-entry form. The only difference is that the NEXT button is no longer functional, and the DONE button is now the default (the button that will be selected if you press Return). When the form appears, make whatever changes you wish to the check's data, and then press Return or click on the form's DONE button. If you click on the CANCEL button, the check entry will remain unchanged, even if you changed some of the fields in the check-edit form.
If you make any changes to the amount of the check, your balance will, of course, be updated to reflect those changes.
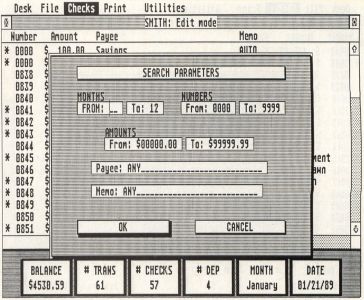
Searching checks
If you need to locate a check or group of checks, you can use MicroCheck ST's search feature. To access this function, click on the "Search" option of the Checks drop-down menu or press Control-S. The search parameter-entry form will then appear. (See Figure 6.) When the form appears, each of the search parameter fields will contain default values. If you were to use all of the default values, you would be searching for every check in your account.
FIGURE 4When an account is first opened, MicroCheck ST is in the edit mode as indicated in the window's title bar. In the edit mode you may enter transactions or modify transactions that have been previously entered.

Fill in the parameters for the search, using the arrow keys, Tab key or mouse to move between the form's various fields. When you've filled in your search parameters, press Return to begin the search, or click on the OK button.
During a search, the parameters you entered are compared to the data found in each entry of your account. If the transaction matches every criterion in the search, it is added to the check list. Note that both of the text fields in the search parameters, Payee and Memo, will allow partial matches—that is, a payee search parameter of Ta will match checks with such payees as Tammy Brooks, Tabitha White and Tadbury Lumber. To find every check with a payee field beginning with G, just enter G as the payee parameter. Also note that the search function is not casesensitive. To MicroCheck ST the letter "G" and the letter "g" are the same value.
A search is limited to a check list of no more than 1,000 entries. If the number of matches exceeds this (highly unlikely), an alert box will appear, informing you the search window will hold no more checks.
When the search is complete, a dialog box will appear showing the totals for the search. Click on the OK button or press Return to remove this dialog box, and the checks that matched your search criterion will appear in the check window. You are now in MicroCheck STs search mode, in which you may not edit or enter transactions. To exit the search mode and return to the edit mode, click on the Close entry of the File drop-down menu, press Control-C on your keyboard, or click on the window's "close box," located in the upper left corner of the window.
Selecting a new month
Many times when entering transactions, you may have to move from one month to another. To close the current month and move to another, click on the New Month entry of the File menu or press Control-M. The new-month dialog box will then appear. To select a new month, click on the appropriate month button and then click on OK. To exit the dialog box without selecting a new month, click on the CANCEL button.
Printing check data
MicroCheck ST provides two methods of creating hard copies of your checking account. In the Print drop-down menu, you will find the selections Window and Register. The former is used to print only those checks in the current window; the latter prints the entire account. Click on the appropriate menu selection, or press Control-W or Control-G, respectively.
Cancelling checks
When you receive your statement from the bank each month, you must go through your account and mark those transactions that the bank has processed. This is the first step in "reconciling" your account, a process that ensures that your figures match those of the bank.
To enter MicroCheck STs cancel mode, click on the Cancel entry of the Checks drop-down window or press Control-P on your keyboard. A dialog box similar to the one shown for selecting a new month will appear. Click on the month you want to work on, and then select the OK button; the mode displayed in the window's title bar will then change from edit to cancel.
In the cancel mode, whenever you click on a check displayed in the window, instead of bringing up the check-edit form, MicroCheck ST will place an asterisk next to the entry, indicating that the bank has processed that transaction. To uncancel an entry, click on it a second time. The asterisk will be removed.
Once you have an account opened, you'll want to begin entering checks. To do this, click on the Enter entry of the Checks menu or press Control-E. The check-entry form will appear.
When you're finished cancelling transactions, return to the edit mode by clicking on the Close selection of the File menu, press Control-C, or by clicking on the window's close box.
Reconciling your account
Once you've gone through your statement and cancelled all the appropriate transactions, you may reconcile your account. Click on the Reconcile entry of the Checks drop-down menu or press Control-R on your keyboard. A dialog box will appear, requesting your account's ending balance as shown on your bank statement. Once you've entered this amount, press Return, and MicroCheck ST will read through all your check files and, after making the appropriate calculations, display a final report. (See Figure 7.) If the amount shown at the bottom of this report is 0, then your figures agree with the bank's. Otherwise, either you or your bank made a mistake.
Press Return to exit from the reconcile-report dialog box.
Adjusting your balance
Sometimes, no matter how hard you try, you simply cannot get your account to agree with your bank statement. Usually this means that you've made a mistake somewhere in your account—maybe a check is made out for a different amount than what you recorded—that you have not been able to find. Although you should always try to reconcile your account properly, there may be times when you have to give up. In those cases, the best you can do is adjust your account's balance to agree with the one on your statement.
To perform this adjustment, enter a dummy check or deposit transaction for an amount that will bring your balance to the proper amount. When entering a dummy check, use the number 0000. These dummy transactions should be cancelled, just as if they had appeared on your statement.
Automatic transactions
Many banks can, at your request, set up your checking account so that it will automatically pay out checks at specified times each month. This type of service works out well for all the parties involved. It's convenient for you not to have to remember to write a check every month, and the payee (maybe an insurance company or a telecommunications service) can be reasonably sure it will get its payment regularly and on time.
Of course, if your checking files are going to be accurate, these transactions need to be entered into files just like any other. Fortunately, MicroCheck ST provides you with a method of handling automatic transactions, both debits and credits. You need enter this type of transaction only once, into a special file, after which time it will automatically be added to your account's data every time you start a new month.
To set up an automatic transaction, click on the Auto selection of the Checks drop-down menu or press Control-A. The check-entry form will appear with the memo field already filled in as AUTO. Simply fill out the check data as normal. When the form has been completed, and you press the OK button, the check will be added to your auto file (the file with the .AUT extension). Every time you open a new month (one whose file contains no check data), the transactions in the .AUT file will be automatically added to that month's data.
Figure 6If you need to locate a check or group of checks, you can use Microcheck ST's search feature. To access this function, click on the Search option of the Checks drop-down menu or press Control-S. The search parameter-entry form will appear.
If you've never entered an automatic transaction into your account, there won't be an .AUT file on your disk. When you attempt to add your first AUTO check to the account, you'll be asked if you want to start a new AUTO file. Click on the YES button, and the file will be created for you.
If you ever want to discontinue the use of the automatic transactions, simply delete the .AUT file from your data disk.
Closing your account
When you're ready to conclude a checking session, it's important that you close your account. Failure to close your account properly may result in lost check data!
To close your account, click on the Close entry of the File drop-down menu, press Control-C or click on the window's close button. You may close your account only when in the edit mode.
Quitting
You may return to the GEM desktop by selecting the Quit entry of the File drop-down menu or by pressing Control-Q The Quit selection is a safe way of closing your account. All your data files will be properly updated before the program terminates.
Starting a new year
MicroCheck STs calendar runs from January to December. That means that, come January 1, you must clear out the old files and start anew. Before you do this make sure you have backed up your MicroCheck ST data disk! If you fail to do this, you will have no way to refer to the previous year's files.
Before you can set up a new year, you must close the account you have open (if any). Then click on the New Year entry of the Utilities drop-down menu or press Control-Y. You will be asked if you really want to create a new year. If you click on the YES button, you will be asked again, just to make sure—remember, this function will destroy existing MicroCheck ST files on your data disk. Finally, a file-selector box will appear. Click on the .MCK file for the account you wish to set up for the new year.
MicroCheck ST will go through your entire account, deleting all cancelled transactions and moving uncancelled transactions into a special file for Month 0. The Month 0 file can be manipulated just like any other month's file and is simply a place where unprocessed transactions from the previous year can be stored until your bank statement shows that they have been processed. When you get your bank statement, you should go through Month 0, cancelling checks the same way you would for any other month.
When the New Year process has been completed, your account will contain check data only in Month 0 (and only then if you had uncancelled transactions in your account, which is likely); all other months will be cleared. (You made that back-up, right?) Automatic transactions, however, are unaffected by the New Year process and will still function properly with the new year's files.
Porting 8-bit MicroCheck files
For those of you who have been using the 8-bit version of MicroCheck, the ST version provides a function that will convert the old checking files for use with this program.
The first step in this process is to move the files from the 5 ¼-inch disk to a 3 ¼-inch disk. There are two ways to do this. The first method requires a "null-modem" cable A null-modem cable allows two computers running telecommunications programs to directly transfer files between them and may be purchased at most Atari computer dealers. To use the cable, connect one end to your ST's modem and the other end to your 8-bit computer's modem. Then run a telecommunications program on each computer. Set your ST to receive X-Modem, then do an X-Modem send of all the MicroCheck monthly files from your 8-bit computer.
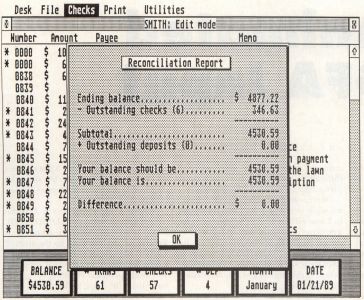
Click on the Reconcile entry of the Checks dropdown menu or press Control-R on your keyboard. A dialog box will appear, requesting your account's ending balance as shown on your bank statement. Once you've entered this amount, press Return, and MicroCheck ST will read through all your check files and, after making the appropriate calculations, display a final report.
Another way to do the transfer is to use your 8-bit computer to upload the MicroCheck data files to a BBS system or into your workspace on a commercial online system such as DELPHI, GEnie or CompuServe, and then download your files onto your ST. (If you use a BBS for this transfer, you'll need to make special arrangements with the SYSOPs. You don't want to find all your checking files in a public download area!)
Whichever method you use, make sure that you make the X-Modem transfer in the binary mode rather than in the text mode. And note that the only files that you need to transfer are the monthly data files. On your 5 ¼-inch disk, these files are named MONTH00.DAT, MONTH01.DAT, MONTH02.DAT, and so on. Further, note that empty months need not be transferred. When you run MicroCheck ST's Import function, it'll create new month files for any 8-bit data files that are missing.
Once you have the files transferred, place them in the same directory as the MicroCheck ST program, and then run MicroCheck ST. Create a new account as described in the section "Starting a new account" above. For the account's balance you should use the balance shown in your 8-bit MicroCheck account. When the new account is ready, click on the "Import" selection of the Utilities drop-down menu. An alert box will appear, asking if your 8-bit MicroCheck files are in the same directory as the MicroCheck ST program. If you're ready to continue, click on the YES button or press Return. A file-selector box will then appear. Select the .MCK file for the new account you just created, and MicroCheck ST will then transfer your 8-bit checking data into that account.
If you had any automatic transactions in your 8-bit account, you will need to reenter them using the method described in the section "Automatic transactions" above.
Conclusion
This program has been in the works—off and on—for over two years, and I have to admit that it is with great relief that I release it to the pages of ST-LOG. Although I suppose it's too much to hope that MicroCheck ST will be as popular as its predecessor was (according to some unwritten law of the universe, an author usually is allowed only one mega-hit per lifetime), I'm confident that you will find it a useful addition to your applications software library. Use it in good health—and may your account always balance.

The author would like to thank Jim Gross for his relentless efforts in beta-testing this program and for his helpful suggestions. Jim's uncanny ability to crash even the most solid of programs has made this the best it can be.