the Animation stand: STORYBOARDING
BY MAURICE MOLYNEAUX
Blissfully ignorant of the realities of time and space and plain old common sense, Maurice Molyneaux hopes someone will someday discover "retroactive reincarnation" so that when he dies he can come back in a previous life as animation director Chuck Jones. His greatest fear would be to come back as Wile E. Coyote, and in the process have to learn some humility.
Last issue I covered some of the techniques of conceiving a project. This time we'll talk about how to bring those ideas of yours under control and in a form you can animate.
The Storyboard
The storyboard was originally a tool of animators only, but it's become a standard mechanism for presenting ideas in all types of filmmaking, ranging from live-action shooting to special effects production.
A storyboard is a "shorthand" version of the animation/film you are planning. It should be thought of as a visual outline of the work, sort of a picture-oriented script that uses a series of drawings to indicate, break down and visualize all the action. Looking at a storyboard is a bit like looking at a comic strip, where each drawing represents a particular point of view and/or action. These drawings depict roughly what the finished scenes may look like, including the viewing angle, what appears in view, the size of objects/characters and their relationships with other items in the scene, direction of movement, and so on. It may also indicate drawing style and even colors if you choose to make one that detailed.
Each drawing is usually accompanied by text describing the action, in addition to noting crucial details like the length of the shot, sound and special effects, and so on. Generally, the more complex the action you plan, the more frames in the storyboard. You can storyboard a 20-second pan with one drawing and an arrow indicating the direction of the camera movement. However, a ten-second shot of a character getting off the ground, grabbing a rifle, loading it, aiming and firing, might require between four and six drawings minimum to clearly show all the actions.
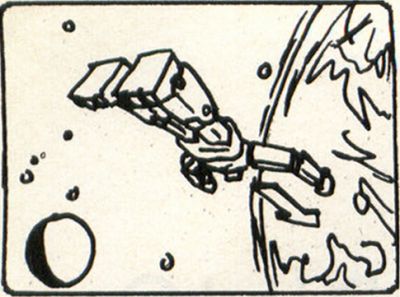
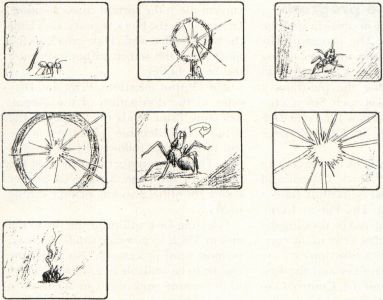
Figure 1 (page 38) is an example of a storyboard; in this case it's the infamous Japanimation sequence that was deleted from the Art & Film Director video I created for Epyx. Note that a new picture appears every time there is a major movement, change in the scene, or variation in view-point. Just by looking at these drawings you can get a feel for how the shot would have looked.
There may not seem to be much to these storyboards, but there is a structure to the way the scenes and actions are presented, which I shall explain now.
As I said last time, the plan for the scene was this: Characters aboard a giant robot spacecraft are conversing about some problem. Momentarily, a kid character in the background starts talking tough, rattling on and on until we can't stand it any more. At this point, Megabit Mouse enters the scene and shoots the kid to shut him up. In animation we must present all this in a manner that will allow the audience to understand where we are, what we are looking at and where the various characters are in relation to one another, while at the same time actually carrying through with whatever business (action) the scene entails.
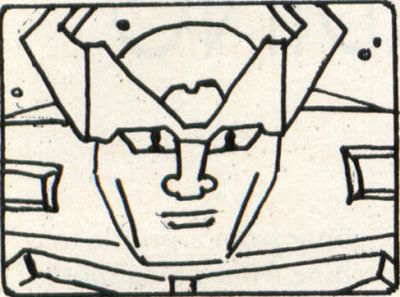
Let's consider why the storyboards were drawn as they were. The characters are in a giant robot ship heading towards Earth. I established this by first drawing a robot flying towards the Earth (note the arrow indicating how it is to move). I put the moon in the background to reinforce that the planet is Earth. I then reversed angles to view the robot in a close-up, allowing the viewer to see the silhouettes of the characters through the robot's eyes/windows. This not only gives the viewer a better look at the robot, but also establishes its scale, and that it is actually a vessel with people on board.
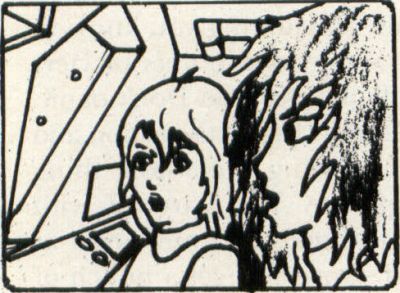
Next, the viewpoint switches to the interior or of the robot. I chose the angle here because it shows both characters (a girl in the background and the hero in the foreground) at the same time and allows us to see out one of the eyes/windows. The viewer would not be confused into thinking that we've shifted scenes to another locale because I've left visual cues to let them know where they are. In the previous angle they saw the silhouettes of two figures through the robot's eyes. In this one they also see two characters, a window shaped like one of the eyes and space outside. Sure, viewers are likely to automatically assume that we are now aboard the robot, but there's no reason not to reinforce this, because it is likely that not all viewers would come to this conclusion immediately, particularly if a lot of sudden scene changing preceded this sequence. The action in this shot is that of the girl asking a question.
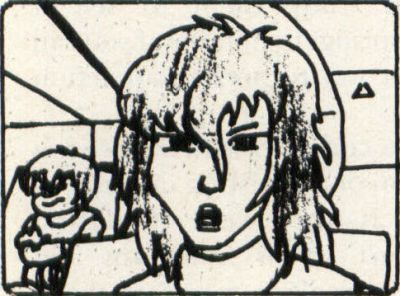
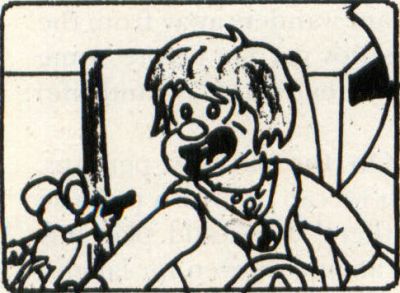
We switch to a close-up of the hero's face as he responds to the girl. This gives us a better look at the hero as he speaks, and it also gives us a different view of the control room, allowing us to see the hitherto unseen obnoxious kid in the background. This change in angle not only adds visual interest, but, more importantly, establishes that the kid is in the room and where he is in relation to the other characters. Thus, when we go to a tight shot of the kid in the next angle, he won't seem to have appeared from nowhere.
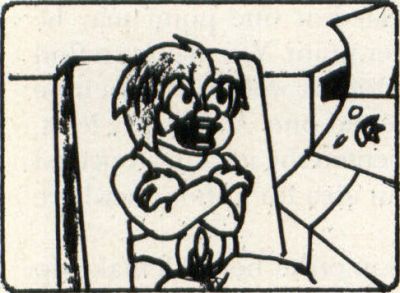
The viewpoint switches to the kid, who rattles on and on until Megabit Mouse pops into the scene, levels a gun on the kid and shoots him (in order to shut him up). Unlike the previous angles, where very little changed, this shot has several things happening, and thus it is presented in three sequential drawings. First we see the kid sitting cross armed and complaining. Next he reacts in horror as Megabit Mouse appears and levels a gun on him. Finally, he vanishes in a white flash as the gun is fired (note that Megabit is silhouetted against the flash).
Now, take a few moments and read the text accompanying the storyboard. Notice the description elaborates on the specifics of the action presented. For example, it will not only describe the action of an object or character, but the nature of that movement (in this case, lots of choppy movements and sudden jerks). Accompanying the description of some panels are lines of narration and dialogue, to be spoken by the narrator or the indicated character.
Materials
The term "storyboard" comes from the fact that storyboards, in professional circles, are usually a series of drawings defining the story, which are pinned up in sequence on a corkboard. As the project progresses, sketches are added, deleted, replaced, and the drawings rearranged on the board to reflect the most recent version. This is still probably the best method of planning your work, making small sketches and tacking them to a large bulletin board. It allows you to easily rearrange and change sections of the storyboard, which is harder to do if you've put more than one drawing per sheet on paper.
If you don't have a bulletin board, you can still draw the pictures on separate slips of paper (unruled index cards are good) that you can easily rearrange and lay out on a table to view.
Some people prefer to storyboard on sheets of paper containing a series of frames already on the page. Many art and professional video-supply shops sell storyboard pads that have frames for you to draw your sketches in and adjoining boxes for writing comments. I never buy these. I use my ST and DEGAS Elite to draw a picture containing a series of frame borders (with space for written comments), and dump it to my printer (next time I'll use Easy Draw and create an appropriate page to print). I then photocopy a few dozen of them and get to work. You can do whichever method you prefer, though I warn you that the photocopying method will only work well if the copies are made on the kind of paper where ink doesn't smear, pencil lines stick, and the photocopying fluid doesn't rub off and turn the paper gray if you use an eraser.
The sheets I make consist of three rows of three frames each. Many storyboard pads cram dozens of frames onto a single sheet. For my taste these are too small and don't allow enough room for drawing detail (when you need it).
Developing your idea and drawing it
When you set out to start storyboarding, you may wonder just how detailed you should get. There are as many answers to this as there are ideas to be presented and people to come up with them. Insofar as drawing style goes, draw the amount of detail you feel necessary to clearly record what you want. The storyboard example in Figure 1 is more detailed than the boards many animators draw, as they were penciled first and then inked. Pencil sketches alone may be enough for your needs. As to how many drawings are required, generally you'll want to have a storyboard drawing for at least every point-of-view change (like changing scenes, going from a profile to a head-on shot, switching from a long shot to a closeup), and probably for each and every major action in the sequence.
Of course, this is assuming you know in advance all the action and points of view, which is probably not the case. Don't panic. You don't start off drawing all the action and scenes in order, putting the whole thing together in sequence. You start off with whatever you can think of, in any order at all, and sketch it. Once you get a bunch of these together you put them in some kind of order, then study them to see if something new springs to mind or if you can think of a better way to present an action you have drawn.
Whenever you come up with a new idea or a modification of an existing one, sketch it and place it into your fledgling storyboard. Don't throw away any old sketches when you replace or remove them, because you may find at a later date that those ideas rejected at one point may be needed at another point. You may even find that a new idea doesn't work, and you have to go back to the old one. At the very least, the way you presented the idea in a rejected sketch may stir an idea for a shot elsewhere in the project.
An example is in order here. I'll make up a situation and go through the storyboarding steps.
The story: An ant wanders away from the anthill, but does not get far before some disaster strikes and ends its day (and life) rather abruptly.
Simple, yes? On the surface, perhaps. There's not much we can do with a premise like this—or is there? We could play this realistic, scary, dramatic or even for laughs. How? Consider the following possible refinements of the idea:
Realistic: A red worker ant runs into a black ant. They engage in battle, struggling mightily, thrashing and biting and stinging. But in the end the black ant severs one of the red ant's legs and its abdomen, vanquishing it.
Since this is a realistic approach, the animation would be of real-looking ants, moving in that rapid, somewhat jerky fashion, that insects move.
Text for Panel 1:
—Fade in from black to Space. Moon is to left, Earth looms to right. A typical Japanese robot cruises towards the Earth.
NARRATION: "Film Director gives you a lot of power, and with it you can do better than what is considered "professional" animation in some circles."
Panel 2:
—CU of robot's face. Eyes are windows, and human figures are silhouetted inside them. Stars drift to imply movement.
Panel 3:
—Cut to: Interior robot. Typical Japanimation types are seen (with two-inch-wide eyes, half-inch-wide mouths and unruly mops of hair). A girl sits a bit back from us, behind the robot's right "eye," while a guy (such as he is) is seen in CU profile. Voices are (naturally) out of synch with the animation and annoying as all get out. The only thing that moves is the girl's mouth and the stars outside the window.
GIRL: "Are you sure we should return to Earth without help?"
Panel 4:
—CU of hero from front. His head turns a bit (a one-frame jerk) from glancing at her to looking straight ahead, and his mouth moves (no blinking!). Obnoxious kid-type sits in BG.
HERO: "Yes, we must do what we can to liberate the people of Earth from the Verbicide! Help or not, we must!"
Panel 5:
—Medium shot of kid. His big mouth is shown on only two positions: open and closed (no in-betweens), as he rattles off inane dialogue in one of those screechy voices that drive sane men to commit heinous crimes.
KID: "Yeah. We'll teach 'em! We'll show those Verbicidal maniacs who's toughest! Why, I could take them all out, single-handedly..." (Etc., etc., etc.)
Panel 6:
—Suddenly, Megabit Mouse appears at screen left, pointing a pistol at the kid. Kid's head jerks (need I have said it?) to face Mega, and he screams.
KID: "Hey! There's a mouse here, and he's got a gun."
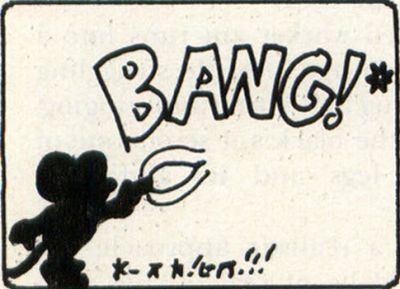
Panel 7:
—Bang! Screen flashes white as Mega pulls the trigger. Mega is seen in silhouette, and gunflash is also visible. After gunshot, screen fades to black.
NARRATION: "Thank you. As you can see, even a beginner can put more life into a scene than that!"
Scary: A great shadow falls over the ant. It goes about its business unaware. The shadow pulls back a bit, then a spot of bright light hits the ant. Close-up of the ant starting to twitch nervously, then running about as if in pain. We change angles to look up and a see a shadowy form holding the silhouetted shape of a magnifying glass, a searing point of flaring light at its center. Cut to a medium close-up of the ant twitching. Cut back to a closer view of the flaring light through the magnifying glass. Closer angle on the ant, writhing in pain. More intense view of the light. The ant, light, ant, light, ant, light, until you see the chaired corpse of the ant.
Again, a realistic or semirealistic approach could be taken. The use of the shadows, the rapid intercutting between the dying ant and the blazing light through the lens adds the tension.
Dramatic: This is overplayed acting. A family of ants walk along and come face to face with an anteater! The anteater stares them down. The father ant points for his family to hurry back to ant hill. The others react wild-eyed and frightened, but he pushes them away. The anteater watches the family, its tongue flicks. The father takes one last look at his slowly retreating family, then glares steely-eyed at the anteater. He strikes a heroic pose, then marches in a path to draw attention away from his family. He gets eaten as his family reaches the safety of the hill and reacts in horror to his demise.
Because a real ant would not be capable of the expressions needed here, a stylized, more cartoonish type of character is needed, but not funny-looking ones, as we don't want people to laugh at its demise.
Comic: As a cartoon ant walks along, a shadow falls over it. Then, an intense light engulfs it. We see the silhouette of a kid with a magnifying glass focusing light on it. The ant squints at the light, dons a pair of sunglasses and lays down to get a tan. It gets hotter, so it puts on a sombrero, but it catches on fire. It puts up a beach umbrella to make some shade, and it goes up in a puff of black smoke. Sweating profusely, it falls to the ground and drags itself along like a man in the desert. It crawls out of the light, then sits up and wipes its brow, smiling with relief. But then, the light moves back on it, and we see the kid's hand holding the magnifying glass close. The ant looks annoyed, taps its foot, then walks towards the hand and glass, whistling innocently. Suddenly, the ant (instantly sporting a huge set of teeth) jumps and bites the kid's finger.
We hear a loud scream, and the hand and glass zip out of view. The ant turns and walks off, triumphantly brushing its hands together. An instant later, the magnifying glass falls on him, squashing him flat.
In this one the approach is to make the ant do its best to avoid the heat, until it finally gets riled enough to strike back. The humor would come out of its solutions to the scorching heat, and its reactions at the failure. Finally, the surprise punchline comes when it defeats its would-be-assassin's plan to fry it, but is inadvertently squashed by the dropped magnifying glass.
And there are more ways to play it than I've described here. When planning an animation or film you have to consider what sort of feeling you want it to convey and adjust your action and imagery to it. So you'd probably start out scribbling little ideas for the ant, and any other characters or items that might appear, in addition to the staging of a scene, trying different styles and approaches. Figure 2 shows a series of my actual rough sketches depicting various ideas for the ants, anteater, and so on that appear in the various ideas.
FIGURE 2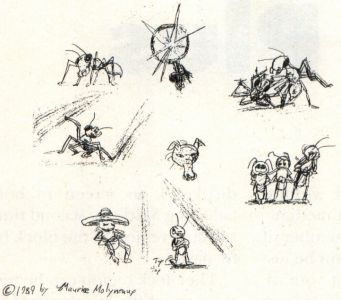
© 1987 by Maurice Molyneaux
FIGURE 3B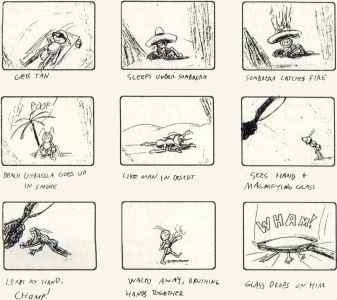
© 1987 by Maurice Molyneaux
Once you've gotten some sketches like this, you'll start narrowing down which ones you like best. Out of the set I drew, I prefer the scary and comic ones, as they seem to have the most "punch" idea-wise. The realistic one isn't interesting to me because I might as well watch a nature film. The dramatic one is too fine a line between melodrama and inadvertent comedy.
However, the stark dramatic intercutting on the scary idea, and the sheer silliness of the comic approach appeal to me, so I'll develop those ideas further. This means some more sketching to get a better idea of each. Here I start roughly storyboarding the action and angles for each, and on this basis start considering which of these two I want to do (I can always change my mind later, but it's best to try to make a good choice right away so to avoid getting to far into something that won't work). Figure 3 contains examples of this, what I call a "preliminary storyboard," which highlight only the most important moments in the action considered.
I again consider the two ideas I've come up with, trying to determine which is the one I want to animate. The dramatic one is neat from a standpoint of visuals, but there's not much plot. By plot I mean a story. You could sum it up as: "Ant is fried by a force it cannot comprehend." Nothing very involved about that. You could tag "So what?" to the description, and that would sum it up. It might be an interesting exercise in cinematic technique, but it's not really much of a film/story.
Next, I turn a baleful eye on the comic approach. What do we have here? We can sum up the plot this way: "Ant finds that things are getting hotter, first it takes advantage by trying to get a tan, but then it tries to escape it through a variety of means. Finally, it realizes that someone is trying to kill it, and it strikes back."
Compare that to the previous idea. See the difference? There is a continuity of action in the latter approach that is absent in the first. The events build up to something. Rather than watching a helpless ant get more and more frantic as it dies, we see a character responding to the situation in imaginative and funny ways. It may not seem to be all that much of a difference, but it's an important one; especially in relation to the climax.
Consider that in the dramatic approach the ant's fate is preordained, and it has no control over any part of what happens. In the comic idea the ant's fate is sealed because instead of running away, he strikes back, causing the magnifying glass to be dropped on it. Its action results in a reaction. Action: it bites. Reaction: the magnifying glass drops on it. In this way the ant is a participant in the story, not a passive target.
To be continued
Next time out we'll finish our tutorial on storyboarding, as I develop the ant cartoon into a full-fledged storyboard, and throw in an extra little bonus or two as well.