Multi Paint
NOTE: Due to the large size of this program, it is available only on this month's disk version or in the ST-LOG SIG on DELPHI.
APPLICATION
By Bob Tedesco
Bob Tedesco is a typesetter and freelance programmer from Queens, New York, who has been working with the ST since its introduction. This is his second published program for the ST.
|
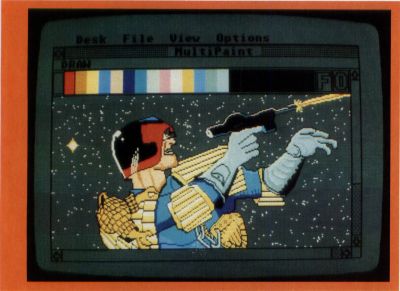
MultiPaint is a desk accessory paint program for the Atari ST. With it, detailed pictures can be created while working alongside other GEM applications that support desk accessories. It can be used to enhance the output of a CAD program or language such as ST BASIC, for example, or to just have fun and doodle while word processing. It is designed to work in color or monochrome, in any screen resolution and is compatible with DEGAS and Neochrome picture files. Functions include draw, point, copy, magnify, fill, text, circle, disc, frame, box, airbrush, palette, lines and rays with many options. A full-screen view is also provided, as well as variable line styles and drawing weights. In addition a "grabber" function is available to grab images directly off of a GEM screen, which can then be manipulated using any available MultiPaint function. You'll find three files entitled MPAINT.ACC, COLOR.RSC and MONO.RSC (along with the Pascal source code) on your ST-LOG disk. Copy MPAINT.ACC to your boot disk along with the appropriate .RSC file for the type of monitor that you are using. Put your boot disk in Drive A and reset your ST. You activate MultiPaint by moving to its name in the desk menu and left-clicking with the mouse. You will be presented with the full-screen window that is the main working display. |
The main window
The main working area of MultiPaint is a "window" on your picture in memory. It contains, depending on the current screen resolution, a group of colors at the top called the color selector. The color selector will contain 16 colors in low resolution, four colors in medium resolution and two colors (black and white) in high resolution.
To the right of the color selector is the pattern box, which is used to select the current fill pattern. Located next to the pattern box are two buttons labeled F and O, which stand for function dialog and options dialog, respectively. These buttons are the means for selecting the dialog boxes with the mouse. The window also contains vertical and horizontal scroll bars and arrows for displaying different parts of your picture, and a close box used to exit MultiPaint back to the host program. The "info" line at the top is available to describe the current function. Finally, the working area of the window is the area in which you will create your picture.
Please note: The mouse is disabled from moving into the menu area so as to prevent other applications from jumping in and interfering with your picture.
Please note: MultiPaint uses up approximately 100K of memory. While it can be run on an ST with only 512K of memory, one megabyte will be necessary for MultiPaint to work in conjunction with larger ST programs.
The color selector
The color selector represents the color palette currently in use on the ST screen and is used to select a color that all MultiPaint functions will use. To select, left-click on the color of your choice. A new color can be selected at any time while working within the main window.
The pattern box
The pattern box is used to select a pattern that all functions that support patterns will use. To select a pattern, point the mouse at the pattern box and left-click. A new pattern will be displayed. To scroll forward through a series of patterns, continuously hold down the left button while pointing the mouse.
Keyboard modifiers are: alternate, which you hold down while left-clicking to scroll backward through the available patterns; control, which you hold down while left-clicking to immediately move to the "solid" pattern; and shift, which you hold down while left-clicking to immediately move to the first of a series of crosshatch patterns.
The close box and desk menu
Click on the close box or hit Escape to exit back to the host program, making MultiPaint inactive. Your picture will be preserved in memory until you are ready to again make MultiPaint active by selecting it from the desk menu.
The keyboard modifier is alternate, which you hold down while selecting MultiPaint from the desk menu to use the current on-screen colors. The previous MultiPaint color palette will be permanently overwritten with the new one. Hold down alternate while exiting MultiPaint, and the current color palette will replace the one used by the host program. In this way MultiPaint can be used as a means to change the colors that the host program will use while it is running. Use with caution.
The scroll bars and arrows
The scroll bars and arrows work just as they do on the GEM desktop. With them you can reposition your picture within the main window.
The undo key
The undo key is active as a means to undo the last series of changes made to the picture in memory. Undo will restore the last changes made up until any of the following actions take place:
The user exits MultiPaint making it inactive.
The user clicks on the scroll bars or either of the arrows.
The user selects either the function dialog or the options dialog.
The user moves into full-screen view.
If any of these actions are performed, any changes made up until that point become permanent.
Please note: Undo is not available in full-screen view or while using the magnify function. In addition, while using the copy function, undo will only restore changes made since the last click of the mouse button. Use with caution. Read on for a description of the MultiPaint dialog boxes and the full-screen view.
The full-screen view
The full-screen view is available to work on your entire picture in memory at one time. To enter the full-screen view, right-click on the mouse button, then right-click again to get back to the main window. While in full-screen view, the undo key is not active. In addition, you may enter the full-screen view while using the copy, magnify or palette functions, but they will not operate; they will only work in the main window. While the full-screen view is useful for rendering images on large areas of the picture, the main window is recommended for use most of the time, so that the undo key is always available to correct mistakes.
The grabber
MultiPaint has the ability to "grab" the contents of a window or even the entire screen of the host program. If your application is GEM-based and supports desk accessories, and MultiPaint is inactive, you can grab the contents of the front window on the screen (the one with the window title bar highlighted) by holding down the control and alternate keys, plus the left-shift key simultaneously. The screen will briefly switch to show your picture, and the contents of the window will be incorporated into your picture at the same window location as on the application screen. If there is no window opened on your application screen, then the entire screen contents below the menu bar will be transferred to your picture.
Both of these operations are irreversible, so use with caution. In addition, if you hold down the right-shift key along with control, alternate and left-shift, the GEM-screen color palette will be grabbed along with the image, overwriting the previous palette used by MultiPaint. Although the grabber is designed to interfere as little as possible with the host program, there may be conflict with the operation of some applications. Experiment first before doing any important work.
The grabber can be used, for example, to program graphics in a language that supports desk accessories (such as ST BASIC), and incorporate the output immediately into MultiPaint for further manipulation. It can also be used to modify two- or three-dimensional objects output by a CAD program. These tasks can be accomplished immediately, without the need to save, then load, the images to and from disk.
The MultiPaint dialog boxes
The function dialog and options dialog boxes are the means by which most of the available options, functions and operations of MultiPaint are controlled. The function dialog can be activated by pressing the F1 keyboard key, the help key or by left-clicking on the F button next to the pattern box in the main window. To activate the options dialog box, press F2 or left-click on the O button in the main window. The options dialog is also available by selecting an icon in the function dialog.
You must be working in the main window to use the dialogs; they are not available in full-screen view. To make a selection in either dialog, left-click on the appropriate icon.
The function dialog
At the top of the function dialog is the function box, displaying all the available function icons of MultiPaint. Below and to the left is the draw-mode box, and to the right are the icons for wiping, loading and saving pictures, as well as an icon to access the options dialog. A function or mode selection will not take effect until the dialog is exited (by pressing Return or left-clicking on the Atari symbol in the lower right-hand corner). The wipe, load, save and options icon selections will take effect immediately.
The function box
Following is a description of each available MultiPaint function. All of the functions use the current draw-mode setting.
Draw: The draw function allows you to draw by left-clicking and moving the mouse around the screen. The current weight selected will be used as the brush size for all points. The current fill pattern will be drawn if the current weight is larger than the smallest available size.
Keyboard modifiers are: alternate, which you hold down while left-clicking to draw only one point on the screen as long as the left mouse button is held down; and shift, which you hold down while left-clicking to "streak" a series of points as the mouse is moved across the screen.
Line: The line function allows you to draw lines of different weights and styles according to the selections made in the options dialog. Left-click and hold to start the line, then "stretch" it out to the desired length and location. Release the button to draw the line on-screen. If the current weight is larger than the smallest available size, the line-style setting will have no effect.
The keyboard modifiers are: alternate, control and shift. Alternate allows you to draw "K lines." Hold down alternate while left-clicking to use the endpoint of the last line drawn as the starting point of the new one. If a new starting point was established with the control key, that point will be used instead.
Hold control down while left-clicking to establish a new starting point for the K line and ray functions. When the mouse button is pressed, the mouse cursor will turn into cross hairs for more accurate placement. When the button is released, the cross-hairs position will be the new starting point.
Hold down either shift key and left-click to draw a line from the current starting point to the current mouse position.
Text: The text function allows you to type characters from the keyboard a line at a time and to paste them into the picture. The text size is controlled by the weight settings in the options dialog. These sizes range from the smallest (3), which is almost too small to read, up to (26), which is useful for headlines or banners. There are also various fonts.
To start a text line, click the left mouse button, and the mouse cursor will be replaced by a vertical line the same size as the text to be displayed. Text is then entered by typing at the keyboard. Special ST characters can be displayed by holding down the control key while typing. The backspace key can be used to go back and delete unwanted characters. This line of text can be positioned anywhere on the display by moving the mouse. Finally, left-clicking the mouse button will paint the text into the picture.
Keyboard modifiers are: alternate, which you hold down while left-clicking (before typing your line) to select the thickened text style; control, which you hold down to select the slanted text style; left-shift, which you hold down to select the outlined text style; and right-shift, which you hold down to select the underlined text style.
Please note: All of the above keys can be pressed in any combination simultaneously to achieve a combined text-style effect. For example, holding down the left-shift and control keys will yield outlined text that is slanted.
Copy: The copy function is a flexible "block mover" that allows a section of a picture to be outlined and then repositioned elsewhere on the screen, either as a move operation or a copy operation. It can even be used to grab part of the screen for use as a temporary "brush." To use, hold down the left mouse button to drag out the outline of a box around the part of the picture to be copied. Release the button, and the mouse cursor will then disappear, and a copy of the image will follow the movement of the mouse around the screen.
At this point, two alternatives are available. One is to simply paste the image down at the desired screen location by left-clicking once again. The other is to press and hold down the right mouse button while moving the image around the screen. This has the effect of painting with the entire image as a brush. Release the right button to stop painting.
Please note that while copy is invoked, the undo key will only restore changes made to the picture from the last click of the mouse button. Also, copy does not operate in full-screen view.
The keyboard modifier is alternate. Instead of copying the image from one part of the screen to the other as explained above, an image can be moved. Hold down the alternate key while left-clicking to drag a box around the image to be moved. When the button is released the image will follow the mouse around the screen, and a solid box in the background color will replace the image in its old location.
Please note: Move always transfers images using the opaque draw mode, regardless of what draw mode is actually selected in the draw mode box.
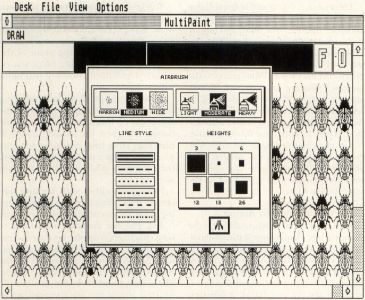
Airbrush: The airbrush function allows for the "spraying" of pixels similar to the spraying of paint in an aerosol can. The flow intensity and the spread can be controlled through the options dialog. To use the airbrush, left-click and hold, and a stream of pixels will be sprayed on the screen. Each point sprayed will be the size of the current weight and (if larger than the smallest available size) drawn in the current fill pattern. See below for a description of the options dialog.
Fill: With the fill function you can fill any area of the picture with the current fill pattern in the current color. An area is defined as any part of the picture enclosed by a solid line and/or the edges of the screen or window. Simply point the mouse at the area to be filled and left-click.
Circle and Disc: Both the circle and the disc functions allow you to draw either round circles or ellipses. Disc draws circles in the current fill pattern, and circle draws unfilled circles using the current weight and line style if larger than the smallest available size. To use either function, left-click and hold the mouse button to drag the outline of an ellipse on the screen, moving the mouse outward. Release the mouse button to draw the figure into the picture.
Holding control down while left-clicking will cause the disc to be drawn with a solid outline. This does not apply to the circle function. Holding shift down while left-clicking will cause a circle that is equal in width and height to be drawn.
Please note: With the disc function the above keys can be pressed down simultaneously to achieve a filled round circle with a solid outline.
Frame and Box: The frame and box functions work just like the circle and disc functions except they do exactly as their names imply. Also, frames and boxes with rounded corners can be created.
Hold down alternate while left-clicking and a frame or box with rounded corners will be drawn. Hold down control while left-clicking and the box drawn will have a solid outline surrounding it. (This does not apply to the frame function.) Hold down either shift key while left-clicking and a square box that is equal in width and height will be drawn.
Please note: The above keys can be pressed down simultaneously in any combination to achieve combined effects.
Magnify: Use the magnify function to "zoom" in on an area of your picture for finely detailed work. Each point on the screen will be enlarged to the size of the current weight setting in the options dialog (the smallest weight setting is the same as the next largest size for purposes of the magnify function). Simply left-click to set a point on the screen. The color selector is available as always, to change colors. The undo key is not active while magnify is invoked. While magnify does not operate in full-screen view, it is still available as a means to see the enlarged image in its original state.
Palette: The palette function is the means by which you can change the screen colors to your liking. When palette is invoked, your picture will disappear from the main window and will be replaced by the color panel in the upper left-hand corner (the picture is still in memory;it's just been erased from the window). The color panel has three rows of eight boxes: one each for the red, green and blue (RGB) components or intensities of the currently selected color in the color selector. The first box on the left side of the row represents the darkest intensity for each component; the last box the brightest. The setting for the current color is reflected at all times by the positions of the three RGB markers. Any change in color choice from the color selector will be immediately reflected in the color panel.
To change the currently selected color, left-click on one of the boxes within the RGB component of your choice. The color panel and color selector will both be updated. Alternatively, you can left-click on the RGB letters positioned on the edges of each row, and the RGB marker for that component will be moved in the direction of that letter. The palette function does not operate in full-screen view.
Please note: Palette is not available in high resolution monochrome. To toggle the palette between black and white, press the tab keyboard key.
The Draw Mode Box: The draw mode box contains the icons for the X-ray and opaque modes of MultiPaint. Each function will use the mode selected in its operation at all times. The X-ray mode causes the background color to be transparent and show through, while the opaque mode causes the background color to block out any image underneath. To illustrate, draw a small frame in the center of the screen; and then on top of it, with the X-ray mode selected, draw a larger box using a crosshatch pattern. The frame should show through the crosshatch pattern of the box. Then select the opaque mode and draw an even larger box with a different pattern on top. The box and frame underneath are overwritten.
In the X-ray mode, images can be made to overlap. Fill patterns can be combined to create new patterns. New color tints and shades can be created if the patterns being overlapped are of different colors.
The Wipe Icon: Use the wipe icon to erase your picture from memory. Upon selection, you will be asked to confirm the wipe. This operation is irreversible, so use with caution.
Load and Save: The load and save icons are used to load and store images from and to disk. MultiPaint normally stores pictures in DEGAS format, but you can also load and save in Neochrome format if you are working in low resolution color. Upon selection, you will be presented with a file-selector box, where you can type the directory path and filename of the picture you wish to load or save.
Naturally, any existing pictures created with either DEGAS or Neochrome can be loaded into MultiPaint for viewing or modification.
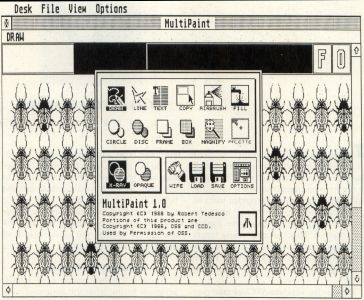
The Options Icon: The options icon allows you to immediately access the options dialog. Upon exit from the options dialog, the function dialog will be brought back and made active once again.
The options dialog
The options dialog contains control settings for weights and line styles, plus the airbrush. Select your icon by left-clicking the mouse. To exit, click on the Atari symbol in the lower right-hand corner.
The Airbrush Box: The airbrush box is composed of three grouped icons on the left, which make up the degree of coverage, and three grouped icons on the right, which make up the degree of saturation.
The Line Style Box: The line style box has settings for the various line styles used by the lines, frame and circle functions. If the weight setting is larger than the smallest available size, the line style setting will have no effect (any lines drawn will be solid).
The Weights Box: The weights box is the most important control setting in the options dialog. It affects all the functions except copy, fill and palette. Each weight icon illustrates the actual size used by the appropriate function. The numbers shown above and below each icon represent sizes used in connection with the text function. The function dialog descriptions above explain the effect of the weight settings on each individual function.
That's all he wrote
And that finishes the description of MultiPaint's functions. I hope you will find it a useful addition to your collection.