C-MANSHIP
SIMPLE ANIMATION
BY CLAYTON WALNUM
Performing animation on the ST is a little bit tougher than it is on the 8-bit Atari computers, if for no other reason than the ST does not have player/missile graphics. The programmer is responsible for every step of the animation, getting very little help from the hardware itself. Even so, coming up with a simple animation sequence is not particularly difficult—as long as you are willing to do some preliminary work and are competent in handling MFDBs and raster operations.
In this installment of C-manship, we will study the creation of an animation sequence through each step of the process. But we will not review previously covered material; therefore, if you are not comfortable with MFDBs and the vro__cpyfm( ) function, I strongly advise that you review the C-manship on raster operations (Issue 12) or find material on that subject in your other reference materials.
The program
Listing 1 is this month's sample program. It was created using Laser C, the new version of Megamax C. But don't worry; with one minor change it will compile and link fine with the older version of Megamax C. Simply change the FDB in the function draw__icon( ) to MFDB.
For those of you who are planning to switch to Laser C, a word of caution. The header files that come with the package have been modified to be more compatible with the "standards" that have been set up for GEM and the ST. The FDB-to-MFDB change is just one of many changes, and when you first try to compile a program created with the older Megamax C, you may find that you are going to have to juggle your #includes a little to get the code to compile properly.
Now back to our sample program. Once you have the program compiled and linked, go ahead and run it. The screen will go blank, after which you should press the left mouse button. A spaceship will appear on the right-hand side of the screen, and a photon missile will start moving toward it from the left. When the missile collides with the ship, the ship will explode, and you'll once again be faced with a blank screen. Either press the left button to see the animation again, or the right button to exit back to the desktop.
The first step
Before we program an animation, we must, of course, have something to animate. In other words, the first thing we must do is take out a program like DEGAS and draw the various figures that will make up the animation sequence. Each figure in the sequence will be slightly different than the one that came before, moving us closer and closer to the final result.
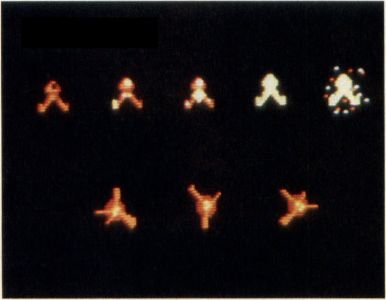
For example, if we wanted to have an exploding ship, we would start with the ship itself as Frame 1. Then we would take that ship and add a yellow glow to its center; this would be Frame 2. For Frame 3, we would expand the yellow glow. Frame 4 would show the ship completely engulfed by the glow, and in the last frame we would have the ship disintegrating into pieces. If you take a look at Figure 1, you can see this process. (The sprites shown were created by Maurice Molyneaux for "Moonlord ST" from the July '88 issue of ST-LOG. The ship drawings are slightly different from the ones used in this month's sample program; the original drawings fell victim to a hardware failure long ago.)
In our sample animation, we have a photon missile moving across the screen and hitting the alien ship, causing it to explode. The three frames of animation for the photons are also shown in Figure 1.
Once we have created all the figures we need for the animation, we must convert the graphics into numerical data. We do this using a sprite editor, such as Raster Sprite Editor from Issue 16 of ST-LOG. These editors allow the user to "cut out" a section of a picture and will automatically convert the cut-out section into the proper form of data. All we have to do then is place the data into our program.
If you look at the top of Listing 1, you will see the graphics data for our sample animation. The data labeled alien[] is the alien ship. The data blocks labeled expl1[], expl2[], expl3[] and expl4[] are the alien ship in its various stages of disintegration. Finally, the blocks of data labeled photon1[], photon2[] and photon3[] are the figures for our photon animation sequence.
Programming the animation
Now that we have all our figures converted to data, we must come up with a program that'll move that data on and off the screen in such a way as to create the actual animation. In the case of the photon, we must copy each figure to the screen in sequence, while at the same time moving the photon toward the alien ship. The exploding alien ship will be a little easier to do, since we don't have to move the ship itself.
Let's take a look at the program listing. First turn your attention to the function main( ). Here we initialize the application and open a virtual workstation. Then we check the resolution to make sure that the user is not trying to run the program in medium or high resolution. If we're in the wrong resolution, we bring up an alert box that informs the user of his error, after which we close the workstation and exit back to the desktop.
If the screen resolution is okay, program execution goes to the function do__animate( ). In this function, all we really do is monitor the mouse buttons. If the left button is pressed, we perform the animation, then come back to wait for another button press. If the right button is pressed, we exit the program.
The photon
When the left button is pressed, program execution jumps to the function photon( ), where the actual animation begins. In photon( ) we first store the address of each image of our photon animation into the array of pointers, ph[]. We then turn off the mouse and draw the image of the alien ship on the right-hand side of the screen using our own function, draw__icon( ). (This function is a slightly improved version of the draw__icon( ) that appeared in Issue 12's C-manship.)
Simple animation on the ST is not particularly hard. However, you should be aware that, unlike its 8-bit little brother, the ST is not really well designed for animations involving many objects at once.
Next we initialize the X and Y coordinates of the photons, as well as the color stored in pen. The while loop that follows this initialization will repeat until pen is changed to one of the colors that make up the alien ship. Within the loop, we draw each stage of the photon animation, moving it slightly to the right each time.
To animate the photon, we first draw the initial figure in the sequence, using draw__icon( ). Then, in order to control the speed of the animation, we call the AES function, evnt__timer( ) like this:
evnt_timer ( low, high );
Here, low is the low word of the number of milliseconds to pause and high is the high word of the number of milliseconds to pause. This function always returns a 1.
After the pause, we redraw the sprite in the same position. Because we are using a writing mode of 6, which Exclusive ORs the source and destination values, this second drawing of the sprite erases the first from the screen, leaving the screen exactly as it was before we drew the sprite. The only problem with this method of drawing a sprite over a background is that when the sprite is first drawn, it will appear transparent; that is, any graphics behind it will show through. There are ways to overcome this problem, but we'll save that for a future installment of C-manship. In this case, because our background consists of nothing more than a black screen, we don't have any of the problems associated with Exclusive ORing a sprite with the background.
After erasing the first sprite, we add 4 to x, the sprite's X coordinate, so that the next photon sprite will be drawn farther to the right, closer to the alien ship. After that, we increment p so that the next time we use p to index our array of pointers, ph[], we'll be pointing to the next image in the photon sequence. Finally, we get the color of the screen at our current location and call evnt__timer( ) to pause 50 milliseconds before going on to the next frame of the animation.
To retrieve the color of the pixel at our current screen location, we use a call to a VDI function, v__get__pixel( ), like this:
v_get_pixel ( handle, x, y, &pixel, &pen );
Here, handle is the virtual workstation handle, x and y are the X and Y coordinates of the pixel we wish to examine, &pixel is the address of an integer that will be set to 1 if the pixel being examined is set and set (unset?) to 0 if it's not, and &pen is the address of an integer that will contain the color value of the pixel being examined. If the color detected is one of the colors that make up our ship (in this case, we're looking for RED or DRK__RED), we know that the missile has collided with the ship. We drop out of the loop, after which program execution jumps to the function kill__alien( ), where we will perform the exploding ship animation.
Kaboom!
Because we don't need to actually move the ship, the explosion sequence is much easier. All we have to do is draw the four frames of the animation one after the other, providing a short delay between them and erasing each image before drawing the next. This time around, we're erasing the images by drawing a black circle on top of them, rather than using the Exclusive OR method described above.
Once the main sequence is completed, we drop into the code that draws the "sparkles" on the screen—just to add a little pizazz. Here we're doing nothing more than using v__pmarker( ) to draw 40 crosses in random locations within the area that the ship occupied. Because we're drawing them so fast, you would swear that there were many of them on the screen at the same time!
When we're through in kill__alien( ), it's back to photon( ) to turn the mouse back on, and then back one more step to do__animate( ) to wait for the next mouse button click. A left click will repeat the animation, while a right click will cause us to exit the program.
The end again
As you can see, simple animation on the ST is not particularly hard. However, you should be aware that, unlike its 8-bit little brother, the ST is not really well designed for animations involving many objects at once. The lack of player/missile graphics makes programming arcade-type action games a real chore. And there's really no way to do it in C. You have to have the speed of assembly language.
Still, the techniques presented here can be effective and fun in simple applications. Experiment a bit, and see what you come up with. You might surprise yourself.