STEP 1
NEW & IMPROVED
by Maurice Molyneaux
Maurice Molyneaux studies classic cel and modern computer animation, deadens his eardrums with overloud classical music, and further damages his already questionable sanity by listening to recordings of Monty Python and Tom Lehrer. Otherwise he just makes a nuisance of himself. His DELPHI usename is MAURICEM.
As I sit down to write this, it is late September 1988, and I have just recently received a disk-based Beta copy of what is promised to be the first major revision of the ST's Operating System (OS) in the three years since the 520ST was first released. If all goes well, this new version of the OS will be available to users by the time you read this (or shortly thereafter) and may even be included in the latest ST and Mega units to come out of Atari. In order to give you an idea of whether or not you'll want to upgrade to the new OS (provided Atari will even make it available as an upgrade), this month I'll be talking about the changes. I will not be listing bugs, as this is a Beta version, and it would be unfair to report any problems encountered that might be eliminated before the OS is released.
TOS
Backing up a bit, for those of you new to the ST, the Operating System is a series of programs and routines which are the core of the ST. All the disk, printer, video, keyboard and mouse-handling codes are part of the OS. The ST's OS is called "TOS" which stands for "The Operating System." It is this which, more than anything, makes your ST act like an ST. The hardware can act like other things if a different OS is plugged in. (Dave Small's Spectre 128, for example, makes your ST act just like a late model Macintosh.) In all STs manufactured after 1985, TOS is contained in ROM (Read Only Memory) chips within the computer (most pre-'86 520STs that did not have TOS in ROM have since been upgraded).
TOS is actually the sum of a number of smaller elements, of which some of the primary pieces are:
GEMDOS—(Graphics Environment Manager Disk Operating System) The hardware-independent part of TOS, which monitors and controls the input and output functions of the ST, including screen display, keyboard and mouse input, and disk and port I/O.
BIOS—(Basic Input Output System) The low-level software interface between the ST hardware and GEMDOS.
XBIOS—(extended BIOS) Special BIOS-type routines to support special features of the ST hardware.
VDI—(Virtual Device Interface) Graphics drivers that interface the hardware and software. Used to translate software graphics commands into hardware instructions.
AES—(Application Environment Services) Software tools used primarily to handle the graphics interface, such as windows, dialog boxes, menu bars and other GEM features.
As you can see, there are special parts of TOS for doing different jobs. Furthermore, you may notice how complex this whole thing is. GEMDOS receives a command, which is passed through the BIOS and/or XBIOS to the hardware, and may use VDI or AES calls (commands) to get the job done.
GEM
This is the user-interface of the ST, the "Graphics Environment Manager," which is what gives you all those icons, windows, drop-down menus, alert boxes, etc. Contrary to what some people think, GEM is not the ST's OS; it is a program run by TOS. Furthermore, some people think that GEM and the GEM Desktop are one and the same. Again, not true. The Desktop is a GEM application, run under GEM, which is in turn run under TOS!
GEM has its roots deep in GEMDOS, AES and VDI. However, there is a part of GEM which is not in TOS, and that is the "Graphics Device Operating System" or GDOS. GDOS's job is to load graphics device drivers (screen, printer, plotter, etc.), fonts, etc., and act as an interface between the application (program) being run and the output device being used. GDOS is usually found as an AUTO folder program packaged with some other software (such as Easy Draw or DEGAS Elite). It "hooks" into GEM when the machine is booted and stays in RAM until the machine is shut off.
The ST GDOS has numerous problems, however. Namely it is slow, and it loads device drivers and fonts only at boot-up. Thus, to change drivers and fonts, you have to reboot your ST. (There exists a replacement for GDOS, which corrects most of these shortcomings. Written by Charles F. Johnson and John Eidsvoog, it is called G + Plus and is marketed by CodeHead Software.)
Versions
I know some of you are asking, "What about the ‘new’ Mega ST ROMs?" Well, truth be told, those ROMs were just a "patched" version of the same old ones. The changes there were made primarily to allow for the blitter chip. Essentially, there are three ROM versions: the original ROM TOS, the Mega/Blitter ROMS and the new TOS.
Changes, Changes
Now that we've put to bed the issue of just what TOS is and what versions exist, let's take a look at the newest version, and what changes you will find. Please note that I was using Beta release TOS 1.4, and it's possible (though unlikely) that some odd or end may have been changed by the time the new TOS ROMs are released.
The Desktop looks the same. The only difference here being that the labels on the Drive and Trash icons are not as tall.
The drop-down menus are also the same as before. Visually, it's the same old thing. However, there are changes lurking just under the surface. For example, double-clicking on the Trash Can results in an alert-box opening that states, "You cannot open the Trash Can icon into a window." The older TOS versions said the same, but continued: "To delete a folder, document or application, drag it to the Trash Can." This info was eliminated because it is a repeat of what is stated if you highlight the Trash icon and select Show Info from the file dropdown.
Speaking of the Trash, the older TOS had a Trash Info box which contained an error. It stated "The Trash Can is the destination to which you drag the disks, folders, documents or applications that you want to delete PERMANENTLY?" The italics on "disks" are mine, but they serve to note the error. You cannot drag a disk icon to the Trash to erase it. Doing so will result in the following message: "You cannot drag a disk to the Trash Can." The new TOS's Trash Info reports, "The Trash Can is used to permanently delete files or folders." Period. Not only is it correct, but it's much simpler and to the point than the old message.
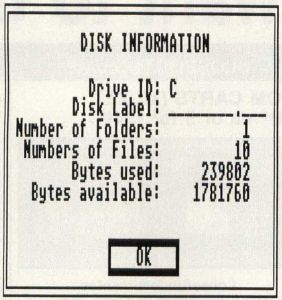
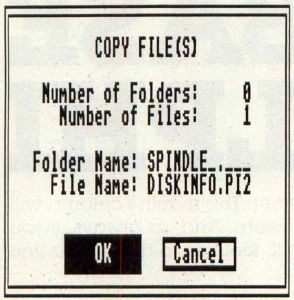
Okay, that was the most obvious surface change. Other changes that appear on the Desktop proper have to do with many of the dialog boxes that appear as the result of using drop-down menus. One nice touch that makes these boxes easier to look at is that (generally) they no longer use underlines to lead numeric values but use spaces instead. Therefore, rather than seeing "Bytes used: ___165492," you would see "Bytes used: 165492." Compare the illustrations accompanying this article with the same dialog/alert/etc. boxes on your version of TOS.
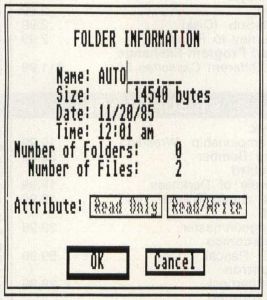
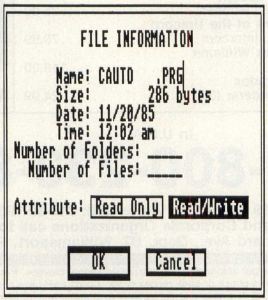
Info-mation
Show Info under the file menu looks a little different in Figures 1, 2 and 3; mostly it's just easier on the eyes. The main difference is that now, for the first time in TOS history, you can change the name of a folder (hooray!). Before there was no way to do this from GEM itself. Thus, if you want to rename a folder, you can change its name just like you can on a file. Furthermore, as with much of the new TOS, things are much clearer. For example, notice that the box in Figure 3 is labeled "FILE INFORMATION." The old TOS box for this was labeled "ITEM INFORMATION," which isn't as accurate. There is also more consistency between similar boxes. Show Info on disks, folders and files all return dialog boxes which are laid out more or less the same, with the same terms, etc. However, note that while the same dialog appears for files and folders, the "Attributes" are only active for files. Thus, you can't "lock" a folder.
Installation Charge
The Install Disk Drive selection under Options has been changed only insofar as that the default button (the one that responds to the Return key) is now Install rather than Cancel.
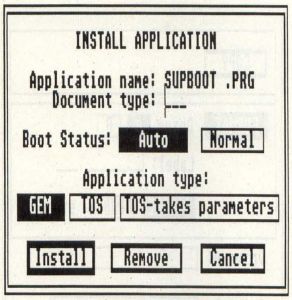
In Figure 4 Install Application looks much the same as well, the key differences being the addition of Boot Status options and a Remove button. Remove allows you to un-install an application. (Previously the only way to do this was to reboot or edit the DESKTOP.INF file [if you had saved the Desktop with the application in question installed] and then reboot.)
One major change is that Install Application now retains the full pathname of the installed file, including drive identifier and folder names. Previously it did not, and installing a program to run from a specific path used to involve editing DESKTOP.INF.
The Boot Status options are the most interesting. "Normal" means the installed program runs just like always. However, selecting "Auto" (and then saving the Desktop) will result in the selected program (just one, mind you) auto-running whenever you boot-up. This program can be on any drive and, better yet, doesn't have to be in the AUTO folder on your boot drive (in fact, if it is, it'll run twice). Even better, since the auto-boot program is run after TOS runs the GEM Desktop, you can now auto-boot GEM programs (impossible to do from the AUTO folder because GEM isn't activated until afterward). You can run TOS and GEM programs but not those of the TTP variety.
A note for beginners: Install Application allows you to designate a type of data file that will, when such a file is opened or double-clicked on, automatically run the program which uses it. You do this by selecting (single-click to highlight) a program file on the Desktop, and selecting Install Application. In the dialog box that appears, you enter the three-letter extension of the type of file the program in question uses. Thus, to install Neochrome you would enter NEO as the Document type. After that, double-clicking on any NEO file would run Neochrome. To avoid having to reinstall the application every time you reboot, you must save the Desktop.
A note for Desktop customizers: When you save the Desktop with a file installed to auto-boot, a line like the following is included in DESKTOP.INF:
#Z 01 C:\FOLDER\PROGRAM.PRG@
When you select a program to auto-boot, it wipes out any other program previously set to auto-boot. Thus, you are limited to one program to auto-boot from the Desktop.
The maximum size I was able to make a DESKTOP.INF file, under the new ROMs, was just under 1,600 bytes. If I tried to install any more applications after that point, I received a message stating that I could not install any more applications.
Selections
Set Preferences under Options has also received a small face-lift with the addition of a choice for confirmation of file overwrites. If you want the system not to prompt you when overwriting files, you can do so (though it's beyond me why anyone would want to risk the danger of accidentally overwriting something important).
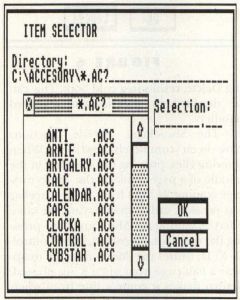
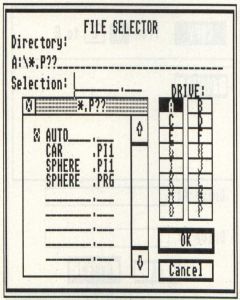
One thing I griped about in an early Step 1 was the GEM file selector. This is the box that you see whenever you are given a choice of a file to load, save, etc. The original was maddeningly ill-designed, with an obscure title (ITEM SELECTOR) that didn't tell you if you were loading, saving, deleting or whatever. Also, the only way to select a different disk drive for the directory path was to manually edit the Directory line in the selector. Figure 5 features the old selector and the new selector.
The new selector has buttons for each of the 16 possible drives the ST can access (A-P), and switching from one drive to another is as simple as clicking on the appropriate button. To reread a disk no longer requires clicking on the "grip" bar at the top of the directory box; just clicking on the appropriate drive button. Furthermore, a new AES call (FSELEXINPUT) has been added which allows programmers to replace the File Selector label at the top of the selector with the message of his/her choice. Before, tricky programming was needed to do this.
Another nice touch when you edit the pathname in the selector: Pressing Return now forces the box to display the new pathname parameters, rather than acting as the OK button. Pressing Return at any other acts as OK. When editing a path, you can click on the gripper bar to update the files, but clicking within the file display area no longer works.
Unfortunately, the new selector does not feature any way to check free disk space, or to toggle between a limited search string and an all-files search (as in toggling between searching for files matching *.P?1 or *.*), as do some third-party selector replacements. Furthermore, the selector still limits viewing to only nine files at a time (sigh).
Disk Copy and Format
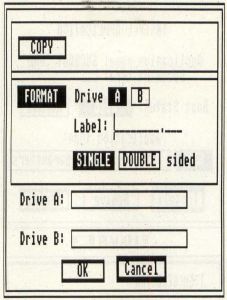
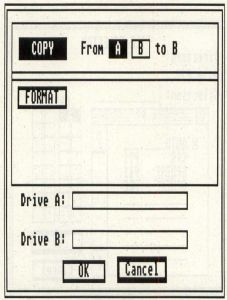
Highlighting a floppy-disk icon and clicking on Format under the file menu results in a totally new dialog box as you can see in Figure 6 than the one seen before. This is a copy/format box, which allows you to do either or both from the same place. If you drag one floppy-disk icon to another, the box in Figure 7 will appear. If you choose Format from the Desk drop-down, it will come up looking like Figure 6. To switch from Copy to Format, or vice versa, one merely has to click on the appropriate buttons. Thus, if you were going to copy a disk but forgot to format the destination disk first, you can do it from here, rather than having to Cancel the operation and select that option for the file menu. Handy.
Furthermore, when disk copying you can use the A and B buttons to toggle the source and destination drives. Thus, if you decided you'd rather have the other drive as the source, switching is as simple as clicking the appropriate button (you can toggle the drive to format as well). The Cancel button is now the default, making it less likely you'll accidentally click on OK and format or copy a disk when you were trying to exit.
A welcome addition for PC users: Disks formatted from the Desktop in this manner now have MS-DOS compatible boot sectors, eliminating the need for many of those little MS-DOS boot utilities.
File/Folder Copying and Deletion
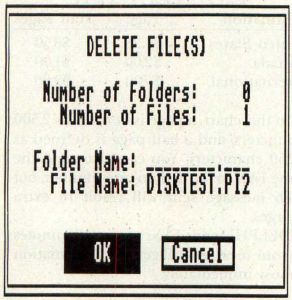
When copying files and folders, things work just about as normal. The main difference is, again, a much better user interface. Figure 8 shows the alert box that appears when you are copying files. Notice that, unlike the old box which merely showed the number of files and folders remaining to be copied, this box displays the name of the file being copied, and its destination folder (if any). When deleting files and/or folders, a similar alert appears, as in Figure 9.
A file can be "moved," as well as copied, by holding down the Control key while dragging a file(s) to its destination. If the source and destination directories are on the same drive or partition, the file is moved by renaming it (changing its pathname to or from that of a folder, etc.). If the source and destination are different devices or partitions, the file is copied and the original deleted.
In the event of your mistakenly starting a copy, move or delete operation, holding down Undo on your keyboard will cause an alert to appear stating, "Abort this operation?" with Yes and No buttons. This will halt the process, but will not undo any action already done. (If you let it trash a few files, they're gone; if you copy or move a few files, the copies remain or some file will have been moved.) Furthermore, the time/date stamp on files are preserved when copied or moved.
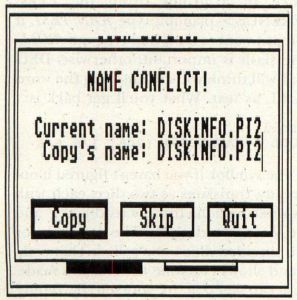
If a name conflict occurs during a copy procedure, a NAME CONFLICT! box appears as in Figure 10. Unlike the old box, whose only options were OK (overwrite) and Cancel (skip), this new box contains three buttons: Copy (overwrite), Skip (go to next file, if any) and Quit (abort copy procedure). The addition of Quit is welcome as it allows you to abort, which was previously impossible. If the File Overwrites option of Set Preferences is set to No, NAME CONFLICT! will not appear when duplicate filenames are encountered—they will just be overwritten. NAME CONFLICT! will appear for conflicting folder names regardless of the status of the File Overwrite setting.
Miscellany
There are quite a number of other changes. I'll list some of them here:
—Warm and Cold resets are available from the keyboard. Holding down Alternate and Control while pressing Delete, causes a warmstart (just as in the PC world), while holding down Alternate, Control and the right Shift key while pressing Delete, results in a cold boot. This can be disabled by user-defined keyboard handlers.
—The Show/Print text-file functions have been completely rewritten. When showing files, pressing the spacebar in the middle of a page results in the -More- message coming 24 lines from when spacebar was pressed, rather than having the same effect as waiting for -More- and then pressing the spacebar. Pressing d, D, or Control-D (⋀ D) causes the -More- message to appear a half page from when it was pressed. Return makes it come a line from when it was pressed. Q q, and ⋀ C and Undo cause the output to stop immediately. When printing files the keyboard is polled every 16 characters. Like Show, Q q, ⋀ C and Undo abort printing.
—When copying files, all available memory is used to minimize disk swapping on single-drive systems (at last!).
—All background windows are updated after a file copy, move, delete, disk copy or format operation.
—Pressing Escape forces the Desktop to read the directory of the active/top window. Before, it would only do so if a media change was detected. Furthermore, the media change detection routines are better, making it less likely that the system will miss the fact that you have swapped disks.
—The Desktop now shows as many files as possible in each window. Previously, there was a limit of 400 files that could be shown. The only limit now is the available free RAM (used to store the file information read from the directory).
—The Desktop does a much better job of opening the next window in the location where the last one was closed. In the older TOS, the system oftentimes got confused. Furthermore, window handling is improved. If an error occurs when a drive is "opened," the system does not open a blank window as it previously did.
—GEMDOS has been rewritten, and much of it has been improved. The FAT (File Allocation Table) search routines (used for finding data on disks) are much faster. The infamous 40-folder bug has been corrected. Limits still exist, mainly on the depth of folders and the accumulated depth of open files, but these limits are much harder to reach than on the old ROMs, and can still be eliminated using the FOLDRXXX.PRG program to add more folder capacity.
—The size of TOS has been brought down to the size of the original ROMs, so some programs that did not work with the larger Mega/Blitter ROMs may work again.
—The "archive bit" of a file's attributes is now supported. It denotes if a file is new (new or modified) or old (unchanged). Support of this archive bit will now allow programmers to check if a file has been modified since a certain date/time. For example, a program that backs up hard disks could be set to back up only those files which have archive bits set to the "new/modified" status. Once the file has been backed up, the program would set the bit to "old/backed-up" status. Thus, the program would know by itself which files you have created or modified since the last back up was made, and only back up those files, saving time and trouble.
Conclusion
Before wrapping up this month, I'd like to acknowledge the assistance of John Townsend at Atari Corp., who provided me with the technical help and research materials used for writing this article. Thanks, John! Also, thanks to John Eidsvoog for his contribution of interesting facts I'd probably have otherwise missed.
Summing up: It has taken Atari a long time to come up with a significant update to TOS, and while some may say this new version is "too little too late," I beg to point out that many of the changes made in the new TOS make it much easier to live with. The messages are clearer, overall speed is improved, and there are ways to abort things that were previously un-abortable. We even got the long-awaited ability to auto-boot a GEM program. And, while it would be nice to have TOS support more Desk Accessories, true multitasking, more colors (one could easily have 16 colors in medium res if the appropriate changes were made), alternate disk formats (say, Twisted), etc., at the very least we've finally got some improvement. And the nice thing is, many of the changes made were what we users have asked for. So, if there's something on your TOS wish list, drop a line to Atari and let them know about it. Who knows? It may end up in the next TOS. (Hopefully we won't wait three years for that one!).
This Step 1 has been surprisingly free of puns and bad humor so, to end this on an appropriately wacko note, I offer this little tidbit: If one pokes around through the ST OS, it's possible to find some interesting things. Case in point: With TOS in ROM, viewing memory in ASCII form from hex FCF3C8 to FCF407 in the old TOS, or FC2400 to FC243F in the Mega/Blitter TOS (and it appears in the version of the new TOS I have now), reveals a message which reads, "Dave StaUgas loves Bea Hablig" (sic).
It could only happen at Atari.
Addenda
In "Playing Games with Graphics" (ST-Log #24) there was a slip-up in regard to the figures. What was labeled as Figure 5 was actually Figure 6, and Figure 5 got lost somewhere between me and the magazine. Sorry if that caused anyone any confusion!