TUTORIAL
STEP 1 Playing Games with Graphics
by Maurice Molyneaux
When not writing articles for ST-Log, Maurice Molyneaux continues to struggle with a nine-year-old science fiction novel, designs game graphics, consults for software companies and creates animated cartoon productions using microcomputers. Despite a ridiculously French name, he claims to have been born in Vicenza, Italy, and denies vicious rumors that he eats escargot and calamari while computing. He is the creator and director of the Art and Film Director sales video for Epyx—a ten-minute fully animated cartoon demonstration created entirely with ST systems. His DELPHI username is MAURICEM.
Not just a game machine!
True, true, STs are not just game machines, but there are a lot of games available for them. I'm not much of a game player. I rarely get involved in playing game software. . .but I've had my hand in designing the graphics for a few. To me that's more interesting than playing the game proper. Most of you probably wouldn't agree on that point, but that's just individual taste. Anyway, in keeping with the new approach to "Step 1" I described last month, this issue I'll begin discussing using your ST for a task many of you are no doubt interested in: designing game graphics.
Before you wonder; no, I've never actually programmed a game in my life. To paraphrase Doctor Leonard McCoy, "I'm an artist, not a programmer!" What games have I designed graphics for? Let's see, there was a Star Trek game that unfortunately never got off the ground, Omnitrend's games Paladin and Universe III, in addition to Breach. "Breach?" I hear some of you asking. I'm not responsible for the graphics on the ST version of the game, but I did the Amiga version. Now, don't go scream "traitor." I never once touched an Amoeba (er, you know what I mean) in creating these graphics (I was contacted too late for the ST version . . . too bad). In fact, on both Paladin and Universe III, I also created the graphics for the IBM versions, as well, without touching a PC. The graphics for all versions were designed on my trusty ST.
Pigeonholing
I'm not fond of generalizing and classifying things by types (because that tends to lead to stereotyping), but sometimes a little pigeonholing can be useful to define what you're working with. There are essentially two types of display methods used with computers—vector and raster—and these break down the two most common categories of game graphics as well.
Vector graphics are those which consist of lines plotted between points. Look at an arcade Asteroids or Star Wars game Notice how everything is drawn by lines? Notice that there are no solid (filled in) areas, and the lack of obvious pixels and jaggies on these vector displays? This is all because vector-plotted graphics consist entirely of lines plotted between points. All the objects are drawn by defining a series of points and drawing connecting lines between them. This gives great flexibility in that the objects can be resized or turned every which way without losing any detail. The disadvantage is that, generally, by using this method you can't get much detail anyway. (Imagine the game trying to draw a metallic starship—in real-time—totally by vectors! Without powerful, expensive hardware, you can't do it well.)
There are essentially two types of display methods used with computers—vector and raster—and these break down the two most common categories of game graphics as well.
Raster graphics are those graphics defined by dots on a finite grid. Look at your ST's screen. Each letter is composed of dots, arranged in such a fashion that they look like something legible. Examples of arcade games using raster images range from Pac-Man to AfterBurner. Raster images are usually more colorful than vector graphics, with lots of small details and areas of solid color, not unfilled outlines. The problem here is that of dot size. The bigger they are, the more "jaggies" you see (particularly when there are lines that are not perfectly vertical or horizontal).
Taking all this down to the level of your ST, there are both vector-plotted and raster-type graphics used, but because of the ST's construction, everything becomes a raster image before it is displayed on the screen. Starglider uses vector-plotted graphics but, since the ST's video chip doesn't create the screen display using rasters, we get "jaggied" vectors. What happens in the ST is that the vector coordinates are plotted on the computer's "grid map" of the screen, and lines are drawn between these points. Since the ST's graphics output is raster (320x200, 640x200, or 640x400), these lines must be drawn by plotting pixels on the screen, resulting in jaggies. This is the reason the graphics on games like Starglider don't look as slick as those arcade vector graphics (which use special vector plotting hardware). The advantage on the ST is that once the vector lines have been plotted, a fill of color can be aimed inside the shape, making it solid. To create solid-looking objects with vectors requires lines plotted so close together that they create the illusion of solid color.
Laying tile
All of the games of Omnitrend's that I have designed graphics for have used what are known as "tile" graphics. Tile graphics refers to building up images out of numerous small square, graphic fragments, which are laid down in patterns just like tile. Each individual "tile" has a distinct picture on it, like grass, dirt, bushes, a segment of wall, a vending machine, etc. Thus, by arranging a number of wall tiles, you could make a building. Cluster a bunch of grass tiles and surround them with bush tiles, and you have a meadow or lawn, etc.
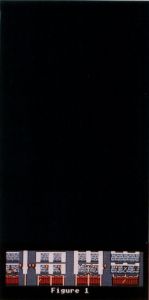
In many cases, there are numerous related tiles, such as walls at different angles (horizontal, vertical, corner sections, wall intersections, etc.) For Paladin, I designed a whole range of wooden and stone, wall segments, including a few duplicates with details added (Figure 1).
In many games, like the Ultima series, everything is represented by tiles, from castles to characters. When your character moves over a square of grass, you no longer see that square, but the tile representing your character or party. In games like those of Omnitrend's, there are two distinct types of tiles, known as "terrain squares" and "object squares." Terrain squares are just like those defined above, tiles of background material: walls, trees, etc. Object squares contain things that go over terrain squares, like characters and/or objects you can pick up. So, when you move your soldier onto a square occupied by a table, you can see the table behind him.
A mask is a single-color element, shaped like the object it is assigned to, but often a pixel or so larger.
Of course, this is not to say that every single item in the game that is not a wall or floor, or every single person shown, is an object square and not a terrain square. In Paladin there are a number of human figures ("extras," I like to call them) which are, in fact, terrain squares. Why? Well, while it is necessary for some objects to be relocated, taken and even dropped elsewhere, some things in the game really shouldn't be moving around.
The advantage to the first technique, where all tiles are in essence terrain squares, is that it is simple to do. The programmer merely "stamps" copies of certain tiles on the screen in a grid pattern. When your character moves onto a given square, the tile there is replaced by the tile of your character. No fuss, no muss.
The trouble with that system is that the player can't see what his character is on top of (if he's forgotten). This is where the terrain and object tile system has its advantages, because it allows you to see past objects to what they're on top or in front of (so to speak.) Furthermore, if handled correctly, it can make the tile boundaries seem a little less rigid. In Omnitrend's games, when you move one of your characters from one square to another, you actually see the character step from one to the next while the screen scrolls.
The disadvantage is that it is a bit more complicated to do this. The programmer can't merely replace one tile with another, but must place the object square over the terrain square In Omnitrend's games, this necessitates the graphic designer to create masks for each object. A mask is a single-color element, shaped like the object it is assigned to, but often a pixel or so larger. When the program must place an object over a terrain square, it can't merely just stamp it down, because it would just wipe out the background (like in a terrain-square-only approach.)
The method needed is some way to intermix the terrain and object squares without one totally wiping out the other. Objects tend not to fill up an entire square, leaving a lot of blank space. This blank space is usually left as the computer's background color (color 0), thus the programmer could execute a Logical OR operation, whereby the pixels of the background color that appear in the object square would not be plotted over the terrain square, letting it show through.
The trouble with this is that the colors may intermingle. Imagine you have two transparencies; on one is some grass, on the other is a man. Slap these two into a projector at the same time. Where the man overlaps the grass you get a yucky-looking mixture. This is what would happen if the programmer used a Logical OR alone. Furthermore, since in this method the background color is treated as utterly transparent, you can't use the background color in your object because that part will become see-through to the background. This is a real problem, considering the limited numbers of colors available on most personal computers.
The solution is to prepare the terrain square to receive the object. This is where the mask comes in. The mask is stamped down first, in essence cookie-cutting a hole into the terrain square. The object is then Logical ORed onto the square, right over the hole made by the mask.
The reason for having a mask that is larger than the object is to make certain a given object will show up over all types of terrain. Say you had a soldier in a green uniform as your object. The terrain square the object is on contains green grass. Green on green would be hard to see. The overlapping border of background color (usually white or black—though I prefer black because white tends to wash out other colors) keeps the object distinct from the terrain.
Let's get graphic
Okay, we've covered how tile graphics work and two variations on them. What about actually drawing them?
The scale of the tiles must be established before drawing begins. In the case of Omnitrend's ST games, the "standard" tile is 21 pixels wide and 17 pixels high. I use Epyx's Art Director program for all my low-resolution color drawing, because its tools are the most flexible for this kind of work. Before doing anything else, I have to establish a working "grid."
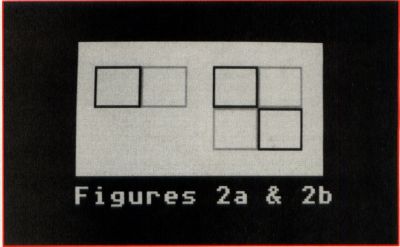
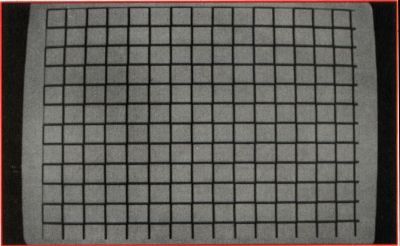
On a blank screen of the background color, I draw an unfilled rectangle whose border is the width and height of a tile. Next, I cut out a copy of the rectangle (making it my paintbrush), pick a contrasting color from my palette (like blue if the first rectangle is orange), then switch my brush to a silhouette (whereby all non-background colors become the currently selected color). I stamp the now-recolored brush edge to edge with the original rectangle, making sure the horizontal top and bottom lines of each line up, and that they buttress each other, leaving no gap, but do not overlap (Figure 2a).
Next, I cut out both rectangles, switch the silhouette mode off (restoring the original colors), flip my new brush/block horizontally and paste it down right below the originals (Figure 2b). I now have a four-tile "checkerboard" of alternating colored rectangles. Finally, I cut out this whole block (very carefully, making sure I pick up no pixels beyond the edges of the rectangles) and fill the entire screen with it, making sure my fill point is the pixel in the upper left corner of the screen. When done, the screen is filled with a checkerboard of blank tiles (Figure 3). I use two different colors because it makes it easier to know exactly where one tile ends and the other begins.
(To do the above with DEGAS Elite you would create the first two rectangles manually [draw an orange one and a blue one next to it], then cut those, flip the block over and stamp it below the first two. Next you would clip all four, go to a blank workscreen and repeatedly stamp the block down to create the full-screen checkerboard.)
Usually there will be some cut-off rectangles at the right and bottom screen edges, which I usually erase.
Next comes the process of actually drawing the tiles. Usually I am given a list which specifies certain items that are "must haves" and sometimes where they must go on the grid (or grids if there is more than one screen of tiles). To start with I set up the color palette ... or try to. It's usually impossible to throw together a final palette when you start, so I don't usually try. What I do is define those colors I know I will be using, and ignore the others.
For example, if the game has outdoor settings (like Paladin), I'll define two greens, two browns, etc.; if human figures appear, a flesh tone; blue for water, etc. Some games have color cycling effects (both Breach and Paladin use this), and I'll have to set aside two or three colors for this. I use the bare minimum number of colors I can get away with. So, a soldier with a green shirt will use the same greens used on trees, grass, etc.
Once I've defined a starting palette, I start drawing (usually terrain first, then objects, though, I rarely do all of one before starting on the other). I try to draw everything I can with the colors already defined, adding new colors only when absolutely necessary. This prevents me from too quickly running out of colors. I'll constantly be adjusting the values of the colors as I go, trying to make sure the hues work well wherever they must go (and constantly saving my work as I do this!).
As each tile is completed, I will make sure to eliminate all traces of the rectangular border which defines its edges (you must not draw only up to the border, but draw over it, because the lines of each rectangle define the outermost row or column of pixels in the tile). On terrain squares this is not usually a problem, as they tend to fill complete tiles, but on object squares, make sure to get rid of them once you no longer need them.
In the end, I will usually end up deciding to change all the pixels of one color to another on a selected series of tiles (often to free up a color register, or just to make things look better). This is easily done with Art Director because I can define a "window" around the specified tiles, and use "x-color" to replace one color with another or to swap two colors. (With DEGAS Elite you can replace colors by using "change.")
Drawing tips
The most common mistake with game graphics, and tile graphics in particular, is making things either too simple (and hence unappealing) or so detailed as to make the true nature of the item indistinct (even worse). In a square that might measure a mere one half by one half inches on your ST monitor, it's hard to get a good picture of almost anything. You usually have to spend a lot of time trying to make your terrain and objects really look like something!
In some cases, it's best to go with what I like to call "visual cliches," or items that are instantly recognizable. For Universe III I was required to create a pair of "UV Contacts" or ultraviolet contact lenses. Well, it was nearly impossible to make these lenses look like anything but little glass balls. In the end they were changed to glasses, because I could draw something that a player could identify at a glance and not be confused.
When drawing objects, I try to avoid having them touch the edges of their tiles, because then I can't make a mask big enough to overlap the size of the object. In some cases this can't be helped, but it's something you should pay attention to. The last thing you want is your on-screen persona's head to blend into a wall and his boots to seem to merge into the dirt at his feet.
Terrain squares that feature things like brick walls, wooden plank floors, grass, trees and water are not as easy to make as you might think. Trees and bushes end up looking like they're in an orchard if you draw one per tile. If your grass, dirt, etc, are too regular, it accentuates the faci that everything shown is laid out in tiles (you can't hide it, but there's no need to draw attention to it).
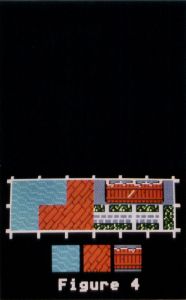
Try making such items overlap the tile edge, like having the left half of the tree against the right side of the tile and the right half against the left side. Water, bricks and such really must be designed so that when you line up a number of them they match up evenly, without obvious breaks. You have to fight to get this to look good, but it's worth it (Figure 4).
Making masks
As the object squares are completed, I'll start creating the masks. Most masks are merely one pixel larger around than the-object, though in some special cases they'll be precisely the size of the object. Creating masks is simple, but the technique varies depending on the software you're using. With Art Director I merely fill in the mask squares with the specified color, clip the objects as brushes, make them a one-color silhouette, then stamp that onto the mask squares. Next, if I need the masks a pixel bigger than the objects, I'll set a "window" around the masks, and use Art's single-color "outline" mode (which automatically draws a single pixel wide line around a selected color).
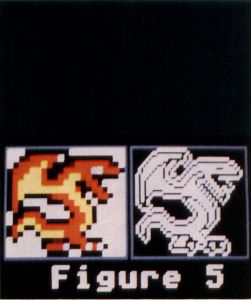
With DEGAS Elite you would have to stamp the object down onto the mask square, eliminate all colors in the object, then manually outline it. Figure 5 displays a mask and how it can relate to an object.
When copying the objects to mask tiles, it's important to make certain that they are stamped down on the mask square precisely as they are related to their own tiles. If they are even one pixel off, the mask will end up being in the wrong place, and the end result will not be pretty. Art has special keys which will allow your mouse cursor to move only horizontally (hold down Shift) or vertically (hold down Alternate) at one time. With DEGAS you may use the Alt-arrow and Alt-Shift-arrow key combinations to do the same.
Blits and sprites
Beyond tiles and vectors there's the usual game graphics which often consist of full-screen backgrounds and figures which move over that backdrop. The technique used to move the figures is the bit-block transfer or "blit," and the figures themselves are known as "software sprites." With this method, moving images are overlain upon a background plate. This is somewhat analogous to the object-over-terrain tile system, but more flexible because object sizes tend not to be so limited, and are generally free to move anywhere on the screen, rather than locked to a grid.
Games like Joust and Star Raiders fall into this category. Such programs often feature a lot of animation effects, such as flapping birds, banking aircraft, dynamic explosions, etc. How these are drawn and imported into the game depends on the programmer and his tools, but a lot of what I discussed earlier still applies. It's important to make sure your objects are distinct and recognizable, and not to use all your colors on one or two objects—or you won't have any colors left for the background, etc.
One of the most useful things is to import graphics from one program to another. For the Star Trek game demo I created, I built 3-D starships with Tom Hudson's CAD-3D, saved pictures of them at the required positions, then extensively touched them up (adding windows, running lights, torpedo tubes, etc). Doing it this way sped up the process a lot and lent an air of realism to the animation. When a ship turned around on your viewer, the perspective and lighting remained correct and consistent.
Beyond this there comes the question of designing graphics for machines other than the ST. Admittedly, creating graphics for the Amiga on an ST isn't the best way to go, as you can't normally put enough colors on the screen to really approximate an Amiga display. (Those new 512 and 4096 color paint programs might change this, but we have to find a way to port those images to the destination machine.)
You can design IBM PC graphics (CGA and EGA mode) on your ST quite easily, because the screen resolutions are the same as ST low-resolution (320 x 200) mode. The only trick is to make sure to set up your color palette properly and make certain that either you or the programmers (if you are not one and the same) have the proper utilities for carrying out the conversions. It can be done—no doubt about it—but you have to play by the rules and understand the graphics limitations of the machine your graphics will be ported to.
I recently heard a horror story where a major software publisher hired an artist to create EGA graphics for a PC game and found the finished graphics unusable. The artist had created the graphics on an ST and used colors that had no counterparts in EGA. He'd gone into such detailing that recoloring didn't work. They had to hire another artist and do it from scratch!
And what about monochrome?
No, I haven't forgotten users of monochrome systems. Admittedly and unfortunately, most entertainment software on the ST is color-only. Graphics for monochrome have their advantages and problems. The benefits are in the fact that the higher resolution allows finer detail. The main drawback is that there are only two colors, black and white, which means the detail color allows isn't possible! Furthermore, you can't just replace one color with another, or stamp things over each other (it just doesn't work the same).
In place of color the artist must use outlines, dithered fill patterns (specific arrangements of black and white dots which create the effect of textures and gray tones). With tile graphics it's often best to try to leave any overlaid objects simple, without complex fills, and use the dithered effects on terrain squares. See Figure 6 for an example of the differences between the same tile in low resolution and monochrome.
Tools
The final question for the would-be graphics designer is "What software should I use?" There are as many answers to that question as there are possible techniques you can use in designing the graphics. Suffice to say the more graphics software you have, the better off you are. On any given project I may use Art & Film Director, DEGAS Elite, CAD-3D, and Cyber Paint, all in concert and with graphics tablets and video digitizers. Each tool has its strengths, and I am constantly porting graphics from format to format to take advantage of various tools.
A few software recommendations
Art & Film Director: If you primarily intend to work on low-resolution graphics, this two-in-one package provides the best graphics editing tools and special effects: up to 16 workscreens on a machine with a meg or more RAM, each with up to eight palettes. Graphics can be imported and exported in DEGAS .PI1 and NEO formats. Animation can be tested in Film Director.
DEGAS Elite: If you need to work in any and all ST resolutions, this is your best bet. Nice font handling and multiple workscreens (up to eight in one-meg or more RAM) are highlights. File formats are considered the ST "standard."
CAD-3D (get version 2.0 if you have one-meg or more RAM): If you want to simply create nicely shaded objects that can turn, this is what you need. Saves images in NEO and DEGAS format. You really must use this in conjunction with a paint program like those listed above.
Addenda
In "More Baudy Tales" (July 1988, ST-Log), at the very end of the next to the last paragraph of the section "Intro to the Hayes command set" (column 1, page 81) the line should read "...as in ATS0 = 0." Sorry if this little error caused any confusion.