ANCIENT CORRIDORS
Part 1 · A Guide to Dungeon Master
by Bob Retelle
Bob Retelle has been a professional in the field of telecommunications for the past several years (look for BOBR online) and has been writing (and playing) computer adventure games for longer than he'd like to admit.
Limping along the dank stone corridors, your fighters nursing their wounds, and your magic users' mana almost exhausted, you pause where the tunnel suddenly branches. Ahead of you, the stone walls disappear into the gloom straight as an arrow, but to your right you can see the beginning of another series of zig-zags as that corridor twists and turns.
The ominous sounding "CLICK" you heard as your party's leader stepped on a hidden switch in the stone floor, followed by the distant rattle of an iron door opening somewhere ahead can only spell danger. Suddenly, the flickering light from your waning torch catches the cruel edge of a drawn sword, and from the corner of your eye, you see a brief flicker of movement just outside of the shrinking globe of light from your torch.
With a sigh, your fighters ready their weapons as your wizard tries to cajole one last fireball from the little bit of magical mana that remains. Your priest passes around what's left of the healing potion, then picks up a rock to throw with his sling.
Is it skeletons again, with their blood-red wooden shields and flashing sharp-edged falchion swords, or some other, as yet unimagined, horror? You turn into the side corridor, tensed once again for battle. Whatever they are, they're blocking the way on your quest for your own destiny—and that of the entire world!
This of course, is Dungeon Master (DM), the fantasy role-playing game from Software Heaven, Inc. and FTL Games. Nearly two years in the making, DM stretches the limits of the Atari ST with its highly detailed graphics and lifelike digitized sound. Perhaps the most outstanding feature of the game, though, is its playability. It's obvious that a lot of thought and hard work went into creating an imaginary world which would be challenging, while never quite becoming impossible to cope with.
As playable as the game is, though, there are times when a little aid and guidance could come in handy to get you past a particularly difficult puzzle, or to give you a little support in getting past some of the nasty creatures which populate the dungeon. That's what these articles will do. This month, we'll present an overview of the game and some general tips on getting started and surviving while you build up your experience. Next month we'll get into some of the more specific things you may run into, and ways of handling them.
As with any game of this level of complexity, be sure to read the manual that comes with DM. The 18-page story which begins the manual sets the scene for your quest, and while it's a little misleading about the ultimate goal of the game, it will give you a feeling for what it's all about. The section on magic is very important; although while the descriptions of the various elements of magical spells do give some clues as to their use, you'll probably find them more colorful than practical.
The story
Briefly, you play the part of Theron, apprentice to the Grey Lord, the most powerful of the High Lords and the greatest wizard in the world. Your Master had sent you away on an errand to protect you, while he attempted to retrieve the legendary Power Gem from deep within the mountain. Something went wrong, and in the resulting explosion, the Grey Lord was torn apart.
His evil side, known as Lord Chaos, locked himself in the wizard's dungeon, intending to find the Power Gem for himself and to use its power to wreak destruction on the world. The good side of the Grey Lord, unable to enter the dungeon himself, has called on you to brave the traps and monsters which Lord Chaos has filled the dungeon with, and to recover the Fire-staff. Together with the Power Gem, the Firestaff can fuse the good and evil sides of the wizard together once more, and restore order and balance to the world.
Because you have been affected by the same explosion and been rendered invisible and immaterial, you must select a party of mortal champions to guide through the depths of the dungeon on this quest. You can choose from among 24 of these somewhat foolhardy individuals who had tried to brave the dangers of the dungeon without a guide—unsuccessfully. Once you have made your selection of up to four of these champions, you are ready to enter the world of Dungeon Master.
Choosing your champions
As you enter the Hall of Champions, you'll find each of the champions frozen into magical mirrors hanging on the walls. Each one has the skills and equipment that he, she or it possessed at the time they fell to the horrors of the dungeon. Take your time and look at all 24 before you decide on the makeup of your party. Once you choose a champion, you can't change your mind without restarting the game.
Examine each one's skills and statistics, with the idea of forming a well-balanced party. For your first quest into the dungeon, you should probably choose two fighters with good strength and health numbers, and two with high mana and wisdom levels to be your wizard and priest. Try to choose champions who also have ninja experience, which will allow them to move quickly and aim accurately.
The numbers you'll see for each of the characteristics will change slightly from game to game, but they'll have the same general relationship. Some champions are very strong, but with very limited mana, which will restrict their ability to do magic. Others have high levels of mana, but with such low health that they will be very vulnerable in battle.
You'll have the option of choosing to either resurrect the champions just as you see them, with the same name and all the same skills and attributes, or you can reincarnate them as a new player, giving them a new name. This second option will convert their skills into slightly higher numbers for their physical characteristics, but leave them totally without any learned skills. The increase in their attributes is so slight that for your first game, it's probably better to let them keep their skills and names, and just resurrect them.
Arranging your party
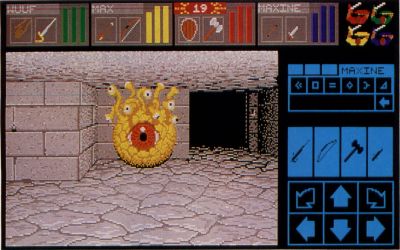
Once you've chosen your group of four champions, you may find it necessary to rearrange them in order to put the best fighters in front of the group. Each of the characters has a color associated with him. The four icons in the upper righthand corner of the screen each correspond to the champion with that color. By clicking on one of the icons and moving it onto another of the icons, you can make those two champions trade places in the group. The party always walks "two by two," two in front, two in back. You should give the fighters in front the best swords and axes, while the two in back can use bows or slings to shoot over their heads.
One thing to watch about the arrangement of the group is that a person on the right will throw or shoot down the right-hand side of the corridor, and the person on the left will aim down the left side. If a monster is in the middle of the hallway, it won't make any difference, and both will be able to hit it. Often though, you'll find the monsters staying to one side or the other, especially when they've just come around a corner. This means that you have to watch carefully to see that you don't waste your arrows or fireballs by shooting down the wrong side of the tunnel. You can fire one shot, then trade places in the group to get off another shot, if you have enough time.
Playing the game
The most important thing to remember while playing the game is that you are responsible for guiding your party and for looking after their needs. You must remember to feed them and give them water. During battles, you must remember to watch over them so that their health doesn't fall too low while you're occupied choosing weapons and fighting monsters. You must clothe them, and most importantly, see to their training in the skills they'll need to survive the dungeon.
Your job as guide to the champions truly begins when your leader steps on the floor plate that opens the iron-grate door into the dungeon. Beyond that door you'll need all your cunning and bravery to guide your party to victory over Chaos.
Scrolls and altars
On the Hall of Champions level, you'll find some tasty morsels of food to put in your champions' packs, as well as some useful items like torches. You'll also find your first scrolls. In DM, scrolls are all "informative" that is, you read a scroll to find out something useful, but the act of reading a scroll doesn't do anything "magical." To read a scroll, go to a character's inventory screen and either put it into their "action hand" or hold it over the eye icon and hold the left mouse button down. Once you've read a scroll and written down what it said, you don't need to keep it.
You'll also find the first of several "Altars of VI," where you can bring back the bones of a dead champion and have them resurrected. Thankfully, DM provides this means of recovering from mistakes or overwhelming attacks. The game is not over as long as at least one of your party survives to bring the bones of the others back to an altar.
Of course, like everything else, resurrection does not come without a price. Every time a champion is resurrected at an altar, he will lose some health points. Also, it may be extremely tedious to have to retrace your steps to the closest altar to bring a member of the party back to life, and to go back and recover all the items they were carrying when they died. In other words, try not to get anyone killed!
Food and water
You'll find food scattered here and there throughout the dungeon, but you'll need to ration it wisely if you want to avoid watching your people starve to death. Different kinds of food are more or less filling than others. You'll soon learn which foods are good for a quick snack and which can be counted on to fill a hungry champion after a long day's exploring.
One thing that cannot be overstressed, however, is don't overfeed your party! Wait until their food indicator drops below half before you feed them anything. They won't begin to suffer the effects of hunger until their food indicator turns yellow, and feeding them too often will only waste your limited supply of food.
Unlike food, the "Lions Head" water fountains on the walls appear to be unlimited, so you can give your champions a drink wherever you pass a fountain. There are areas in the dungeon which have no water fountains at all, though, so be sure that you're carrying a good supply. When you're in those areas, the same advice applies to water as to feeding the party.
It's not immediately apparent, but you can use an empty flask to hold water as well as magic potions. A flask will almost completely quench a very thirsty champion, while it takes three swallows from a waterskin. A flask cannot be shared among the members of the party, while a waterskin can be passed around until its three swallows are gone. You fill either a flask or waterskin by holding it against a water fountain on the wall and clicking the left mouse button.
Training your champions
The most valuable thing you can do for your champions is to train them in the various skills they need. Any of the champions can learn to use any of the skills, no matter how they may start out. Fighters may be low in magical ability and wizards may be weaklings, but by practicing diligently, they can advance to high levels.
It's important to remember to keep practicing these skills, even when there's no apparent need to be swinging swords or throwing things. If the only time you use a skill is in combat with monsters, your champions' abilities will grow slowly. Very early in the game, you will find the scroll which tells how to create a magical torch for light. If you have your fighters cast this spell as often as they can, not only will it save your normal torches, but you'll soon find them advancing to higher wizard levels, which also gives them more mana.
Use the lowest magic-power level at first. If you're told that someone needs more practice in using the spell, keep at it. They'll receive experience credit for trying. If a champion doesn't have enough mana to cast the entire spell at once, just click on the "syllables" they can do and wait until they regain enough mana to do the rest. It can be a long process, but it's beneficial in the end.
The "War Cry" option given to an unarmed character will give that person experience toward advancing in priest levels, which will also increase their total mana. Anytime it looks as if your party will be safe from attack for a time, you can have them put their weapons away and have a chorus of war cries to build up priestly experience It can be nice to have each champion able to create their own healing potions and to be able to heal the others in the party when they begin to encounter the really nasty creatures deep in the dungeon!
Ninja skills affect your champions' strength and dexterity and help determine how effective they are when using "range" weapons like a bow or sling, or when throwing things. A good way to gain ninja experience is to throw objects whenever you have the chance. Scrolls, torches, unneeded pieces of clothing, anything that can be picked up and thrown out ahead of the party will give the character who is currently the party leader extra ninja experience.
The advice about giving your strongest fighters the best weapons and putting them out in front of the party generally should be followed. They'll be the ones on whom most of the responsibility for close-in, hand-to-hand fighting will rest, and they'll need all the experience they can get. There are a few places, however, where it's fairly safe to put the weaker members of the party up in front, to let them get some fighter experience too.
Remember that every time a champion advances a level of experience, no matter what skill is involved, their health and stamina increases, along with one or more of their other statistics. One thing that can be said about the dungeon with complete assurance is that no matter how bad things look now, they can only get worse, and the better prepared they are, the longer your party will survive!
Notes and maps
There are several things which will aid you in playing DM and which can make life a little easier (and a little longer!). Be sure to make notes as you go along, especially when you find magical scrolls scattered here and there in the dungeon. It doesn't matter if you write them down in ancient runes or not, but the spells and clues contained in the scrolls are crucial to the game. Also, recording where you found valuable items will help you if you have to (or want to) start over.
One of the most valuable things you can do is to make a map of the dungeon as you go along. There are many twists and turns, and after a while all the tunnels begin to look alike. Knowing which corridors are safe to retreat into, and which are fatal dead ends just may save your champions' lives! Also, there are a lot of side passages which contain valuable equipment and clues that you might miss if you don't note them on a map.
Unfortunately, mapping the dungeon levels tends to slow down the play of the game and requires tremendous patience. Because DM runs in "real-time," the monsters won't wait while you draw your map, and your torches will continue to burn down while you add little details.
If you can, draw your own map as you go along; but if you'd rather not take the time, there are several sets of excellent maps which have been drawn by other brave souls. These can be downloaded from information services such as the ST Log SIG on DELPHI and from local bulletin-board systems. If you have a local Atari user group, check to see if they have the DM maps in their club library.
Some players may feel that using such pre-drawn maps is cheating, so you should be reassured that the game can be won without mapping or using ready-made maps. It may just take a bit more concentration to remember where you are, and that you may miss some areas.
Details! Details!
The Dungeon is rich with detail, and the smallest thing may hold great importance. Your powers of observation will be taxed to the extreme. Tiny little chinks between stones in the walls may be secret switches which will trigger events, both good and bad. Gray iron keys lying on the gray stones of the floor will defy you to notice them, but notice them you must if you are to proceed. A crack in the wall may look just like a hundred other cracks, but look closely, and you may notice a tiny hidden button to press.
While you're examining the walls for hidden switches, be sure to also watch where you're putting your feet. There happen to be many floor plates in the hallways which may do things like open or close pits in front of you or slam doors behind you. Sometimes you may find it necessary to drop something onto a floor plate to keep it depressed while you go on beyond it. Things like burned-out torches and scrolls that you've already read are useful for this purpose, and you won't have to worry about leaving something useful behind.
Further down in the dungeon, you'll encounter tiny floor plates which are too small to be held down by chests or shields or in any other way than by standing on them. To keep these switches shut, you'll have to lure someone or something onto them, then use magic to hold them there
Puzzlements
Besides the locked doors for which you'll have to find keys, and the secret doors in the walls which are opened by pressing hidden switches, you'll also encounter many devious puzzles which Lord Chaos has placed in your way in an effort to foil your quest. Most of the puzzles are quite logical, and with many you may find clues inscribed on the walls nearby. If you seem to be having trouble solving a puzzle, look around for these clues. Be observant of the areas nearby too. If you push a switch in the wall and nothing seems to happen, look around and see if anything is different from before.
The farther down into the dungeon you go, the more devious these puzzles become. You'll also begin to encounter buttons which open doors far across the level. If you find a door which can't be opened immediately, watch for buttons later on which don't seem to do anything. You may find that, if you go back, the door will be open!
Some of the puzzles can only be solved by quick action, and your party must move as fast as possible to get through these areas. Watch the line at the bottom of the inventory screen for each champion, which tells how much each is carrying and the maximum amount each can carry. If this line turns yellow, it means that the person's load is at or above half of die maximum. This not only wears down their stamina, but it makes them move slower as well. In most cases, this really won't affect them badly; they'll just have to stop and rest more often. There may actually be times when this situation is unavoidable—for instance, when you have a lot of items to carry, and you can't distribute the load among the group any more evenly.
There are several places, though, where the need for fast movement means that you may have to lighten the load so that none of your party is "in the yellow," even if this means dropping valuable equipment. Fortunately, these areas are all located so that you'll be able to recover anything you have to drop, so you don't have to worry about losing anything permanently.
To get through the puzzles that require fast movement, first drop any equipment that may not be immediately useful. Extra food and torches, spare weapons and armor can be left behind to lighten the load. Check to be sure that none of the party has a LOAD indicator which is yellow. Then put your best ninja in the lead by clicking on his/her name at the top of the screen. Remember, the leader's name is highlighted in yellow. You can check each champion's ninja skill levels by going to his inventory screen and holding die left mouse button down while pointing to the eye icon.
The last and possibly most important part of moving quickly is to use the keyboard cursor keys to move. Pressing the arrow keys on the keyboard is much quicker than clicking the mouse on the direction arrow icons on the screen! Count how many spaces you'll have to move, if possible, then with the mouse pointer, activate the puzzle and quickly press the appropriate keyboard arrow key the number of times counted.
With a little practice, you should be able to get through these puzzles without too much trouble If you do get hopelessly stuck at any of the puzzles, fear not! Next month's article will go into more detail, with hints for specific situations—and, of course, we'll begin to talk about those charming monsters you'll encounter!