TUTORIAL
STEP 1
Customizing the GEM Desktop Too!
Mega notes and more Desktop changes
by Maurice Molyneaux
When not writing articles for ST-Log, Maurice Molyneaux continues to struggle with a 9-year-old science fiction novel, designs game graphics, consults for software companies and creates animated cartoon productions using microcomputers. Despite a ridiculously French name, he claims to having been born in Vicenza, Italy, and denies vicious rumors that he eats escargots and calamari while computing. He is the creator and director of the "Art and Film Director" sales video for Epyx — a ten-minute, fully animated, cartoon demonstration created entirely with ST systems. His DELPHI user-name is MAURICEM.
No, this isn't a rerun. This is the "sequel" to the original "Customizing the GEM Desktop," which appeared in the May 1987 issue of ST-Log. Although that article was pretty exhaustive, as time has passed I've found new ways to make the GEM Desktop even more a creature of your own design. Also, with the introduction of the Mega STs, there are some updates and changes with regard to some of the information contained in the original article (which you may want to dig up and keep handy as an additional reference.)
Furthermore, after the rather heavily technical nature of the last three Step Is (covering printer drivers and ST hardware), I thought it was time to have a little "fun." But before the fun stuff, let's get the updates out of the way.
Mega updates
The Mega ST computers put new wrinkles in the saga of the infamous DESKTOP.INF file (DI). Not only is there the long-anticipated "blitter" chip and the "new" TOS ROMs (which also appear in later models of the 1040ST and 520STfm), but also a revised Control Panel accessory. These cause additional values to be set or changed in the DI.
Let's start with the new CONTROL. ACC. It includes the Control Panel, Set Printer and Set RS232 Config. boxes in a single accessory slot. Previously, CONTROL.ACC contained the Control Panel and Set Printer boxes, but they took two accessory slots out of the maximum of six. It did not contain the Set RS232 option, which was found in EMULATOR.ACC. Furthermore, there are now 16 baud/bps rates to select from in the Set RS232 panel, whereas there were only four originally. If you open the DI file (using a word processor with an ASCII or nondocument mode, like 1st Word, at the top of the file you will find a line like the following (the numbers may change, but the line will always begin with "#a"):
#a000000
This line saves the data from Set RS232 Config. The values here will change depending on how you configure the port. Each digit represents a single setting of the RS232 port configuration, with the exception of the fifth digit, which sets two of the selections found on the Set RS232 alert box. The second digit may contain a number or an ASCII character. The six digits represent the following, going from left to right:
1st—DUPLEX—A 0 sets Full and a 1 sets Half.
2nd—BAUD RATE—The following baud/bps rates are denoted by the character which appears to the value's right (i.e., if 75 baud is selected the character " > " will be the second digit, as in #a0 > 0000).
| 50—? | 1200—2 |
| 75—> | 1800—8 |
| 110—= | 2000—7 |
| 134—< | 2400—6 |
| 150—; | 3600—5 |
| 200—: | 4800—1 |
| 300—3 | 9600—0 |
| 600—9 | 19200—4 |
3rd—PARITY—0 = None, 1 = Odd, 2 = Even.
4th—BITS/CHAR—0 = 8 bits, 1 = 7, 2 = 6, 3 = 5.
5th—XON/XOFF & RTS/CTS— Combined in a single digit. In the examples given here, XON/XOFF is the first listed, and RTS/CTS the second, so that "Off/On" means XON/XOFF is "off" and RTS/CTS is "on."
| 0 = Off/Off | 2 = Off/On |
| 1= On/Off | 3 = On/On |
6th—Strip Bit—0 = On, l=Off.
Now, the blitter chip. At the very bottom of the Options menu on the Desktop there's a selection called "blitter." If a check mark appears next to it, the blitter chip is active, if not, the chip is off. The system setting is for the blitter to be on. However, the user can set the default blitter status by setting it the way he/she wants and saving the Desktop. The DI file now contains a value for this setting, in the line which starts with #E, as in:
#E FB 02
The first value, one byte (hexadecimal FB in this example), holds the preferences for sorting files (as set from the View menu), copy/delete confirmations on/off, and the mouse double-click rates (set from the Control Panel). The value changes, of course, depending on which bits are set on or off.
The second byte (02 in this example) is used to control which resolution to use. Now it also records/sets the blitter status. If the blitter is off, then the first numeral of the pair is a 0, if on, it is a 1. Therefore, with the blitter off, 01 is low, 02 is medium and 03 is high. Blitter on, 11 is low, 12 is medium and 13 is high. Of course, putting a value of 03 or 13 here if you have color monitor, or putting a 01, 11, 02 or 12 here if you have a monochrome monitor, won't trick your ST into using a resolution your monitor cannot display.
Other GEM Desktop changes include "Are you sure? [Yes/No]" alert boxes which appear when you click on Save Desktop and Print Screen under the Options menu. Furthermore, if you click the left mouse button while pointing at a window's scroll arrows or in the gray area around a scroll "box" (called the scroll bar) and hold the button down, the scroll will auto-repeat until you let go. No more clicking on the scroll bar 1,000 times to leaf through large documents in 1st Word!
There has even been a fix in TOS/GEM that eliminates the infamous type-an-underscore-and-crash-the-system bug. This bug, if you've never encountered it, strikes when you try to type an underscore in fields in certain kinds of dialog boxes. Try, for example, calling up the Control Panel accessory and click on the time or date as if you were going to set it. Now, type an underline. Kablooey! This can also happen in the GEM item selector and other dialog boxes. It doesn't happen with the new ROMs, fortunately.
Of course, that doesn't mean TOS/GEM is bug-free. Far from it. There are some "new" bugs to contend with. One has to do with running program from a nonactive window (which you do by holding down the right mouse button while double-clicking with the left). Doing this with the new TOS causes the machine to lock up! Furthermore, there's a goof in the file-naming routines. If you save a file without an extender, as in PICTURE, the OS (operating system) automatically appends the period (.) character that separates the filename from its extender, regardless of the extender. So, if you have a program that specifically looks for PICTURE, it won't work because the file you saved will have a period as part of its filename.
There are other bugs, but as with the old ROMs, they are more likely to be encountered by programmers than end users. Users whose machines have the new ROMs are more likely to encounter compatibility problems. This means that a few programs that ran fine on an older ST won't run properly or at all on a Mega or the later model STs with the new ROMs. This is due to changes made in the ROMs, but don't go pointing fingers at Atari. In the vast majority of cases, the programmers of the software used an undocumented memory location or called an operating system routine in some fashion other than through "legal" means. When changes were made, those programs working so illegally have problems.
Oh well; you win some, you lose some. Fortunately, word is that Atari will have revised ROMs this fall which will speed up GEMDOS (disk operating system) routines, fix more bugs, etc (cross your fingers!)
Desktop too
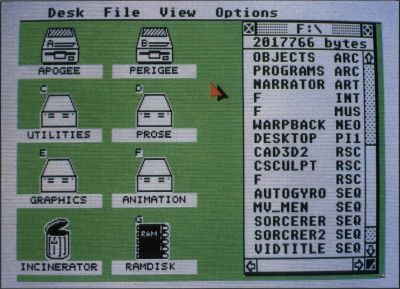
People who look at my ST's Desktop often do a double take No, I don't use Neo-desk or some other "alternate" desktop. However, the on-screen disk icons look just like my disk drives, and the hard-disk partitions are represented by little pictures of my SupraDrive. And—what's this?—there's a RAM chip icon for the RAM-disk and the trash can's lid is open! (Figure 1.)
Some of you might have guessed that I've used an icon-editing program to change the appearance of the Desktop icons. However, what confuses a lot of people is how I have three different types of drive icons on my Desktop. This is no magic, no special programming trick, just a little icon redefinition and a bit of surgery on the DI file. (Of course!)
There are a number of programs that will change the icons on your Desktop, but not many let you design your own. If you have one of these programs you can design your own floppy disk, trash can and other icons.
The problem with some of these utilities is that they use an accessory in conjunction with a TOS program to install the icons. Once the icons are installed, they need not be reinstalled until you reset or reboot. But, regardless of this, the blasted accessory takes up RAM and an accessory slot. The solution? If possible throw away the accessory and put the icon-loader program and the icon-data file in the main directory of your boot disk. Don't put the program in an AUTO folder! It won't work! This is because the programs in the AUTO folder are run before the GEM Desktop program is run. If you tried to run such an icon installer from the AUTO folder it would fail to work, this due to the fact that it can't find icons to replace because the Desktop has yet to be set up.
Now, you can either run the installer manually, or get one of those programs to make GEM auto-run programs as soon as the Desktop comes up. Thus, the new icons are installed, but no memory is consumed by useless accessories. (A note: Some icon replacement utilities are very sensitive to AUTO folder programs which alter the way programs, accessories and other RAM are used, such as programs like John Eidsvoog's excellent Topdown.)
Now, how do you get multiple types of icons for different drives (if you have a hard disk, RAM disks, etc.)? Easy. When you redefine the icons, you change the icons for folders, programs and data files to pictures of different devices. In my case the folders stay folders, the data/text files become RAM chips and the program file icons become hard-disk drives.
Next, we have to install these icons on the Desktop. Usually, the only icons used outside windows are the disk and trash icons, but we can change that. Load the DI file into your word processor, ASCII or non-document mode on (if possible), and edit the file. (Consult "Customizing the GEM Desktop" in ST-Log #14 for a detailed walk-through of modifying this file.)
Scan down until you find the information for the Desk icons, their names, identifiers, etc. If you have one or two floppy drives, you'll see two lines something like this:
#M 00 03 00 FF A FLOPPY DISK@ @
#M 01 03 00 FF B FLOPPY DISK@ @
#T 07 03 02 FF   TRASH@ @
If you have a hard disk (partitioned, of course), perhaps something like this:
#M 00 03 00 FF A DISK A@ @
#M 01 03 00 FF B DISK B@ @
#M 02 03 03 FF C UTILITIES@ @
#M 03 03 03 FF D PROSE@ @
#M 04 03 03 FF E GRAPHICS@ @
#M 05 03 03 FF F ANIMATION@ @
#M 06 03 04 FF G RAMDISK@ @
#T 07 03 02 FF   TRASH@ @
These set the icons for the Desktop. The first value (after the #M) is column of the icon (0 to 3 in low resolution, 0 to 7 in medium or high), and the second is the row (0 to 3 in color, 0 to 7 in monochrome). The third determines which of the system icon images (disk/file drawer, trash can, program, data, or folder icon) to display. Change the third value to one of the following for different icons:
00 = File Drawer (disk drive)
01 = Folder (subdirectory)
02 = Trash Can
03 = Program (.APP, .PRG, TOS, TTP)
04 = Data/Text (pile of paper)
You can select any icon you wish to use on the Desktop, but be warned that the "letter" for a drive icon (if using anything but the disk icon) will appear in the upper left corner of the icon, rather than where it appears on the file-drawer icon. Therefore, you should draw the icon so that no part of it enters the 6×6 block of pixels in the upper left-hand corner of the icon block. (Look at the icons in Figure 1 and note where the drive identifiers are located.)
Following the icon value number is an FF, which is then followed by the drive identifier, and then the text of drive name/label. The "@ @" indicates the end of the drive line.
Before modification, the lines might look like the following. Note that the icon value (third column of numbers) are all the same: 00 for the "file drawer" icon.
#M 00 03 00 FF A DISK A@ @
#M 01 03 00 FF B DISK B@ @
#M 02 03 00 FF C UTILITIES@ @
#M 03 03 00 FF D PROSE@ @
#M 04 03 00 FF E GRAPHICS@ @
#M 05 03 00 FF F ANIMATION@ @
#M 06 03 00 FF G RAMDISK@ @
#T 07 03 02 FF   TRASH@ @
After modification, it might look like the following. Here we have left the regular disk icons (icon number 00) in place for the floppy drives A and B, and left the trash can alone as well (icon number 02). For drives C through F, the hard-disk partitions, the icon value has been changed to 03, the icon for a program. For drive G, the ramdisk, the icon number was changed to 04, the icon for a data/text file
#M 00 03 00 FF A DISK A@ @
#M 01 03 00 FF B DISK B@ @
#M 02 03 03 FF C UTILITIES@ @
#M 03 03 03 FF D PROSE@ @
#M 04 03 03 FF E GRAPHICS@ @
#M 05 03 03 FF F ANIMATION@ @
#M 06 03 04 FF G RAMDISK@ @
#T 07 03 02 FF   TRASH@ @
Once all these changes have been made, save your DI file (Remember! ASCII mode!) to your boot disk. If you have multiple DI files, as with programs that let you select different DIs for different resolutions, you will either need to modify them all or make certain that your ST uses the DI file you just modified.) Reset your computer. When the Desktop appears, it should look pretty weird. The icons will be all wrong (if you didn't already install your own custom icons). You'll have text, program, maybe even folder icons sitting out on the Desktop, each with little identifying letters attached.
Now, run the program that installs the icons. When you come back to the Desktop, you'll see your own customized images in place of those shabby old GEM icons. You may find one or more of your new icons look wrong. If so, edit and resave them. Once all is to your satisfaction, you're ready to roll. Set up the icon in staller to run automatically when you reach the Desktop (you'll need one of those aforementioned GEM-boot programs to do this) and you're all set. Every time you boot, you'll have a custom look to your ST Desktop.
If you don't have means to automatically run your icon installation utility, you may be forced to run it manually upon reaching the Desktop.
This makes for one sharp-looking Desktop. But it has one drawback. Since you've modified the icons normally used in the Desktop windows, those icons will be identical to those you made into drives. You'll have to sort by text (View menu) to keep the whole thing looking good. Unless, of course, you like double-clicking on hard-drive icons to run ST Writer.
Even more mods
Now here's the rub: a really wild Desktop overhaul. It requires you to have a program (such as Easel ST, by Computer Fenestrations) which installs a graphic image as the Desktop background (e.g., a Neo or DEGAS pic) and an icon redesigner. What you'll do is draw a NEO or DEGAS picture of the Desktop, complete with (in low resolution) multicolor icons, etc. The best way to do this is to take a "snapshot" of your current Desktop, using one of the many public domain snapshot utilities. This will show you precisely where the icons, their labels and identifying letters will be.
Next, you'll use the icon editor and reduce the program icons to a single dot (the smallest allowed), which, if possible, you should place where it will disappear behind the drive-identifier letter. (In this case, you will probably not want to redefine any window icons for use on the Desktop. Why bother when all you're doing is making them invisible!) You will then install the picture as the Desktop background, and your nearly nonexistent new icons as well. You cannot, however, eliminate the icon labels nor the drive-identifier letter which appears on them. You must take this into account as you redesign your icons and draw your background for them.
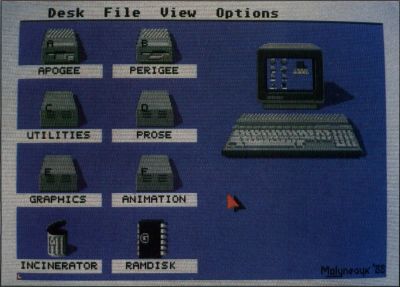
What you end up with might well look something like the picture in Figure 2. The main limitation to this particular modification is that if you drag an icon to another location, you'll see its "ghost" outline, but when you drop it, it will nearly disappear. Furthermore, the icon drawn on the background stays where it is. Ah well, sacrifice in the name of art.
The final step
For quite some time a number of people have rather pithily observed that this series was a dead end in its original conception. "How much beginner's stuff can you cover?" they would say, then laugh and add (all thinking they were very witty and original in saying this), that I would have to go on to intermediate level stuff, and call the series "Step 2."
They were right and wrong as well. There is a lot of material beginners need to know, but I've covered most of the technical aspects over these past 12 articles. I'm finding it difficult to write anything more without endlessly repeating myself. Furthermore, because of all this background material, I find myself constantly forced to choose between restating previously printed material for the sake of new readers, or referring people back to old issues, which they may or may not have access to. Usually, I choose the latter just so as not to end up repeating myself ad infinitum (a great way to make money, but a sloppy way to write a column).
So, of late I have been thinking about what to do. I really don't want to keep trudging over the same ground, so to speak. Then again, I don't want to start discussing power-user level stuff and abandon all the novices and part-time users out there. It was quite a problem. Finally, I decided there was nowhere to go with the series as it stood. After all, I've written approximately 40,000 words of beginner's material for ST-Log in the past year and a half! Where do you go from there?
So, Step 1, as you and I have come to know it, takes its final bow this issue. But, don't panic, I'm not abandoning all you novices. The old Step 1 is being retired, but it's going to be replaced with something better; something a little more broad based. Instead of just defining terms, explaining the myriad complexities of an ST and telling you how to tweak your printer, I'm going to be telling you about different uses for your ST system.
For example, we might talk about how a word processor, spelling checker, etc., can help you in writing articles and stories. We might discuss the process of designing graphics for a game. I'll definitely be talking to you about what kinds of things you can really do with these machines.
Yes, they can play games, and yes, they can be used for business management, but there are so many other possibilities—exciting ones—that shouldn't be ignored. In the three years I've had my ST, I've used it to write dozens of articles, revise a 130,000 word novel, design game graphics for several companies, create 3D cartoon characters, and produce a ten-minute animated, sales-video cartoon for Epyx and the possibilities keep growing all the time.
Possibilites, that's where we're going. From the first step in understanding your computer to the first step in using it. Computers are powerful tools. If you're willing to learn to use one, there are all kinds of opportunities, for business, pleasure or both. My ST was the smartest investment I ever made, because it's allowed me to do things—inexpensively— that I couldn't have done otherwise. This little Atari computer has made quite a difference in my life, and many others have had the same experience. I intend to show you these things as well, and maybe open your eyes to some possibilities.
And all this is not to say I'll no longer be dispensing useful tips and information as I have in the past. That won't change. The change you will see is that it won't always be the same sort of thing each and every month. My main concern in this series has always been helping you readers, and that will remain the core of whatever this column evolves into.
I'm excited by the possibilities. Hope you stick around for the ride.