HARDWARE
Frankendrive
The Hard Drive Construction Project
by Andy Eddy
The author resides in Connecticut, and is a frequent contributor to ANALOG and ST-LOG. He can be reached on Delphi and GEnie as KIDX; on People/Link as KID X; and Compuserve at 72327,503.
Since purchasing my ST, I've wanted to get a hard drive to make storage easier and neater, provide faster access to the growing list of software I use, and to help eliminate the desert of floppies that surrounds my computer "office." The latter threatens to spread into my family's precious living space, but, unfortunately, hard drive cost was a major limitation regardless of the overall benefits it would bring.
One thing in my favor—and we've said it before—is that as computers become more popular, the equipment that was once at a premium (like modems and hard drives) becomes more commonplace. The driving force behind this movement comes from mass production pushing the prices down; and that situation had taken hard drive prices lower, but not enough for my liking.
Still another method that people are using to lower costs is through do-it-yourself construction—an option that is becoming especially popular in the IBM-compatible world—giving the user the freedom to configure a system to his or her own specifications and budget.
Unfortunately, I never thought home construction of a hard drive system was a viable alternative for the ST; that is, until I heard about a company called Berkeley Microsystems (360 Oakland Avenue, Suite 5, Oakland CA 94611; (415) 465-6956). They've advertised in ST magazines and shared booths at some Atari Faires, demonstrating their method of using readily-available, IBM-compatible parts in union with their interface card to build an inexpensive alternative to the over-the-counter commercial drives.
I've done my share of Heathkit projects in the past and resolved that this might be the answer to my prayers: a low-cost way of getting that hard drive. So I contacted Berkeley for more information, and they sent me a copy of their manual, as well as some of the previous press they've received. With this glimmer of hope (and potential saving of greenbacks), the dream of the Frankendrive sprang into action.
Looking through the documentation, I figured it would be pretty easy to pull the job off. The manual lists (to assist in the configuration process once your construction is completed) various drives that match the parameters of their product, which is basically any ST506/ST412-compatible drive. If you are at all confused by what I just said, then I recommend you take some time to shake hands with Tom Harker's Hard Disk Primer, from the May 1987 ANALOG. It'll be invaluable in providing answers to basic questions that may arise.
Igor, get me a screwdriver...
Now, on to gathering the parts for the Frankendrive. I decided to purchase new products in order to ease my fear of buying pre-owned materials; this strategy goes well for some, but my poor luck in the past with used cars backed up my plan. Scouring a couple of issues of Infoworld and Computer Shopper—the latter a magazine renowned for its wealth of hardware distributor ads—I came up with lots of pricing data, as well as some leads for the purchases themselves.
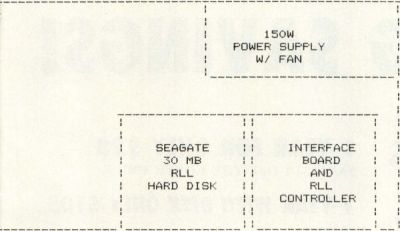
What I managed to do is purchase a Seagate ST238 (a 30MB RLL drive), an IBM-like case for housing the equipment, and an IBM-like 150-watt switched power supply to drive it all. The power supply mounts in the case perfectly (which comes with pre-drilled screw holes and a custom cutaway for the power switch), and also has a built-in fan for pulling the generated heat out of the enclosure. Some would say that a case that size and 150 watts are overkill, but I'll address those comments later.
Add to this the Berkeley interface card and Adaptec 4070 RLL hard disk controller, both provided by Berkeley (the RLL combo costs $300, while the MFM set-up goes for $250). See Table 1 for the pricing breakdown, which doesn't include incidental shipping costs; unfortunately, there are no bargain computer shops near me, so mail-order was a necessity. And to make it all the more satisfying, the Berkeley unit comes with a built-in clock for setting the system clock. When you consider that you'd have to kick out an additional $50 or so for that item elsewhere (excepting Mega owners, who have their clock built-in), you can call that a further savings over most commercial hard drives.
Spreading all the parts out in front of me, I figured it would take very little time to finish the Frankendrive. A bit hasty in my optimism, I followed the somewhat thin directions in the Berkeley manual, taking the interface and mounting it on top of the controller and combining them into one board set. Even though it isn't recommended—I found out later that this is for reasons of RF crosstalk, an interference which could cause excessive read errors—I also mounted the board combo on the hard disk to make one compact unit. My problem came from not being able mount this lump of electronics inside the case properly. Placing it one way would interfere with the closing of the case cover; placing it upside-down would make mounting it with the existing screw holes nearly impossible. Time for a reassessment of my initial strategy.
As you might have noticed, I was winging it from the start, but with so much room in the case, I didn't figure it would be a problem (see The Lesson Learned). So I removed the board set from the drive and aimed for mounting them side-by-side. Everything fell together smoothly; the screw holes in the boards and drive matched the case, so I socked them down. When I attempted to plug all the required cables together, the data cable that ran from the boards to the drive came up a little short. Once again, I disassembled the whole thing and restarted.
Still reasonably clearheaded though, I followed that disappointment by switching the locations of the drive and board set, then placed the power supply in its proper location at the right rear where the switch cutaway is. Again, I tightened them all in place. And once again, The Lesson Learned came back to nudge me—but I hadn't picked up on it yet. On one hand, the power supply cables that provide juice to the controller and drive reached fine; dishearteningly though, the cable to the Berkeley board came close enough to touch its mate, but wouldn't s-t-r-e-t-c-h sufficiently to connect.
| TABLE 1 — COST BREAKDOWN | |
| BERKELEY PACKAGE (RLL) ..... | $300 |
| 30 MB HARD DISK DRIVE ..... | $265 |
| CASE ..... | $24 |
| POWER SUPPLY ..... | $40 |
| EXTRA POWER CABLE..... | $7 |
| TOTAL COST | $636 |
In wimpy frustration, I gave a call to Berkeley for suggestions. The fellow I reached, Vance Chin, told me the best thing I could do at that point was to hook everything up and be sure it worked before going through the process of anchoring the parts and risking further annoyance by having to remove them again should there be a problem (other than operator error). This is when The Lesson Learned finally sunk in and became reality; Don't screw down the parts until you are sure that their location is permanent.
After purchasing an extender power cable. I took Vance up on his idea, hooking all the cables in their proper sockets and insulating circuit boards from shorting on other metal parts. Then came the first crucial test: powering up the system, apart from the ST first...just in case. Flipping on the power switch didn't bring on a shower of sparks or flames, and rewarded me with the whirring of the drive coming up to speed. LEDs blinked and then dimmed as the Frankendrive signaled its readiness for action.
It's Alive...
This brought on the really crucial test: hooking it up to the ST and seeing if the transplant would be successful or rejected. I first took the DMA cable (the length of which I will discuss shortly) and plugged it into the hard drive port on the rear panel of the ST, then repowered the Frankendrive as before. After it went through its routine, I gingerly placed my finger on the ST's switch and rocked it on. Like the expectant father who is told his wife has just given birth, I was blessed with a bouncing baby bundle of bytes—though similarly undiapered and untrained, so to speak.
For this reason, the next procedure was to configure the drive for interaction with the computer system, and the Berkeley package comes with a floppy for taking care of all the processes you need to undertake before putting your hard drive to work. This software lets you set up your system for the specific drive you are using, so it's prepared with such facts as number of cylinders, heads, step pulse rate, and other pertinent figures. Using a text editor that pumps out ASCII text, it's easy to alter their configuration file to match your disk's parameters (using the previously-mentioned table in the manual for assistance).
Once that simple process was completed, it was on to the formatting and partitioning process. Just like a floppy, the hard disk needs to be formatted to break it into smaller blocks for the ST to easily digest. Given that your drive is quite sizable, you must also partition it into several smaller drives to allow quick access time to all your data. Due to GEM limitations, the ST can address a partition no larger than 16MB; I have mine divided into four drives: two of 10MB each, and two of 5MB each. This process also marks any bad sectors you may have on your disk, so the system doesn't try to store data to them. It's a lengthy procedure, but necessary for the sure use of the hard drive.
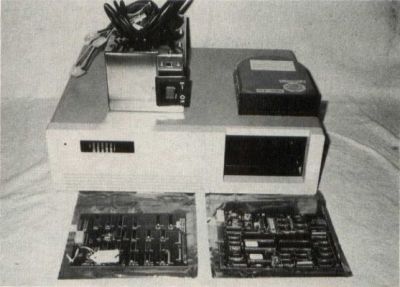
As you can see from Figure 2, my drive is together in the sense that I can move it without the worry of parts falling off, but I still need to make the Frankendrive more permanent. The main problem I face is with the routing of the DMA cable, currently snaking out the front disk drive opening. Berkeley provides a cable that is fairly short—they claim that this is to meet Atari specifications and assure quality data transfer over the DMA line—but for an installation of this nature, you'll wish there was a better way to handle it. If I can't get a longer cable (Supra is reportedly shipping longer cables with their drives), I'll drill a hole in the front of the case for the DMA cable, which will also give a certain amount of strain relief for the cable's connectors.
The Bottom Line
Again referring to Table 1, the final cost of my Frankendrive was about $635, as opposed to the cheapest commercial unit that I've seen advertised in ST-Log, which was listed at just over $750. I figure the money I saved was adequate payment for the aggravation I caused myself and the phone calls I made. Also, the pleasure of doing it myself is something to keep in mind, but pride and accomplishment can't be measured in the same sense as cold hard cash.
The best thing about building the Frankendrive is how much is left open for expansion, as there is plenty of empty space remaining. Chin suggests that a second ST floppy drive can be mounted in the open space, making an especially compact unit for transport. Similarly, someone who uses an IBM-compatible, 5 ¼-inch drive (such as with PC-Ditto) could put that in instead, or as an added bonus.
My plan is to later add a second hard drive unit, as the Adaptec 4070 controller can address two drives. This way I can double my storage for very little expense: the cost of another drive and associated cables, or about $290 to double my storage capacity to 60MB. This provides an even more substantial savings over the high-capacity commercial systems that are available; my 60MB Frankendrive would end up costing approximately $925, far less than commercial units.
Final Note
Shortly after ordering all the parts for the Frankendrive, I spoke to some other ST users on Delphi who had realized even more savings over mine. Clarence Chang (CTCHANG) and Wayne Dunham (WAYNEDUNHAM) purchased Tulin 30MB RLL drives directly from the company for their construction projects, which they managed to find for about $225. That brings up the importance of shopping around before you buy. I searched for some time to find what I found, and even then there were better ways to cut costs. Supra and ICD, two established providers to Atari users, also introduced their versions of the interface building block to give you some choice in creating your own Frankendrive.
Most importantly, be careful not to deal with companies that you or other users aren't too sure of. Mail order buying can be risky, so check into each firm that you plan to buy through, so you don't get burned.