PRODUCT REVIEWS
SOLO FLIGHT
Reviewed By Geoff Corry
MicroProse
10616 Beaver Dam Road
Hunt Valley,MD 21030
Reviewed By Geoff Corry
MicroProse
10616 Beaver Dam Road
Hunt Valley,MD 21030
Ring! Ring! You wake up in a daze, wondering where you are. Oh yes, in a motel unit outside Wichita, Kansas. Ring! Who could be calling at this ungodly hour? You grope for the phone and recognize the gravelly voice of your boss. He tells you to get out of the sack and get down to the airport. There's an important package that has to be delivered to Kansas City as soon as possible. There might even be a bonus in it if you can get it there quick enough. You hang up, find the phone book and call a cab. Later the cab drops you off at an old hanger at the corner of the field. You go inside and see that old monoplane that takes all your spare time and cash to keep airworthy.
That was a fictional buildup to the MicroProse program SOLO FLIGHT. Let's continue with how you would take it from there. After the program has booted, you see a title, and then use the OPTION key until MAIL PILOT, KANSAS is displayed. Now depending on your experience, you push SELECT for higher levels of play. If you are new at this, you should run a few sessions in the FLYING mode to get use to the controls and instruments. Now that you have SELECTed your level, push START and a map of Kansas is displayed showing 7 airports and 5 towns to help you get your bearings. There is a little white dot on the Wichita runway that is you. Push START again and now you can pick your destinations with OPTION. Let's keep with our story and say that you have a 250 lb. package for Kansas City. You can't get anywhere without gas, so push SELECT until you have enough fuel to handle emergencies, but not so much that would give you take-off difficulties. Press START again and your map is again displayed, so that you can prepare a flight plan. O.K., to get to Kansas City, use the main runway at Wichita, take off due north and turn East to a compass heading of 70 degrees. When you are due north of Greeley, turn back to a compass heading of 0 degrees and get into a landing configuration for Kansas City. You will also notice that you pass the runway of Emporia to the south-east, and this would be a good time to start your descent.
Push START again, and you can now see your aircraft at the south end of the Wichita main runway. Push 9 on the keyboard for full throttle and away you go: The plane will lift off when the airspeed reaches 90 knots. Hit `L' to retract your landing gear and move your joystick to the right until the aircraft assumes a gentle bank. Bring the stick back to neutral and watch the heading until it gets just short of 70, then move the stick to the left until you are straight and level again. Now check your altitude. When you get to 1500 feet, throttle back by pushing `5' on the keyboard. Push the stick forward until the rate of climb indicator reaches 0. Allow the the aircraft to slowly sink to 1000' when you should be just north of Greeley. Now left bank the aircraft until you assume a heading of 0 degrees. Using the joystick, line up with the main north-south runway at Kansas City. Throttle back to 4 and get the rate of climb indicator into a -3 reading. Check your I.L.S. indicator, when the runway detail starts to show, and using the joysick and adjusting the throttle, slow the aircraft down to the touch-down speed of about 60 knots. Once you have come to a complete stop on the runway, the map is displayed, and your ground track from Wichita to Kansas City is shown in a dotted line. When you push START again, your score for flying and landing at a reasonable speed is shown and the prompt time of flight is added as bonus points.
Now lets describe some of the features of this interesting program. You have three areas that you can fly in; Kansas, Washington-Oregon, and Colorado. There are the two scenarios, FLYING to become experienced and MAIL PILOT, where points can be earned for completing a flight properly in the best time.
There are three weather conditions that can be picked in the FLYING mode, clear, windy, or low cloud. You can also select landing only in this mode. In the MAIL PILOT mode, you can select various levels of experience, STUDENT, PRIVATE, SENIOR, and COMMAND, each one giving more random weather conditions and aircraft failure problems.
The controls that operate the aircraft are the number keys from 0 to 9 for zero to maximum engine power. The `L' key toggles the landing gear up or down. Don't push `L' when you are on the runway- most embarrassing. Key `F' sequences the flaps through 0, 20, or 40 degrees. You can look to left, right, or rear by pressing the arrow keys. The joystick controls the aircraft's attitude during flight and direction of taxi movement on the ground. These limited controls simplify the flying procedures.
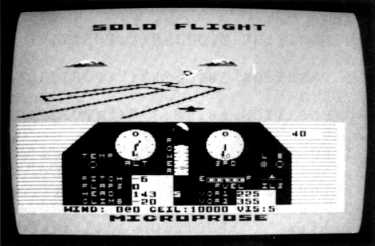
The screen display while on the ground and in the air is a view of the aircraft as seen from about 1000' behind it. When you bank, the plane tilts, but not the horizon. However the background does scroll, simulating forward movement and change of direction. You normally will see the ground and if you fly over a change in terrain height, this will be noticeable, especially when flying through mountain passes. In front of you is the instrument display. This panel consists of two large circular dials, for altitude above sea level and airspeed. A smaller circular dial at center top shows the artificial horizon, very useful when flying through cloud and you are trying to keep on a straight heading. Under this dial is a vertical throttle indicator. At the left is a group of digital displays for pitch (how much bank is on), flap position indicator, heading readout from 0 to 359 degrees clockwise, and a rate of climb indicator. Just to the right is a small compass displaying the 8 points N, NE, E, etc. as you turn. Under the air speed indicator are the fuel gauge and landing gear and brake lights. Below these are the I.L.S. display for aid in landing, and two V.O.R. readouts that give your relative bearing to two fixed transmitters in each flying area.
If this all looks terribly complicated, there is a 16 page booklet that explains all in a very understandable way. In this booklet are detailed charts of the three flying areas showing the appearance of each airfield and other landmarks. Situated on these charts are the radial bearings for each of the V.O.R. stations in 30 degree increments. The booklet also goes into the valid procedures used in real flight situations that can be applied to this program. You can tell that the author, Sid Meier. is an experienced pilot by the nice touches he used in the program and documentation.
Although this program departs from a true fight simulation and would not be too useful for pilot training, the basic structure of SOLO FLIGHT is credable and makes for an absorbing experience to operate. With its many options and the unexpected situations that come up, this is not a program one would tire of easily. Thanks MicroProse, for offering Atari users such a novel and entertaining program.
DRELBS
Reviewed By Tim Ruscheinsky
Synapse Software
Being the last uncaptured Drelb, you must defeat the Trollaboars on the atomic flip grid in order to advance thru the Drelbish windows to the dark corridor. Once having entered the dark Corridor it is your duty to save imprisoned Drelbs who are guarded by the evil Gorgolytes. Beware, because you'll always be hunted, persuede and even eliminated through out your quest, to save the Drelbish Kingdom, by freeing all. Your quest consists of eight journeys through the atomic flip grid and the dark corridor.
I put my joystick into my Atari, hit the START button and away 1 hopped. Okay, I arranged the walls into boxes and started completing th grid. All was going well, until that darn green Gorgolyte appeared on the grid with a damsel yelling for help. Of course I ran to save her, but I was just to too slow. Oh well, maybe next time.There was now only four Drelbish lives left to finish the grid. Just one more to go! Zap! That screwy screwhead tank shot me right between the eyes. No problem, I still had three lives left and only one box to go.
Oh no! It was that Trollaboar after me again. Rats! The green Gorgolyte had disassembled one of my completed boxes. Finally, I got all the boxes on the gird, and the windows with Gorgolytes appeared. There was a Drelbish window close by, I ran, jumped, and missed. Well, two lives were left. No, I don't believe it, I was too slow again. The window was gone and my score was rapidly decreasing. I started to quickly box in the grid, after a few completed boxes my score increased once again. Completing the grid, the window and Gorgolytes returned. Then another window, I jumped, this time I made it into the dark corridor. Quickly hopping and dodging bullets, I saved as many Drelbs as I could. Boy, was that Gorgolyte a good shot, yes, once more I died.
I now had only one life left and knew this had to be it. I cruised through the boxes, blasted through the window and swept through the dark corridor saving all the Drelbs and I advanced to the next level. To my suprise instead of just one screwhead tank chasing me around, there were now two. As you probably guessed, I died in a matter of seconds. But before I played again I took a few lessons from the Raving Reviewer.
One of the first things I learned from this and any other game, is to read the instruction booklet which is provided. Secondly, I found out things that could make life easier for a little Drelb, such as trapping a Trollaboar in a completed box, which immobilizes him for a short time. Also little hearts appearing on the grid freeze the Trollagozrs for five seconds when run over by a Drelb. Another question I was asking myself, "Why save the damsel in distress?" The answer is that you get a big kiss and bonus points based on the number of boxes you have closed. The Gorgolytes are no threat to you unless you run into their boxes.
Finally, the diamonds appearing on the gird create a short cut to the dark corridor by bringing in a window earlier, before all the boxes have been completed. Remember, get through the all the windows as fast as possible, or time will run down and so will your score.
In conclusion, I highly suggest that you get your copy of Drelbs, especially if you enjoy well made maze games. The graphics are nicely detailed and colorful, and the sound is very different. The game is challenging with good documentation, and you can play it for a long time without losing interest.
Ratings
Drelbs
Synapse Software
Playability:9
Challenge:9.1
Graphics:9.3
Sound:8.2
Documentation: 8.2
Overall Rating:8.8
Drelbs
Synapse Software
Playability:9
Challenge:9.1
Graphics:9.3
Sound:8.2
Documentation: 8.2
Overall Rating:8.8
The Cartridge Emulator (Version 1.0)
Reviewed By Geoff Corry
Dynasty Engineering
Reviewed By Geoff Corry
Dynasty Engineering
How would you like to have all your favorite cartridge programs available on a disk, with an autorunning menu so that you can easily select the program of your choice? Each side of a disk would have up to five 16K programs, or up to ten 8K programs, and if you could find that many, up to twenty 4K programs. Star Raiders, Space Invaders, Pacman, and other classic games are 8K programs. Most of the newer cartridges, such as Joust, Oil's Well, etc., are 16K programs.
Included with the Cartridge Emulator package are:
1 Cartridge Emulator hardware
I Utilities Package disk
I Utilities Package disk
Option available:
1 Extender Board
**For those that don't have a disk drive, a cassette version is available which creates boot cassettes of your favorite cartridge programs.**
System requirements
1 Atari 400,600XL,800 or 800XL computer
with at least 48K of memory.
1 Q-tip
1 Atari 810 or 1050 or compatible disk drive.
or with the cassette version:
1 Atari 410 or 1210 cassette recorder.
1 Q-tip
1 Atari 810 or 1050 or compatible disk drive.
or with the cassette version:
1 Atari 410 or 1210 cassette recorder.
Let's go through the simple procedures required before using the Cartridge Emulator utilities package for a disk drive system. First, you format a disk and write DOS files to it (options I and H of your DOS 2.0S disk). Next delete DUP.SYS using option D. Now press `O' to copy a file. Place the Utilities disk in the drive, and type AUTORUN.SYS to get the special menu progam. Switch back to your disk to write AUTORUN.SYS.
When backing up any language or utility (such as Atariwriter), do not follow the above procedure. Instead, just format a disk and write DOS to the disk. After backing up a cartridge to disk, simply boot up the disk and wait for the DOS menu to appear. Then, using the `L' option, binary load the program saved on disk. The reason for this is the language program or utility makes use of DOS to handle all disk interactions.
Here's where the Q-TIP comes in. Turn off the computer and open the cartridge door. Use a nice QTIP to hold the interlock switch down while the door is open.
Put the utilities disk in the drive and turn on your computer. If the Q-TIP is doing its' job properly, the main menu will be displayed. You have four options to choose from, `A' to `D'. Option `A' is the Cartridge to Disk Emulator program that will provide the most use.
If you press `A' and follow the prompts, you will be asked to insert your prepared disk and type in the program name. Next, you VERY carefully plug in the desired cartridge. (Dynasty offers an optional cartridge extender card with power cutoff switch to avoid power glitches when inserting the cartridge). Press START, and the program size will be displayed and the cartridge contents will be written to disk. That's it! You can stay in this option mode to download any other cartridge programs. By pressing SE LECT, you can see the directory and find out how much free disk space is left.
If you have some disks with the earlier boot download version (0.0) of this utility (one program per disk), then use option `B' to transfer these programs to this multi-file disk format. No Q-TIP is required here, just your old boot load disk and a prepared disk with sufficient space to hold your program. Again, you follow the prompts to transfer a program easily, and in the bargain, free up that boot load disk for another use.
Option `C' is directed to the developer of a cartridge based program. This option will allow the programmer to write the complete code for cartridge operation and then test run the program before committing it to firmware (ROM or EPROM). In addition to the disc that contains the new program, the Emulator card must be in the normal cartridge slot before running.
Option `D' will convert most direct cartridge dump files to the Cartridge Emulator format. There are many commercial and public domain programs that download cartridge to binary load disk files. This option gives you the opportunity to convert them to this new Cartridge Emulator format. This is another easy conversion process.
After you have completed any of the above procedures, you can back-up the disk using the normal `J' option from DOS. Note, all files created by the Cartridge Emulator utility are DOS 2.0 binary files and can be moved about freely using good old DOS.
Remember, you must use the Cartridge Emulator card plugged into the cartridge slot (left slot on the 800) when you run any programs with this disk format.
I have found this product very easy to use, with a great deal of human engineering designed in the utility, making it hard to go wrong. There are obvious benefits to consolidating cartridge source programs.
Another great feature is that when you want to run the programs, you don't need the cartridge door open once the Emulator is in place, and you don't need to flip any switches. The Emulator is fully automatic ... another great human engineering feature.
And for the price of a game, the Cartridge Emulator is certainly a very affordable product.
LIGHT
PEN
Learning to program a computer is, at best, time consuming. Many impatient students have reverted to purchasing a large variety of programs intended to simplify programming. A good example is Broderbund's Arcade Machine. It does wonderful things, but oh, that ever-present manual! Looks like reading is a pre-requisite, unless you just want to create pictures. If that's the case, have I found the right toy for you!
A package recently arrived on my doorstep. Eager to get on with the business of trying it out for the first time, I quickly fired up the Atari and the Tech-Sketch Light Pen.
My two and a half year old son relieved me of this new `toy' the moment that I drew my first line. It's true that Jonathan reviews many new products with me, but this time the little guy went too far. He played with this new gadget for nearly two hours, and reluctantly handed it over to me when it was time for him to go to bed.
What can this light pen do to create this kind of response? First of all, it isn't really a `toy'. It could be better described as an educational tool that can teach a child shapes and form when used in the `Figure' mode. Touch the pen to the screen and locate the circles' epicenter, then touch the pen anywhere else to designate its' radius, and the program will draw the circle. Want to place a triangle inside the circle? Touch `Triangle' at the bottom of the screen, mark out it's radius, and the program will draw the circle. Want to place a triangle inside the circle? Touch 'Triangle' at the bottom of the screen, mark out its' three points, and voila; one only, made to measure triangle. It does rectangles too, which were great when I finally got to doodle. This brings us to yet another use for this pen.
It is the perfect Executive's toy. No more waste paper ... no more trying to find a pen or pencil ... and no need to be on the telephone to justify your doodles to all and sundry. You can save your pictures to disk, so that, should you ever need psychiatric help, your permanent record could be followed by the good doctor to pinpoint the exact moment you went off the deep end.
Last, but not least, this light pen will bring out the artist in the least artistic of us. In the `Sketch' mode, creating scenery(unfortunately in only three colors: orange, blue and green) I found this pen quite addictive. So far I've not saved any of my pictures to disk for fear they may get into the wrong hands, but I have created a desert scene, a city skyline, and some strangely shaped orange flowers that remotely resemble Pac-Man. It's easier to use than pencil and paper. Just select `Fill', and point the pen in the direction of that which you wish filled, and it's done in any of the three colors.
For parents of children with an urge to draw, it is invaluable. Just imagine the hours of fun drawing pictures, without one wall in the house requiring cleaning.
I loved the light pen but was disappointed with the fact that only a small number of colors were available. That being my only disappointment, I can recommend this software/hardware package to all Atari owners, and would-be artists.(The pen is also available for most popular computers.) The package contains the program disk, a clear, (short) precise instruction manual, and the light pen which plugs into the joystick port.
Oh yes, there is something I forgot to mention, if you make an error in your drawing, you can selectively erase the offending portion of your picture. My son showed me how when he said, 'Look daddy, the colors are going back into the pen!' The light pen can be bought directly from: Tech-Sketch Inc., 26 Just Road, Fairfield,NJ 07006.