Display
Lists
by Bob Cockroft
by Bob Cockroft
The display list is a program in your Atari computer that tells the Antic chip what and how to display information of the screen. One who has the ability to modify display lists has a much better understanding of graphics than one who does not. New graphic and text modes can be created or combined. Think of how your games could be improved. New and more interesting display lists could be used to enhance the graphics in a program.
Before I talk about display lists, you need to know how images are displayed on the screen. The television shoots an electron beam at the screen starting in the top left corner. This beam is moved horizontally until it reaches the right hand side of the screen where it moves down one vertical line. This process is repeated many times. These horizontal lines created by the beam are called scan lines. The Atari display has 192 of these scan lines located in the middle of the screen. By continually creating lower and lower horizontal lines the beam will eventually reach the bottom right corner where it is reset to the top left corner to enable a new screen to be drawn.
Before we have a look at the display list we need to find where it is. This can be easily accomplished by using the display list pointers.
ADDRESS=PEEK(560)+256*PEEK(561)
The variable 'ADDRESS' has the base (lowest) memory location of the display list. Now what we need is to have a peek at the entire display list(no pun intended). To do this you need to copy in the following program.
10 REM ***** PRINT OUT THE DISPLAY LIST ****
15 DIM DAT(176)
20 ? "THE DISPLY LIST OF WHICH GRAPHICS MODE DO YOU WISH TO SEE?"
22 INPUT G
25 GRAPHICS G
30 DL=PEEK(560)+256*PEEK(561)
35 REM STORE DISPLY LIST IN AN ARRAY
40 FOR X=1 TO 176
52 DAT(X)=PEEK(X+DL-1)
50 NEXT X
55 REM PRINT ARRAY ON THE SCREEN
60 GRAPHICS 0
70 FOR X=1 TO 176
75 PRINT DAT(X);:? ",";
80 NEXT X
If you had correctly copied and ran the preceding program, there would be a list of numbers on the screen. This group of numbers is the display list. It is important to note that the long list of zeros at the end of some of the display lists, play no role. If you ran the program a number of times using different graphic modes, you would have probably noticed that the display list changes everytime the graphic mode changes. Although each graphic mode has its own unique display list, there is a common format you can follow. (It may be helpful to refer to table 1 (an example display list) during the following discussion.
At the beginning of the list you will see 3 bytes which have the value '112'. These bytes create 24 blank scan lines at the top of the screen. The purpose of these is to move the display list to a readable location on the screen.
The next byte down the list, the LMS(the number in this location is in the area of 70). This is a 3 byte instruction which tells the Antic chip where to display the screen data.
The first byte tells the computer this is the LMS instruction and what graphic mode number to expect. The number generated in this byte is equal to the instruction register mode line number plus 64.
(the (IR) mode line number for graphics 2 is 7)
7+64=71
The (IR) mode line number is a number that the Antic uses to designate a particular graphics mode. This number does not correspond with the basic's graphic mode number. For example, the (IR) mode line number of graphic mode 8 is 15. Refer to table 2 for the (IR) mode line number for each graphic mode.
The second and third bytes are in the LSB/MSB form and give the address where the Antic will be jumped to in order to repeat or continue the list. By changing the values in these two locations, the screen can be scrolled in all directions. However, scrolling will not be discussed in this article because it has been already covered in a separate article in this same magazine(refer to magazine index).
The display list that is given to you in table 1, contains a line list of 7's. These 7's are the (IR) mode lines. Each byte you see containing a (IR) mode number represents one horizontal line of that graphic mode the number represents. The first (IR) mode number stands for the highest line of graphics on the screen. The following (IR) numbers represent horizontal lines of graphics which are progressively lower. As you remember each graphic mode has its own particular (IR) mode number. By replacing any or all the (IR) mode numbers with (IR) mode numbers of a different graphic mode, the horizontal line which is controlled by the altered number is changed to the new graphic mode. In other words by altering the (IR) mode numbers you can change any horizontal line on the screen to any graphic mode you like.
Immediatley after the row of (IR) mode numbers is another LMS instruction. The value in this byte varies with graphic modes the same way the previous LMS instruction did. In the example given to you in table 2, '64' is added to '2', the (IR) mode number for graphics 0.
Therefore 2+64=66
Like the previous LMS instruction the two following bytes represent the address where the Antic chip will jump to, to draw the screen.
The following group of 2's are the (IR) mode numbers for graphic made 0. These numbers create the block of text graphics at the bottom of the screen.
The last instruction begins immediately after the 2's (note: in table 1 example this byte appears as a 65). This is another jump instruction. The first byte prepares the Antic for the jump and the last two locations give the destination. After the Antic goes through the display list, thus drawing the graphic mode, it is then reset by this instruction. In other words, these bytes force the Antic to draw the graphic mode repeatedly. Therefore, the second to last byte should equal PEEK(560) and the last byte PEEK(561), the starting address of the display list.
I have now gone through the format of the display list. It is time to use this knowledge in a practical application.
Do you remember the scan lines? (Those lines created by the electron beam). The important thing is that there are 192 of them no matter which graphic mode you are in. With that in mind, it is time to understand how to use (IR) mode lines. Everytime you select a graphic mode, knowing it or not, you select a (IR) mode line. The higher the resolution of the graphic mode the larger the number of these (IR) mode lines. For example, graphic mode 8 has many times more (IR) mode lines than graphic mode 2] This is why graphics 8 is able to have higher resolution than graphics 2. Because graphics 2 and other low resolution graphics modes only use a few (IR) mode lines, each of these lines take up many scan lines. The diagram below displays the variations in size between different (IR) mode lines and scan lines:
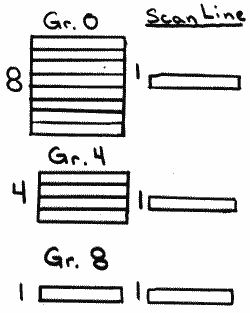
Refer to table 2 for the numerical differences between (IR) mode lines and scan lines. It is important to remeber that the screen only has 192 scan lines and that the total number of scan lines used, cannot exceed this number. It would not take many mode line of a low resolution graphic mode to use all the available scan lines. For example, one (IR) mode line of graphic 2 would use 16 scan lines. Therefore the screen holds only 12 (IR) mode lines of graphic 2.
(Total scan lines=1922 scan lines used for one (IR) line in graphics'2' =16)
Therefore 192/16=12 (IR) mode lines
Similiar calculations can be done for all the graphic modes. The important thing is that one must note the number of scan lines used for each (IR) mode line.
Enough of the theory; now it time for some programs you can use. Lets say, for example that you wished to create a screen which was half in graphics 3 and half in graphics 4. You would try to make the display list look like this.
The following is a graphic mode which is split between mode 3 and mode 4:
112,112,112,72,112,
158,8,8,8,8,8,8,8,8,8,
9,9,9,9,9,9,9,9,9,9,9,9,
9,9,9,9,9,9,9,9,
66,96,159,2,2,2,65,78,158
It is important to notice that I have initially set the graphic mode to the first byte on the screen. With this modified graphic mode the top of the screen will appear in graphics 3 and the bottom is graphics 4 (note that the rows of 8's create graphic mode 3 and the 9's create graphic mode 4.
In the final program I will attempt to combine everything I have said. It will also provide you with a workable example in which to develop your own programs from. There is only one small item in this program which I have not mentioned to you yet. As you probably know graphic modes fall into two major categories: text and no-text modes.
The text modes are graphics mode 0, 1,.and 2, The non-text modes are all the rest. The importance of this is that the computer must be told how you wish your information to be displayed on the screen; in text or graphics. For example, if you were to attempt to input graphics 8 (IR) modes lines into a graphics 0 screen without letting the Antic know to change to a non-text mode during the graphics 8 section, you would not be able to draw in this graphics 8 area. To let the computer know how to display information on the screen, poke in address 87 and the graphic mode you will be using. For example, if you were to use graphics 5 then POKE 87,5. This technique is only necessary when you are changing from a text mode to a no-text mode or the reverse.
1 REM ** MODIFIED DISPLAY LIST PROGRAM
2 GRAPHICS 8:COLOR 1:OLOT 100,100;DRAWTO 120,100
3 DRAWTO 120,120: DRAWTO 100,120:DRAWTO 100,100
4 DIM B(200)
5 C1=0
6 B=PEEK(88)+256*PEEK(89)
10 GRAPHICS 2+16
12 COLOR 1
20 DL=PEEK(560)+256*PEEK(561)
25 REM GRAPHICS MODE 2
30 C=DL+6
40 POKE C,7
45 C=C+1 .
50 IF C1<4 THEN 40
55 REM GRAPHCIS MODE 8
60 C1=0
65 POKE C,15
70 C=C+1
72 C1=C1+1
75 IF C1<80 THEN 65
80 REM RESET LMS JUMP INSTRUCTION
100 POKE C,65
105 C=C+1
110 POKE C,PEEK(560)
115 C=C+1
117 POKE C,PEEK(561)
125 C2=0
128 REM STORE DL VALUES IN AN ARRAY
130 FOR L=DL TO C
135 C2=C2+1
140 B(C2)=PEEK(L0
150 NEXT L
155 REM PRINT RESULT OUT ON THE SCREEN
160 GRAPHICS 0
170 FOR WT=1 TO C2
175 PRINT B(WT);
180 PRINT ",";
190 NEXT WT
Table 1
The Display List for graphics mode 2
112 This instruction will place 8 blank lines on the screen
112 8 blank lines
112 8 blank lines
71 First byte of the LMS (7+64)
112 This is the address of the first line of screen data
158 Therefore:112+256*158=address
7 The following 7's are the (IR) mode lines
7 Each (IR) mode line in this example uses 16 scan lines (see table 2)
7 Therefor there is 160 scan lines use
7
7
7
7
7
7
66 LMS instruction with graphic(0) (IR) number added
96 Starting address of the text window at the bottom of the screen
159 96+256*159=address
2 Text window
2
2
65 This 3 byte instruction returns the Antic to the top of the list
88 Address for the beginning of the Display List
158 88+256*158=address
Table 2
Graphic mode statistics
Graphic(x) Type No. of scan lines per mode line
0 text 8
1 text 8
2 text 16
3 non-text 8
4 non-text 4
5 non-text 4
6 non-text 2
7 non-text 2
8 non-text 1
Graphic(x) (IR) number No. of mode lines
0 2 24
1 6 24
2 7 12
3 8 24
4 9 48
5 10 48
6 11 96
7 13 96
8 15 192