Medium-Resolution Autorun
For Atari ST
Brian McCorkle
This compact program allows you to run Atari ST programs from the AUTO folder in medium resolution.
The AUTO folder on the Atari ST is a handy device. When you turn on the ST, the computer looks on the disk in drive A: for a folder (sub-directory) named AUTO. If AUTO exists, the ST automatically runs every program it finds in that folder. One of the most common uses of the AUTO folder is to run programs that allow you to set the time and date or that set up a RAMdisk in the computer's memory.
The AUTO folder has some significant limitations, however. First, because the ST runs programs from AUTO before it installs the GEM graphics interface, you cannot autorun any GEM program. (A GEM program is one such as First Word, which uses the ST's mouse, windows, menus, and icons. All GEM programs end with the fileŁname extension .PRG, but it also is possible for a non-GEM program to have that extension. Files that end with .TOS or .TTP are never GEM programs.)
Secondly, if you have a color monitor, the ST always autoruns programs in the low-resolution (320 × 200) screen. This screen has only 40 columns for text, which is inconvenient for applications such as word processing.
"Medium-Resolution Autorun" allows you to autorun programs in medium resolution, with a full 80-column screen. Boot ST BASIC, type in the program from the listing, save a copy, and then run it. The BASIC program creates an executable program file named MEDRES.PRG. (Because the BASIC program creates a file named MEDRES.PRG, be sure that you do not use that name for the BASIC program itself.) An internal checksum is used to detect typing errors. If the program signals an error, check all of your typing carefully, especially the DATA lines.
Inside the AUTO Folder
Once you have created MEDRES.PRG, select the disk on which it is to be used. If the disk does not already have an AUTO folder, create one now with the New Folder option from the desktop. (Click twice on the disk icon to open its directory window, then move the pointer to the File menu and select New Folder. When the dialog box appears, type AUTO and press Return.)
It is very important that MEDRES.PRG be the first program placed in the AUTO folder. This is necessary because the order in which files are run from AUTO is determined by their times of creation. The program with the earliest time and date runs first; the next earliest program runs second, and so on.
Thus, if you have just created the AUTO folder, be sure to copy MEDRES.PRG to that folder before putting any other programs there. If AUTO already exists, you should remove everything else from the folder, copy MEDRES.PRG to the folder, and then return the other programs to AUTO. The act of copying a file to a new place gives it a new time and date.
Although the ST's internal clock keeps time with an accuracy of two seconds, the time-stamping of files is accurate only to within one minute. To be absolutely certain that the AUTO folder will work correctly, you should allow at least two minutes to elapse between the time that you place each file in AUTO. This ensures that the ST will have no difficulty deciding the correct order in which to run the programs.
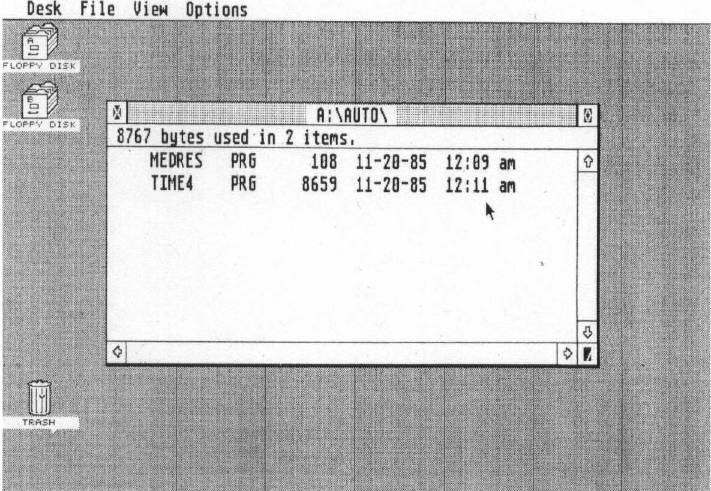
The figure illustrates an example AUTO folder. In this case we have copied MEDRES.PRG into the folder first, followed by SETTIME. PRG, a short program that lets you set the time and date. Notice the difference in creation times between the two files. This AUTO folder will work correctly because MEDRES.PRG has an earlier time and date than SETTIME.PRG.
Once you have set up the disk, press the reset button to try it out. The disk drive spins as MEDRES.PRG loads and executes, then the other program or programs in AUTO will load and run. If you do not get the expected results, reread the instructions carefully and make sure you have set up the AUTO folder as indicated.
Simple Yet Effective
Written in assembly language to save space, MEDRES.PRG is extremely simple, consisting of only five calls to system routines. If you are a beginning assembly language programmer, or think you might be interested in learning assembly language, this is a good example to study. A complete source code listing appears at the end of this article. At the beginning of the source code are three equate (equ) statements which define constant values that appear later in the program. By giving these numbers meaningful names, we make the program easier to understand.
The program begins by checking to see whether you are using a monochrome monitor. This is a convenience which allows you to use the same disks on either color or monochrome systems. When the ST is using a monochrome monitor, it will reboot the system whenever you attempt to change to a different screen resolution. Thus, if it detects that you have a monochrome system, the program terminates without changing anything.
All of the GEMDOS and XBIOS calls in this program follow the same general pattern. First, you must push onto the microprocessor's stack whatever information the system routine needs to work. (The expression sp stands for the stack pointer, which is actually processor register A 7.) Second, you push the number, or opcode, of the routine you wish to execute. Third, you execute a trap instruction to invoke the system routine. Different categories of routines use different trap numbers. Finally, after returning from the routine, you must clean up the stack by adding as many bytes as you previously pushed onto it.
When a system routine returns information to you, that information usually appears in the microprocessor registers D0 and A0. Thus, after executing the first system routine, we look at the number contained in register D0. The
Source Code Listing
*
* MEDRES.PRG for Atari ST.
* Boot in medium resolution from the AUTO folder.
* Copyright 1987 COMPUTE! Publications, Inc.
All rights reserved
*
GEMDOS equ 1
BIOS equ 13
XBIOS equ 14
.text
* See whether we're running on a monochrome system
move.w #4,-(sp) * Getrez, XBIOS function 4
trap #XBIOS * Perform XBIOS trap
addq.1 #2, sp * Clean up stack
cmpi.w #2, dO * 2 = high resolution
beq skip * Don't run on a mono system
* Shift to medium resolution
move.w #1, -(sp) * 1 = medium resolution
move.1 #-1, -(sp) * Retain same physical screen base
move.1 #-1,-(sp) * Retain same logical screen base
move.w #5,-(sp) * Setscreen, XBIOS function 5
trap #XBIOS * Perform XBIOS trap
add.l #12,sp * Clean up stack
* Turn on flashing cursor
move.w #40, -(sp) * Flashing cursor
move.w #1, -(sp) * Enable cursor
move.w #21, -(sp) * Cursconf, XBIOS function 21
trap #XBIOS Perform XBIOS trap
addq.1 #6, sp * Clean up stack
* Set text color to black (otherwise, it ends up yellow)
move.w #0, -(sp) * Black color
move.w #3, -(sp) * Color #3
move.w #7, -(sp) * Setcolor, XBIOS function 7
trap #XBIOS * XBIOS trap
addq.1 #6, sp * Clean up stack
skip:
* Terminate program and release our memory to the system
clr.1 -(sp) * Term, GEMDOS function 0
trap #GEMDOS * Perform GEMDOS trap
.end
cmpi.w instruction checks whether the value in DO is equal to 2, which stands for a monochrome (high-resolution) monitor.
The second system call shifts the computer into medium resolution. The first value pushed onto the stack is 1, which stands for medium resolution. This routine also allows you to change the physical base or logical base of the display screen. Since we don't want to change the screen, we push the value —1 for each of these parameters.
The third system call controls the cursor. The first value pushed on the stack makes the cursor flash and the second makes it visible.
The fourth system call sets the text color to black. If this were not done, the computer would use the low-resolution palette and color assignments, which would create yellow text on white background.
The final system call terminates the program. While there are other ways to terminate ST programs, this is the simplest and probably the most common. All the memory which our program used is released to the system, which takes back control of the computer.
Medium Resolution Autorun For ST
100 rem "MEDRES.PRG" filemaker
110 rem Copyright 1987 COMPUTE Publications, Inc.
120 rem All rights reserved.
130 data 60, 1A, 00, 00, 00, 4E
140 data 00, 00, 00, 00, 00, 00
150 data 00, 00, 00, 00, 00, 00
160 data 00, 00, 00, 00, 00, 00
170 data 00, 00, 00, 00, 3F, 3C
180 data 00, 04, 4E, 4E, 54, 8F
190 data 0C, 40, 00, 02.67, 3C
200 data 3F, 3C, 00, 01, 2F, 3C
210 data FF, FF, FF, FF, 2F, 3C
220 data FF, FF, FF, FF, 3F, 3C
230 data 00, 05, 4E, 4E, DF, FC
240 data 00, 00, 00, 0C, 3F, 3C
250 data 00, 28, 3F, 3C, 00, 01
260 data 3F, 3C, 00, 15, 4E, 4E
270 data 5C, 8F, 3F, 3C, 00, 00
280 data 3F, 3C, 00, 03, 3F, 3C
290 data 00, 07, 4E, 4E, 5C, 8F
300 data 42, A7, 4E, 41, 00, 00
310 close:open "R", 1, "\MEDRES.PRG", 6
320 field #1, 6 as X $
330 for j = 1 to 18
340 y$ = " " : for k = 1 to 6
350 read z$ : byt = val ("&H" + z$) : y$ = y$ + chr $ (byt)
360 c = c + 1 : chk = chk + c + byt : next
370 1set x$ = y$ : r = r + 1 : put 1, r : next
380 close : if chk = 11954 then end
390 print "Typing error in DAT A" : kill "\MEDRES.PRG"