Sprite Designer
André Corbin
This full-featured sprite editor from a Canadian reader lets you design Commodore 64 sprite shapes quickly and conveniently. The program works with either disk or tape.
Nearly every Commodore 64 programmer uses sprites at one time or another. They're the movable graphics shapes that add so much to arcade games and other programs. If you have plenty of time, you can draw the sprites on graph paper, calculate the numbers that make up each sprite, type those numbers into a program, and hope that you didn't make any mistakes along the way. But "Sprite Designer" offers a much faster and easier alternative, allowing you to design sprites directly on the screen, with convenient keyboard controls. You can save a group of sprite shapes to disk or tape and reload them for future use, or you can create a series of BASIC DATA statements containing the sprite data. The program supports both single-color and multicolor sprites and it allows you to work on a group of eight sprites at a time.
Typing It In
Sprite Designer is written in ma-chine language, so you must type it in with the "MLX" machine language entry program published elsewhere in this issue. Read the MLX instructions carefully before you begin. When you run MLX, you'll be asked for a starting address and an ending address for the data you'll be entering. Here are the values to use for Sprite Designer:
Starting address:	84D0
Ending address:	9E47
After you've saved a copy of the program, load it with LOAD "PROGRAM",8,1 for disk or LOAD "PROGRAM",1,1 for tape (replace PROGRAM with the name you used when saving the program). To start the program, type SYS 34000 and press RETURN.
Sprite Designer uses the memory in locations 8192–16383 to store sprite shape data. This work area can hold 16 groups of 8 sprites, allowing you to have a total of 128 sprite shapes in memory at one time.
Main Menu
When you start Sprite Designer, it displays a main menu containing the following choices:
- INITIALIZE
- EDIT
- ANIMATE
- SAVE
- LOAD
- BASIC DATA
- MONOCHROME
- MULTICOLORED
- QUIT
To choose a menu option, simply press the number key next to that option. For instance, the Edit option lets you design a sprite. To choose that option, you press the 2 key. Let's look at the menu options in order.
1. Initialize
Sprite Designer always begins by asking you if you want to initialize, or clear out, the entire sprite work-space. Since this action erases all sprite data in memory, the program asks you to confirm before it continues. If you press Y to answer yes, every dot in all of the sprite shapes is turned on. You can choose this option at any time from the main menu.
2. Edit
Option 2 (Edit) moves you to the sprite-editing screen, which is divided into three areas. In the lower right corner are two numbers that show the sprite series you are working on, as well as the individual sprite you are designing. Each series contains eight sprites, and the series are numbered 0–15, corresponding to their respective positions in memory. Within a series, each of the eight sprites is given a number 0–7.
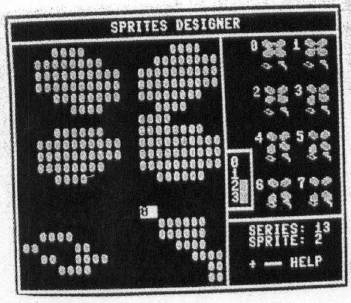
In the upper right portion of the screen you will see the shapes of all eight sprites in the current series. As you design a sprite, the changes immediately appear in this area.
The left portion of the screen is the editing area, where you actually design the sprite shape. This area is 24 × 21 spaces in size, with each screen space corresponding to a dot in the sprite shape.
Editing Functions
Once you have reached the editing screen, you need to remember only one command: The plus key (+) displays an entire screen of instructions for editing. To return from the help screen to the editing screen, press any key. The asterisk (*) returns you from the editing screen to the main menu.
When you enter the editing screen, the editing area contains the shape of sprite 0 within the current series. The function keys f3–f6 allow you to select any series and any individual sprite within a series. Press f3 to go to the next series, or f4 (SHIFT-f3) to go back to the previous series. The f5 key advances to the next sprite in the series, while f6 moves to the previous sprite. If you have designed a series of shapes for animation, you can hold down f3 or f4 to move through the entire series quickly.
A reverse-video cursor indicates your position in the editing area. To move the cursor around, press the cursor keys just as you would normally. The size of the cursor depends on whether you are working on a single color or multi-color sprite. For a single-color sprite, the cursor is a square one space in size; for a multicolor sprite, it is a rectangle two spaces in size, containing a number in the range 0–3.
You can turn on every dot in the current sprite shape by pressing CLR. For a single-color sprite, the space bar lets you turn individual dots on and off inside the editing area. You can erase a dot by pressing the space bar and turn a dot on by pressing SHIFT-SPACE (hold down SHIFT and press the space bar).
For a multicolor sprite, a dot can have any of four different colors, including the background color (see "Multicolor," below). Use the numbers 0–3 or the letter keys Z, X, C, and V to color a dot with the desired color.
You also can change the position of the sprite shape within the editing frame, shifting everything one dot to the right, left, up, or down. This is done by holding down the Commodore key and pressing W, Q, R, or E, respectively.
It is possible to flip a sprite shape horizontally or vertically, by pressing Commodore-I or Commodore-K, respectively.
The f1 key allows you to copy a shape from one sprite to any other shape in memory. First, use function keys f3–f6 to put the shape you want to copy into the editing area. Press f1 to copy the shape; then use f3–f6 to select the shape you want to copy to. Press fl a second time, and the shape is copied instantly.
The f2 key inverts every dot in the current sprite shape. Use f7 and f8 to change the sprite's color.
3. Animate
Option 3 (Animate) lets you cycle through all the sprite shapes in ascending order, beginning with series 0, sprite 0. When you choose this option, Sprite Designer prompts you to enter a delay interval which controls the speed of the animation. The smaller the delay interval, the faster the animation. Press SHIFT-SPACE to stop the animation and return to the main menu. You can also use keys f3–f6 to cycle forward or backward through the sprite shapes, as explained in the preceding section.
4. Save
Sprite Designer allows you to save an entire set of sprite shapes to disk or tape. Enter a filename when prompted; then press D or T to indicate disk or tape, respectively. To cancel the operation, press RETURN when prompted to choose disk or tape. If a disk error occurs, Sprite Designer prints the appropriate error message at the bottom of the screen.
5. Load
This option allows you to reload a set of sprite shapes from disk or tape. Follow the onscreen prompts as explained in the preceding section.
6. Add DATA Lines
Option 6 (BASIC DATA) lets you save sprite shapes in the form of BASIC DATA statements. This is done by adding DATA lines to an existing BASIC program. Activate Sprite Designer and load your existing sprite shapes or design new ones. Once the sprite shapes are in memory, exit Sprite Designer and type NEW. Then load the BASIC program to which you wish to add the sprites. Don't worry that the program will disturb the sprite shapes: Sprite Designer automatically copied them into a safe place (the RAM under BASIC ROM) when you exited the program.
When the BASIC program loads, do not run it. Instead, type SYS 34000 to reactivate Sprite Designer. Do not initialize the sprite shapes at this stage, or load any shapes from disk or tape. Instead, choose option 6. The program prompts you to enter the series of sprites that you wish to save. When that is done, you also are given the opportunity to include REMarks along with the DATA lines.
After you answer those questions, the program prompts you to enter a filename and indicate whether to use disk or tape, as in options 4 and 5. At this point, Sprite Designer adds the DATA lines to the program in memory and saves the new program. If you wish to cancel the operation, press RETURN at the filename prompt without typing anything.
After the save is complete, exit Sprite Designer and type NEW (to reset BASIC'S internal pointers). In order to work properly, the BASIC program to which you add the DATA lines must not exceed 24 disk blocks (6144 bytes) in length.
7. Monochrome
Each series of eight sprites can be either monochrome (single color) or multicolor. You cannot mix monochrome and multicolor sprites in the same series. When you choose option 7, a 16-color board appears on the screen. To choose a color, press the letter key matching that color. That color will be used for all eight sprites in the designated series.
8. Multicolor
Option 8 allows you to choose colors for a series of multicolor sprites. When you choose this option, a 16-color board appears as described in the previous section. Since a multicolor sprite can have four colors, the program asks you to select four colors, numbered 0–3. When you're drawing in multicolor mode, the cursor contains a number to indicate which color you are drawing in. To switch to a different color, press a number in the range 0–3. A small color board to the right of the drawing area shows you the current drawing colors.
0. Quit
When you exit Sprite Designer, the program copies all the sprite shapes in the workspace into the "hidden" RAM underlying the BASIC ROM chip. This is done to make it easy for you to alternate between using your own BASIC programs and Sprite Designer. You can load and use a BASIC program after using Sprite Designer, then reload and activate Sprite Designer again. If you choose not to initialize the work area, Sprite Designer copies the previously stored sprite shapes back into its workspace. This eliminates the need to reload the sprites from disk or tape every time you switch between a BASIC program and Sprite Designer.
Sprite Designer
Please refer to the "MLX" article elsewhere in this issue before entering the following program.