Commodore
128 Machine Language
Part 6
Jim Butterfield, Associate Editor
Part 6
Jim Butterfield, Associate Editor
In this final series installment on Commodore 128 machine language programming, Jim Butterfield looks at ways to build custom memory configurations.
Memory Banks
The 16 standard configurations that Commodore has defined as banks are useful, but limitations exist. In a standard 128-one without a cartridge, extra ROM, or extra RAM-only four bank configurations (0, 1, 14, and 15) are useful. While there are 16 standard configurations, you can actually create 256 different ones. You may store any value from 0-255 in the configuration register at address 65280 ($FF00) and each value will create a particular configuration.
Not all of the 256 combinations are useful. Some call for ROM or RAM that may not exist. If you eliminate such configurations, only about 24 remain. Of these, several others don't seem to be very helpful. For instance, it's hard to imagine a case in which you'd want only half of the BASIC ROM and none of the Kemal ROM. However, you can make your own configurations, and some of them are useful. There's at least one handy configuration missing from Commodore's bank list.
|
||||||||||||||||||||
 |
The Configuration Register
Figure 1 shows the make-up of the configuration register. Only the standard memory elements are shown in the diagram; to simplify the discussion, we'll ignore elements like cartridges and RAM expansion.
This register is effectively split into five parts:
Bit 0. When bit 0 contains a zero, the I/O chips appear in locations $D000-$DFFF. When this bit contains a one, the 128 sees whatever is selected by bits 4 and 5. If it's the Kernal ROM, this part of memory contains character patterns.
Bit 1. This bit controls memory addresses $4000-$7FFF. Placing a one here puts RAM in that area; a zero causes the lower 16K of BASIC ROM to appear.
Bits 2 and 3. Together, these two bits control locations $8000-$BFFF. Setting both bits to 1 puts RAM in this area. Setting them both to 0 causes the upper 12K of BASIC ROM and machine language monitor ROM to appear.
Bits 4 and 5. These two bits control locations $0000-$FFFF. If both bits are set to 1, RAM appears in this zone; when both contain 0, the Kernal ROM appears. Note that when Kernal ROM is selected, character pattern ROM appears at locations $D000-$DFFF. If bit 0 is set to 0, I/O chip registers will be seen at $D000-$DFFF regardless of the settings in bits 4 and 5.
Bits 6 and 7. These two bits control which block of RAM will be used in any of the areas selected as RAM in the other configuration register bits. When both bits are set to zero, block 0 is selected. The bit pattern 01 selects block 1. Note that locations $0002-$03FF will appear from block 0 no matter what value you place in these bits. (Locations $0000-$0001 are registers for the microprocessor's on-chip I/O port.)
Suppose that you want to select the bank 15 configuration. Let's work through it from the high end. All the RAM will be from block 0, so we set bits 6 and 7 of the configuration register to 0. We need Kemal ROM, so bits 4 and 5 must also be set to 0. We also want BASIC ROM, so bits 1, 2, and 3 are all set to 0 as well. To make the I/O chips visible, bit 0 is set to 0. Thus, to select bank 15, we simply store a zero in $171700, setting all of its bits to 0.
Now let's select bank 1, which is almost entirely RAM from block 1. From the top again, we set bits 6 and 7 with the pattern 01 to select block 1 as the source of RAM. (Remember, however, that this doesn't affect locations $0002-$03FF.) Bits 2-5 are all set to 1 so that RAM is in place, and bit 1 also gets a one. Bit-0 must be set to 1 so that the I/O address space doesn't appear. Put all these bits together, and you get $717, the value that selects bank 1.
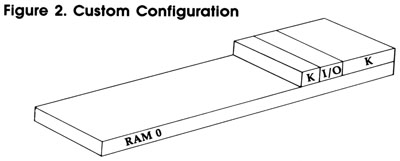
A Custom Configuration
Many machine language programmers would like to have a configuration that provides as much RAM as possible but still retains the Kernal and I/O addresses. This can be done by eliminating BASIC ROM, which machine language programs usually don't need. We'll get 48K of RAM and all the I/O that's necessary.
How do we create it? Easy. Set bits 6 and 7 to 0 to select RAM from block 0. Set bits 4 and 5 to 0 to select Kernal ROM. Set bits 1, 2, and 3 to 1 to put RAM in place. And bit 0 is set to 0 to put the I/O chips in place. Add these values together, and you get $0E as the final value. We'll use this configuration soon in an example.
Fine Points
The MMU specifications reveal additional, intriguing configuration possibilities. You can expand shared RAM to protect more than 1K from reconfiguration. You can even relocate the processor's zero page or stack. For most of us, these are comparatively risky techniques, since BASIC and the Kernal assume a normal configuration.
Here's a handy piece of information, however. If a machine language program sets its own configuration, the calling BASIC program has a lot more latitude in the way it calls that program. To explain: Suppose there is a machine language program somewhere in RAM between $4000-$BFFF. We know that the program uses I/O and the Kernal. From BASIC, you would expect to precede any SYS with BANK 15 to insure that the ML program has access to the Kernal. But that's impossible: The program is above $4000 and can't be reached with BANK 15. BANK 0 would allow you to access it, but then the ML program would have no access to the Kernal ROM.
The solution is for the ML program itself to reconfigure the machine to the custom configuration shown in Figure 2. Everything will work fine, and the ML program won't even need to restore the original configuration before it returns to BASIC.
Now let's write a program to create the configuration.
Configuration Example
The machine language portion of the program will print a simple message. From direct mode, enter MONITOR to activate the 128's built-in machine language monitor; then enter these lines:
A A000 LDA #$0E
A A002 STA $FF00
A A005 LDX #$00
A A007 LDA $A013,X
A A00A JSR $FFD2
A A00D INX
A A00E CPX #$1A
A A010 BCC $A007
A A012 RTS
To enter the message, display memory with the command M A013 A02C. Next, type over the display so that the left portion of the screen looks like this:
>A013 47 52 45 45 54 49 4E 47
>A01B 53 20 46 52 4F 4D 20 48
>A023 59 50 45 52 53 50 41 43
>A02B 45 0D
This data will appear in slightly different form on an 80-column monitor. That doesn't matter-simply type these bytes in the addresses shown, and don't forget to press RETURN at the end of each line. In the final line, it doesn't matter what appears after the byte containing OD. As you enter the bytes, you'll see the message appear in the ASCII display in the right part of the screen.
Debug Exercise
The above program is correct, but perhaps you'd like to try your hand at some of the new debugging features offered by the 128. If you want to try this, create a deliberate mistake by entering a wrong branch at location $A010. Enter this line:
A A010 BCC $A005
This instruction is the same size as the previous one, so it doesn't disturb the rest of the program. It causes a branch back to the LDX instruction, which prevents X from reaching its final value, and creates an endless loop. We'll print a lot of G characters. If you choose the bug option, continue with the rest of the exercise and we'll pick up on debugging in a moment.
The BASIC Part
The next step is to save the program to disk. Enter this command:
S "0:MSG",8,A000,A02D
The drive light comes on briefly as the monitor writes the file MSG to disk. Exit the monitor with X; then type NEW and enter this program:
MD 100 BANK 0
XP 110 BLOAD "MSG"
MX 120 PRINT "HERE IS A MESSAG
E--":PRINT
SF 130 BANK 0
GQ 140 SYS 40960
JE 150 PRINT:PRINT:PRINT "ABOV
E MESSAGE COURTESY OF .
.."
CE 160 PRINT "..CONFIGURATION
{SPACE}$0E."
Don't bother to add code to check the disk status following the BLOAD. A bad BLOAD causes the program to stop in any case. Note that the program repeats BANK 0. That's not necessary, but it's helpful as a reminder of what's going on.
Let's take stock. If the machine language program stayed in bank 0, it could perform no output, since bank 0 contains no ROM or I/O. If we had chosen bank 15, the program couldn't run at all: The SYS to 40960 would take us to ROM, not to the RAM where our program resides. But when we SYS to our bank 0 address, the machine language program switches the computer to a new configuration that has no official bank number. There will be lots of RAM plus Kernal ROM and I/O chips. Go ahead and run the program.
Debugging
If you chose the bug option, or somehow created a different bug, the program doesn't print the intended message. Compared to earlier computers, the 128 makes it easy to debug such problems.
If you are stuck in an endless machine language loop, hold down the RUN/STOP key and press the reset button. After you've released the button, the 128 puts you in the machine language monitor. Once you have regained control, you can disassemble the program with the command D A000. If you created the deliberate bug mentioned above, correct it by entering this line:
A A010 BCC $A007
Don't try to rerun the program at this point. Since the BASIC program loads the ML from disk, you must replace the old ML file with the correct version. Scratch the old MSG file with this command:
@,S0:MSG
The @ symbol indicates a disk command. It could be followed by a device number-in case you had a disk unit 9-but if none is supplied ahead of the comma, unit 8 is assumed. S stands for scratch. The characters 0: indicate that you're using drive 0 (always a good idea, particularly on a 1541 drive, which is prone to save-with-replace problems). After those characters comes the filename itself.
If you're used to the Commodore 64 wedge supplied with the 1541 Test/Demo disk, note the difference in syntax for this monitor disk command. The comma after the @ sign is not optional. To confirm that the old MSG file has been scratched, type this command:
@
The computer prints the disk status. Now you can save the new version of MSG:
S "0:MSG",8,A000,A02D
Exit to BASIC and rerun the program to confirm that the fix succeeded. The 128 is a powerful and flexible machine. You can make use of plenty of memory, and there are many mechanisms to help you exploit the machine's potential. It takes a while to get comfortable with a new architecture, but it's all there and accessible.