THE ATARI® GAZETTE
Player-Missile Graphics with the ATARITM Personal Computer System
Chris Crawford
Anybody who has seen ATARI's Star RaidersTM knows that the Atari Personal Computer System has vastly greater graphics capabilities than any other personal computer. Owners of these computers might wonder if they can get their machines to do the fabulous things that Star Raiders does. The good news is that you can indeed write programs with graphics and animation every bit as good as Star Raiders. In fact, I think it's possible to do better. The bad news is that all this video wizardry isn't as easy to use as BASIC. The Atari computer is a very complex machine; mastering it takes a lot of work. In this article I will explain just one element of the graphics capabilities of the Atari Personal Computer System: player-missile graphics.
Player-missile graphics were designed to meet a common need in personal computing, the need for animation. To understand player-missile graphics you need to understand the old ways of doing animation on machines like the Apple. These machines use what we call pure playfield graphics, in which bits in RAM are directly mapped onto the television screen. You move an image across the screen by moving a pattern of bits through RAM. The procedure you must use is as follows: calculate the current addresses of the bit pattern, erase the bit pattern from these addresses, calculate the new addresses of the bit pattern, and write the bit pattern into the new addresses.
This can be a terribly slow and cumbersome process, particularly when you are moving lots of bits (large objects or many objects) or when the motion is complex. Consequently, most animation on computers like the Apple is limited to pure horizontal motion, pure vertical motion, small objects, or slow motion. Animation like you get in Star Raiders is utterly impossible.
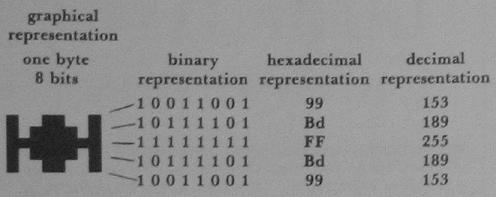
To understand the solution to this problem you must understand its fundamental cause. The screen image is a two-dimensional entity, but the RAM that holds the screen image is a one-dimensional entity. Images that are contiguous on the screen do not necessarily occupy contiguous RAM locations (see Figure 1). To move an image you must perform messy calculations to figure out where it will end up in RAM. Those calculations eat up lots of time. We need to eliminate these calculations by shortcutting past the 2d-to-1d transformation logjam. What we need is an image that is effectively one-dimensional on the screen and one-dimensional in RAM.
Let's set aside a table in RAM for this one-dimensional image. We'll call this table and its associated image a player. We'll have the hardware map this image directly onto the screen, on top of the regular playfield graphics. The first byte in the table will go onto the top line of the screen. The second byte will go onto the second line of the screen, and so on down to the bottom of the screen. Although I'm calling the image one-dimensional, it's actually 8 bits wide, because there are 8 bits in a byte. It's a straight bit-map; if a bit in the byte is turned on, then the corresponding pixel on the screen will be lit up. If the bit in the byte is turned off, then the corresponding pixel has nothing in it.
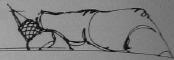
We can draw a picture with this scheme by turning the appropriate bits on or off. The picture we can draw is somewhat limited; it is tall and skinny, only 8 bits wide but stretching from the top of the screen to the bottom. Let's say we want to draw a picture of a little spaceship. We do this by storing zeros into most of the player RAM. We put the bits that form the spaceship into the middle of the player RAM so that it appears in the middle of the screen. See Figure 2 for a depiction of this process.
So far we don't have much: just a dinky image of a little spaceship. How do we get animation? We move it vertically with the same technique that other computers use. First we must erase the old image from RAM, then we draw in the new image. This time, however, the problem is much simpler. We move the image down by moving its bit pattern one byte forward in RAM. We move the image up by moving its bit pattern one byte backwards in RAM. We use no crazy two-dimensional calculations, just a simple one-dimensional move routine. It's trivial in BASIC and easy in assembly language. Horizontal motion is even easier. We have a hardware register for the player called the horizontal position register. When we put a number into the horizontal position register, the player is immediately moved to that horizontal position on the screen. Put a big number in and POW!—the player is on the right side of the screen. Put a little number in and POW!—the player is on the left side of the screen. Horizontal motion is achieved by changing the number you put into the horizontal position register. The two techniques for horizontal and vertical motion can be mixed in any way to produce any complex motion you desire.
This is the two-dimensional screen image
Here are the corresponding bytes in RAM (hexadecimal)
| 0 | 0 | 0 |
| 0 | 0 | 0 |
| 0 | 99 | 0 |
| 0 | Bd | 0 |
| 0 | FF | 0 |
| 0 | Bd | 0 |
| 0 | 99 | 0 |
| 0 | 0 | 0 |
| 0 | 0 | 0 |
This is how the bytes would be placed in one-dimensional RAM. Note how the bytes that make up the spaceship are scattered through the RAM. What a headache!
| 0 |
| 0 |
| 0 |
| 0 |
| 0 |
| 0 |
| 0 |
| 99 |
| 0 |
| 0 |
| Bd |
| 0 |
| 0 |
| FF |
| 0 |
| 0 |
| Bd |
| 0 |
| 0 |
| Bd |
| 0 |
| 0 |
| 99 |
| 0 |
| 0 |
| 0 |
| 0 |
| 0 |
| 0 |
| 0 |
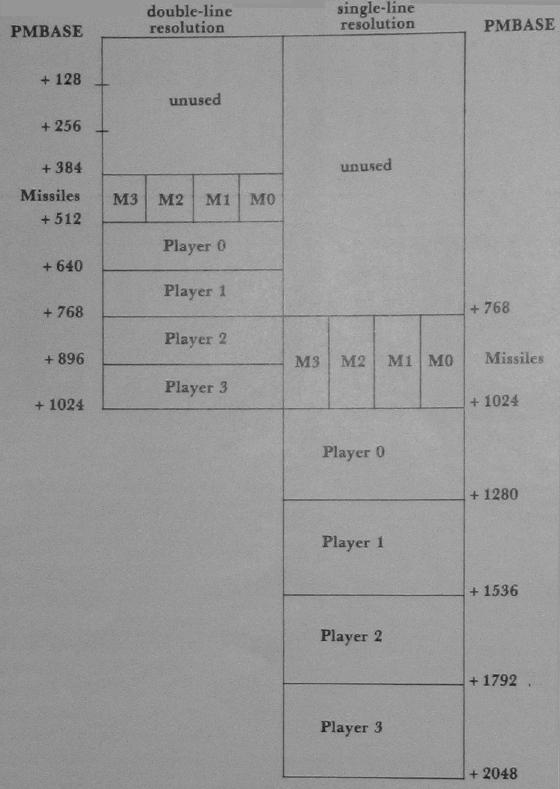
The capabilities I have described so far are nice, but taken alone they don't give you much. That's why Atari added a long list of embellishments to this basic system which enormously extend its power. The first embellishment is that you have not just one, not two, not three, but FOUR (count 'em, FOUR) players available. This means that you can have four little spaceships flying around on the screen. They are all independent and so can move independently. The next embellishment is that each player has its own color register. Thus, you can set each player to a different color, completely independent of the colors in the playfield. This gives you the capability to put up to nine colors onto the screen, depending on your graphics mode. Next, you have the capability to make a player double or quadruple width. This doesn't change the eight-bit resolution of the player, but it does allow you to make him fatter or skinnier as you please. Next, you can select the vertical resolution of the player to either single line resolution (each byte occupies one scan line on the screen) or double line resolution (each byte occupies two scan lines on the screen. Next, you can select the image priorities of players versus playfield. Since both players and playfield will be imaged onto the same location on the screen you have to decide who has priority in the event of a conflict. You can set players to have higher priority than playfield, playfield to have higher priority than players, or several mixtures of player-playfield priority. This allows you to have players disappear behind playfield or vice-versa. Finally, you have tiny two-bit players called missiles. Each player has one missile associated with him. The missile takes the same color as the player but can move independently of the player. This allows bullets or other small graphics items. If you want, you can group the four missiles together to form a fifth player. They then get a separate color.
Listing 1
Program to demonstrate player-missile graphics
10 SETCOLOR 2, 0, 0 : X = 120 : Y = 48 : REM Set background color and player position
20 A = PEEK (106) - 8 : POKE 54279, A : PMBASE = 256*A : REM Set player-missile address
30 POKE 559, 46 : POKE 53277, 3 : REM Enable PM graphics with 2-line resolution
40 POKE 53248, X : REM Set horizontal position
50 FOR I = PMBASE + 512 TO PMBASE + 640 : POKE I, 0 : NEXT I : REM Clear out player first
60 POKE 704, 216 : REM Set color to green
70 FOR I = PMBASE + 512 + Y TO PMBASE + 516 + Y : READ A : POKE I, A : NEXT I : REM Draw player
80 DATA 153, 189, 255, 189, 153
90 REM Now comes the motion routine
100 A = STICK (0) : IF A = 15 THEN GOTO 100
110 IF A = 11 THEN X = X - 1 : POKE 53248, X
120 IF A = 7 THEN X = X + 1 : POKE 53248, X
130 IF A = 13 THEN FOR I = 6 TO 0 STEP -1 : POKE PMBASE + 512 + Y + I,
        PEEK (PMBASE + 511 + Y + I) : NEXT I : Y = Y + 1
140 IF A = 14 THEN FOR I = 0 TO 6 : POKE PMBASE + 511 + Y + I,
        PEEK (PMBASE + 512 + Y + I) : NEXT I : Y = Y - 1
150 GOTO 100
How do you use all of these fantastic capabilities? You might think that it would be terribly difficult to put all of this together into a program, but it isn't. Listing 1 shows a program that puts a player onto the screen and moves it around with the joystick. As you can see, the program is ridiculously short. Here's how it works:
Line 10 sets the background color to black (the better to see the player by). It also sets up our starting positions, X being the horizontal position and Y being the vertical position.
Line 20 finds the top of RAM and steps back eight pages to reserve space for the player-missile RAM. It then pokes the resultant page number into a special hardware register. This tells the computer where it will find the player-missile data. The players are arranged in memory as shown in Figure 3. Finally, line 20 keeps track of where the player memory is through the variable PMBASE. Because of this arrangement, this program will work on any Atari Personal Computer System, regardless of the amount of RAM in place. The number of pages by which you must step back (8 in this case) depends on how much memory your graphics mode consumes and whether you are in single-line resolution or double-line resolution. In any event, the number of pages you step back by must be a multiple of 4 for double-line resolution and a multiple of eight for single-line resolution.
Line 30 first informs the computer that this program will use double-line resolution. Poking a 62 into location 559 would give single-line resolution. The next instruction enables player-missile graphics; that is, it authorizes the computer to begin displaying player-missile graphics. Poking a 0 into location 53277 revokes authorization and turns off the player-missile graphics.
Line 40 sets the horizontal position of the player.
Line 50 is a loop that pokes 0's into the player 0 RAM area. This clears the player and eliminates any loose garbage that was in the player RAM area when the program started.
Line 60 sets the player's color to green. You can use any color you want here. The colors here correspond exactly to the colors you get from the SETCOLOR command. Take the hue value from the SETCOLOR command, multiply by 16, and add the luminosity value. The result is the value you poke into the color register.
|
Useful addresses (all values in decimal) 559 put a 62 here for single line, a 46 for double line resolution 623 sets player/Playfield priorities (only one bit on!) 1: all players have priority over all playfield registers 4: all playfield registers have priority over all players 2: mixed. P0 & P1, then all playfield, then P2 & P3 8: mixed. PF0 & PF1, then all players, then PF2 & PF3 704 color of player-missile 0 705 color of player-missile 1 706 color of player-missile 2 707 color of player-missile 3 53248 horizontal position of player 0 53249 horizontal position of player 1 53250 horizontal position of player 2 53251 horizontal position of player 3 53252 horizontal position of missile 0 53253 horizontal position of missile 1 53254 horizontal position of missile 2 53255 horizontal position of missile 3 53256 size of player 0 (0 = normal, 1 = double, 3 = quadruple) 53257 size of player 1 (0 = normal, 1 = double, 3 = quadruple) 53258 size of player 2 (0 = normal, 1 = double, 3 = quadruple) 53259 size of player 3 (0 = normal, 1 = double, 3 = quadruple) 53277 A 3 here enables player-missile graphics, a 0 disables them. 54279 put high byte of PMBASE here |
Line 70 reads data bytes out of line 80 and pokes them into the player RAM area. The bytes in line 80 define the shape of the player. I calculated them with the process shown in Figure 2. Here you have lots of room for creativity. You can make any shape that you desire, so long as it fits into eight bits. You want more bits? Use four players shoulder to shoulder and you have 32 bits. You can make the loop longer to give more vertical height to your player.
These seven lines are sufficient to put a player onto the screen. If you only put in this much of the program, and ran it, it would show the player on the screen. The next lines are for moving the player with the joystick plugged into port 0.
Line 100 reads the joystick.
Line 110 checks to see if the joy the left. If so, it decrements the horizontal position counter and pokes the horizontal position into the horizontal position register. The line does not protect against bad values of the horizontal position (X < 1 or X > 255).
Line 120 checks to see if the joystick is pressed to the right. If so, it increments the horizontal position counter and pokes the horizontal position into the horizontal position register.
Line 130 checks to see if the joystick is pressed down. If so, it moves the player image in RAM forward by one byte. There are six bytes in the player image that must be moved. When it has moved them it increments the vertical position counter.
Line 140 performs the same function for upward motion.
Line 150 starts the joystick poll loop over again.
This program was written to help you understand the principles of player-missile graphics; as such it has many weaknesses. It also has much potential for improvement. You might want to soup it up in a variety of ways. For example, you could speed it up with tighter code or an assembly language subroutine.
You might add more players; perhaps each could be controlled by a separate joystick. You could change the graphics shapes. You could make the colors change with time or position or how much fuel they have left or whatever. You could add missiles for them to shoot with. You could change width to give the impression of 3d motion that Star Raiders gives. You could add playfield priorities so they could move behind some objects but in front of others. The possibilities are almost limitless.