Commodore 128 Machine Language
Part 3
Jim Butterfield, Associate Editor
This article, the third in Jim Butterfield's series on Commodore 128 machine language programming, explains how to call and link a machine language program from BASIC.
The usual way to activate a machine language (ML) program from BASIC is with a SYS command. Typically, you load and run a BASIC program, and the program loads the machine language program as needed. Sometimes the BASIC program and its accompanying ML code are combined in a single file. When you load such a program, the ML comes into memory along with the BASIC program text, so all you need is the SYS. In other cases, the BASIC program loads the ML file in a separate operation, a process known as overlaying.
Overlaying is a flexible technique. A BASIC program can load more than one machine language program; it can also load data, graphics screens, or other material. When programming an overlay, you must take care that a program doesn't selfdestruct by loading something into memory which the program itself occupies.
Where memory is limited, overlays can greatly expand the capabilities of a computer. The program can load a machine language program into memory and use it; then the program can load a different program to the same part of memory, and so on. In theory, there's no limit to how big a program might be when it's brought into memory as a series of overlays. The CP/M system, which can also be used by the 128, works largely by means of overlays (in fact, when it boots in CP/M mode, the computer loads the entire CP/M operating system from disk).
Overlay Example
Let's write a simple machine language program and load it into memory. The program will, on request, print a given character a certain number of times, followed by a carriage return. We'll use it to draw a simple bar graph. Type MONITOR and press RETURN; then enter the following lines:
A 1400 JST $FFD2
A 1403 DEX
A 1404 BNE $1400
A 1406 LDA #$0D
A 1408 JMP $FFD2
As you enter each line, the computer rewrites the line and prompts you with the address for the next line. A question mark means that you need to retype the line. After you enter the last line, the computer displays this line:
A 140B
To end the assembly, press RETURN on this line without typing anything else. The line at 1400 calls the print routine, which prints whatever character is in the A register. The value in that register will be set by the BASIC calling routine. The line at 1403 subtracts one from the counter value in the X register; this value is set from BASIC as well. Lines 1404–1408 say, "If the count has not hit zero, go back; otherwise, load and print a RETURN character and return to BASIC".
After you enter the program, save it to disk with the following command:
S "0: + ML", 8, 1400,140B
This command saves the program under the filename +ML. There's nothing magical about the plus sign (+) at the beginning of the filename. I prefer to put a special character at the start of the name of any file that is not intended to be loaded with a BASIC LOAD or DLOAD. This serves as a visual reminder of the file's special purpose when you are scanning a disk directory. Any legal Commodore filename can be used when saving files from the ML monitor. However, the BASIC program listed below expects to find a file named +ML, so you should include the plus sign for this example.
After you press RETURN, you'll see the disk light come on and hear the disk motor run. Now for a handy feature of the machine language monitor. We'll ask the disk whether or not everything went well. Type the single character @ and press RETURN. You'll get a report from the disk. There will be a number (the error type, normally 0); a message (normally OK); and then two more numbers, which indicate the disk track and sector where the error occurred in cases where that information is relevant. If you get the OK message, your program has been saved and you're ready to proceed.
The disk commands of the machine language monitor are very useful. They are similar to those of the disk wedge programs used in other Commodore computers. For example, type @,$0 and press RETURN. You'll get the directory of your disk.
Now let's destroy the program we have just written. That way, we can confirm that our BASIC program will load it correctly from disk. We'll use the F (Fill) command to store zeros in memory locations 1400-1480:
F 1400 1480 0
The BASIC Portion
Our machine language program is gone. To exit to BASIC, type X and press RETURN. Now let's write the main program. Type NEW, then enter this program:
100 BANK 15
110 BLOAD " + ML"
120 IF DS<>0 THEN PRINT DS$:STOP
130 V = 10
140 FOR J = 1986 TO 1996
150 PRINT J;:SYS 5120,42, V
160 V = V*1.1
170 NEXT J
We specify bank 15 so that Kernal ROM will be visible when the machine language routine is executed. The BLOAD command brings in the program. Since we don't specify a bank, the program goes to bank 15 (which, for the addresses concerned, is the same as bank 0). Because we don't specify a starting address, the program loads at the address from which it was saved.
After the load, the program checks the disk status to make sure everything went well. The disk status reserved variable, DS, must be zero; if not, we print the status message (DS$) and stop. We don't want to SYS to a program that might not be there.
The main program plots a value that grows at 10 percent per year over 11 years. It prints each year (J) and calls the machine language routine. The operation of SYS has been enhanced in the 128's BASIC 7.0 Additional values can be added after the address; these are stored in the various microprocessor registers when the routine is executed. The SYS in line 150 places the value 42 (the character code for an asterisk) into the accumulator and the value of the variable V (which starts at 10 and grows a little for each line) into the X register. If you like, you can change the program to print a character other than the asterisk. Simply replace the number 42 with the character code for the desired symbol. Similarly, you can play around with the values of V. Remember, however, that you can only pass values less than 256 in this manner.
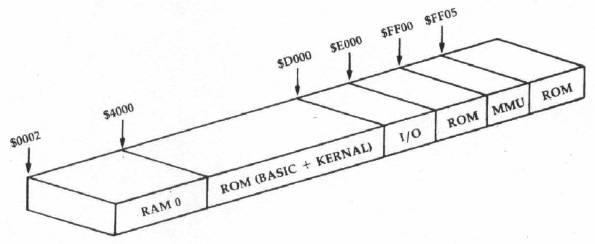
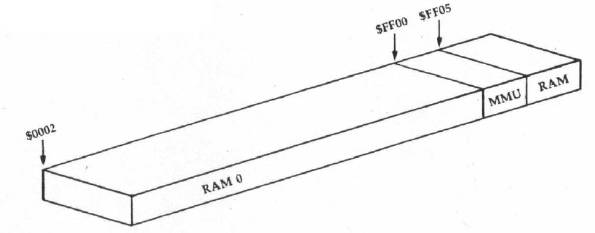
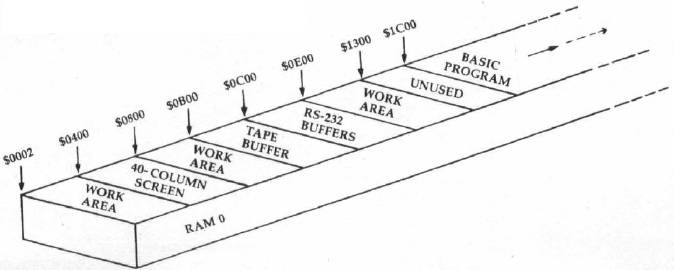
If you use overlay techniques, you may load your machine language program to any free memory area. Stay below location $4000 (decimal 16384), however, unless you're familiar with the fine points of the 128's banking architecture. Don't interfere with areas containing working values. Use the spare locations indicated in Figure 3.
Liberating Memory
If you need a good deal of space and want to use the overlay method, there's a trick that will liberate an extra 9K block of memory up to $4000. You can easily switch BASIC so that it starts at address $4000, leaving free space in the former BASIC program area from
$1C00 to $3FFF. Here's how to do it. At the start of your BASIC program, add the following line:
GRAPHIC 1:GRAPHIC 0
Here's how the trick works. When the GRAPHIC 1 statement is executed, BASIC is moved up to make room for a high-resolution graphics screen. BASIC now starts at location $4001. GRAPHIC 0 returns the display to the normal text screen, but the high-resolution screen area remains allocated and BASIC does not move back down. The result is lots of empty memory for you to use (this method assumes that you don't need high-resolution graphics, of course).
If you use this technique, you might like to deallocate the graphics area and restore your BASIC program's original position (starting at $1C01) when the program is finished. The command to do this is GRAPHIC CLR.
Joining To BASIC
If you don't like the extra disk activity that overlays require, you might prefer a technique that is popular on many other Commodore computers: tacking a machine language program on the end of a BASIC program. The advantage of this technique is that a single load operation brings in both the BASIC program and the machine language program. This technique works equally well with disk or tape. But there are a few points to remember.
When using this technique on other Commodore computers, you must take care not to change the BASIC program once it is in place. It's obvious when you think about it: If you add to the BASIC program, the machine language portion moves higher in memory in order to make room for the new program line(s). As a general rule, you must write the BASIC program first and refrain from changing it once it's finished.
The 128 adds another difficulty to this technique. You can't tack something on to a BASIC program if you don't know where the BASIC program is located. To explain, BASIC usually starts at $1C01, but if someone has been using graphics, the start of BASIC might be at $4001. It's no use writing a program to sit behind BASIC—at, say, location $1F80—and then discover that it sometimes loads to $4280. Chances are that it won't work in the new location, especially since it's above the dreaded $4000 barrier.
There are several ways around this problem. One is to check the start of BASIC and refuse to call the ML code if it's wrong. Another is to begin every program with GRAPHIC CLR in an attempt to move the program down to the desired area. Be careful with GRAPHIC CLR, however—it has a pitfall we'll mention in a moment.
Sample Program
Here's a small program that combines BASIC and machine language in one package. Let's write the BASIC part first:
100 GRAPHIC CLR
110 BANK 15
120 PRINT "SPEED TYPING"
130 PRINT "TRY TO TYPE A SENTENCE"
140 PRINT "END WITH RETURN"
150 SYS XXXX
160 PRINT "FAST, HUH?"
Do not run this program yet; the machine language is not in place. Now type GRAPHIC CLR to make sure the program is situated in the right part of memory. Enter the machine language monitor with MONITOR, then type this command:
M 2D 2D
The first two bytes displayed on the screen should be 01 1C. This operation confirms that BASIC does indeed start at address $1C01. Now enter this command to see where the program ends:
M 1210 1211
Depending on how you typed in the BASIC program (whether you included extra spaces, for example), you'll see a first byte with a value of about $8D and a second byte of $1C. Assuming this is the place where the program ends, you can tack on machine language anywhere after about $1C8D. To give ourselves some slack, let's pick $1CC0 as our machine language starting point. Now that you've chosen this address, type $1CC0 and press RETURN. The monitor prints +7360, indicating that the decimal value of $1CC0 is 7360. Now exit to BASIC and change line 150 as shown here:
150 SYS 7360
Now reenter the monitor and enter the following machine language program:
A 1CC0 JSR $FFE4
A 1CC3 CMP #$0D
A 1CC5 BEQ $1CD8
As we write this program, we'll guess at the exit address, since we haven't gotten there yet. We can always come back to correct this address if it's not correct.
A 1CC7 BCC $1CC0
A 1CC9 LDX $ + 30
Note that the monitor changes the decimal value 30 to $1E when you press RETURN.
A 1CCB JSR $FFD2
A 1CCE DEX
A 1CCF BNE $1CCB
A 1CD1 LDA #$0D
A 1CD3 JSR $FFD2
A ICD6 BNE $1CC0
A ICD8 RTS
On the last line, we see that the exit address is $1CD8. If you had guessed wrongly on line 1CC5, this would be the time to go back and correct it. Now, here's the payoff. Display the end-of-BASIC pointer with the command M 1210 1211. You'll see the same addresses as before. Move the cursor back and change the display to read:
>01210 D9 1C .. .. ..
After you press RETURN, it's safe to save the entire package. When you do so, the BASIC and machine language files are saved as one block. When you reload the file, both programs come in together.
But there's a pitfall which is related to the GRAPHIC CLR command we used in the BASIC program. When you execute GRAPHIC CLR, you may reset the contents of locations $1210-$1211 back to their original values. If you use GRAPHIC CLR in a program as we've done here, be sure to save the program before you run it. To save the program, return to BASIC and save the program with the usual DSAVE command. Run the program and try typing a sentence; you'll be amazed to discover what a speedy typist you've become.
The next article in this series discusses bank switching and how to pass information from one bank to another.