Atari Sound Development System
Michael Ryder
This versatile program lets you design sounds onscreen with a joystick and the keyboard, taking advantage of virtually every feature built into the Atari's sound chip--including some features which are rarely exploited. The custom sounds can then be saved on disk, played back, or added to your own BASIC programs. For all Atari 400/800, XL, and XE computers with at least 40K RAM and a disk drive.
Ever since the Atari was first introduced in 1979, its sound capabilities have always played second fiddle to its graphics. In fact, even many Atari owners are unaware that the sound chip inside their computer has switchable high-pass filters, optional 16-bit frequency resolution, and an adjustable clock rate for modifying the frequency range. Part of the problem is that Atari BASIC's SOUND statement doesn't begin to touch these capabilities; they're accessible only with PEEK and POKE or machine language.
The three programs included here, collectively known as the "Atari Sound Development System," make it easier for you to take advantage of these features--or get acquainted with them in the first place. The main program, "Sound Editor," is a utility that puts the full range of Atari sound capabilities at your command with keyboard and joystick controls. It also lets you design sounds with ADSR envelopes--a feature that, as well see in a moment, isn't even built into the Atari sound chip.
Two additional programs, "Sound Player" and "Sound Program Writer," let you play back the sounds you create with the Sound Editor or automatically generate stand-alone programs that can be converted into subroutines of your own BASIC programs.
Developing Sounds
To get started, type in and save Program 1 below. The Sound Editor is the main program that lets you develop, modify, save, and load sounds.
When you type RUN, at first you'll see nothing but a black screen and hear a few beeps. The beeps signal that everything is running normally while the Sound Editor sets itself up. After a short delay, you'll see the Main Menu, which leads to several submenus for various functions:
MAIN MENU
1--Develop sounds
2--Save/Load/Del/Dir sound envelopes
3--EXIT PROGRAM
Your choice (1--3): ?
Option 1 is the gateway into the main part of the program. Option 2 leads to the Input/Output Menu. Option 3 stops the program and exits to BASIC. Let's tackle option 1 first, since that's the meat of the Sound Editor.
When you press 1, the Sound Menu pops up:
SOUND MENU
1--Envelope Editor, Voice 0
2--Envelope Editor, voice 1
3--Envelope Editor, Voice 2
4--Envelope Editor, Voice 3
5--Play Voices Menu
6--Clear all voices
7--MAIN MENU
Your choice (1--7): ?
Options 6 and ? are fairly obvious: 6 resets all four voices, discarding any existing values that may have been entered, and ? returns to the Main Menu shown above. The other options let you design, modify, and play sounds in numerous ways.
Options 1--4 let you use a joystick to design individual sound envelopes for any of the four voices. Each Envelope Editor screen shows a graphic display of the current envelope and also indicates the pitch value assigned to that voice (see photos). Since envelopes aren't actually built into the Atari sound chip, but instead are handled by this program, let's backtrack for a moment and explain how they work.
Attack And Retreat
One of the many characteristics which distinguish different sounds is the shape of their ADSR envelopes. ADSR stands for attack, decay, sustain, and release. These are the four stages of volume changes that occur during a sound's duration.
Attack is the initial rise in volume to the sound's peak volume. Decay is the decrease in volume that follows the peak. Sustain is the period in which the sound continues to be audible. And release is the final drop in volume to silence. Photo 1 is a typical ADSR envelope.
By changing the shape of this envelope, you can vary the effect of the sound. For instance, a percussive sound has an almost instantaneous attack, very short decay and sustain, and a fairly sharp release (Photo 2).
If you pluck a guitar string and let it resonate, the attack is somewhat less steep and the sustain/release is much more gradual (Photo 3).
Since most real-world sounds have similar envelopes, sounds with a gradual attack and a rapid sustain/release often seem backward and artificial (Photo 4).
You can design almost any kind of ADSR envelope with the Sound Editor. At the bottom of the Envelope Editor screen for each voice is a joystick-controlled cursor. By pushing the joystick left or right, you can move the cursor horizontally to pick a position within the envelope. To set a volume level for that position, press the joystick button, then move the cursor up and down with the stick. When the cursor is at the desired level, press the joystick button again. The level is marked with a white block, and you can move the cursor left or right again to pick the next position.
If you change your mind and want to reset a volume level within the envelope, just move back to that position with the joystick and press the button as before. You can clear out the entire envelope by pressing C (Clear bars).
Other keyboard commands available on the Envelope Editor screens are L (Listen to the envelope), M (return to the Sound Menu), and S (change Sound). If you finish one voice's envelope and want to design an envelope for a different voice, press M for the Sound Menu, then select 1--4 to switch to the other voice's Envelope Editor.
Controlling Sounds
When you press S (change Sound) on an Envelope Editor screen, you get another screen that offers a wide range of control over the POKEY chip, which is responsible for Atari sound. Most of these controls are inaccessible from BASIC without PEEK and POKE. The control screen displays this information:
Modify/Mix Sounds
PRESS TRIGGE--R TO LISTEN-- TO ALL VOICES
Switch clock from 64KHz to 15KHz :0
Hi-pass filter on ch.1, clock by 3 :0
Hi-pass filter on ch.0, clock by 1 :0
Join channels 3 and 2 :0
Join channels 1 and 0 :0
Clock channel 2 with 1.79 MHz :0
Clock channel 0 with 1.79 MHz :0
Change from 17 to 9 bit poly :0
CHANNEL :0
VOLUME :8
DISTORTION :10
FREQUENCY :243
STATUS (0/1) :ON
--Press x to Exit Back to Editor--
Press the joystick trigger to play the voices; press it again to stop. The X key returns you to the Envelope Editor.
The other features on the control screen let you change various POKEY settings for the voices. At the left and right of this screen, you'll notice a pair of pointers (greater-than and less-than signs). You can move the pointers up and down the screen with the A and Z keys, respectively. This is how you select a certain control you want to change.
The first eight controls (Switch clock from 64KHz to 15KHz through Change from 17 to 9 bit poly) can be set to either 0 or 1. When the control is set to 0, it is off; when it's set to 1, it's on. For example, to switch on the control for Hi-pass filter on ch.0, clock by 1, you'd move the pointers to that line with the A or Z key, then type 1. To turn it off, you'd type 0. You can turn any of the controls on or off in any combination.
The last five controls on this screen (CHANNEL through STATUS) work a little differently. After selecting one with the pointers, press the space bar. A question mark prompts you to enter a new value. Type in the new value and press RETURN. The allowable ranges are CHANNEL (0--3), VOLUME (0--15), DISTORTION (0--14), FREQUENCY (0--255), and STATUS (0=ON or 1=OFF). These correspond to the parameters in the BASIC SOUND statement, except for STATUS, which turns the current voice on or off so you can mix the different voices.
The first eight controls, however, aren't accessible with the SOUND statement; they POKE values into certain memory locations which directly control the POKEY chip. Perhaps the best way to learn what these controls do is to inn the. Sound Editor and simply experiment. For a more technical explanation, read the following section.
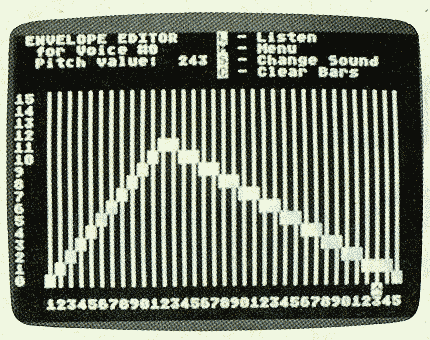
Photo 1: An
attack-decay-sustain-release envelope created with the Sound
Editor.
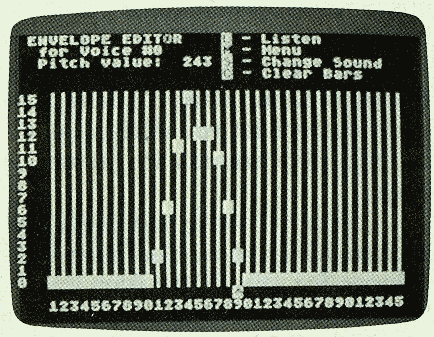
Photo 2: A sharp attack and fast
release is typical of percussion instruments.
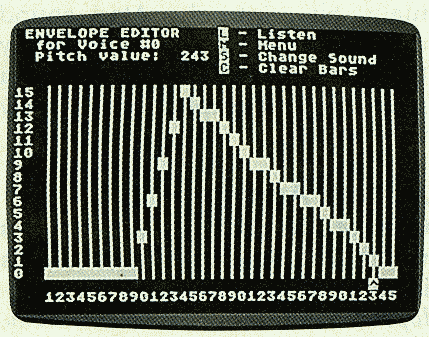
Photo 3: Most musical instruments
have a more gentle attack and release.
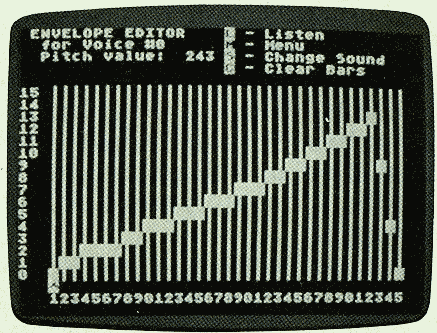
Photo 4: This envelope makes a
backward sound.
Playing POKEY
The POKEY chip is accessed through nine memory locations known as AUDFl (53760), AUDF2 (53762), AUDF3 (53764), AUDF4 (53766), AUDC1 (53761), AUDC2 (53763), AUDC3 (53765), AUDC4 (53767), and AUDCTL (53768). AUDCTL (AUDio ConTroL) controls both the four AUDio Frequency registers (which set the frequencies of the voices) and the four AUDio Control registers (which set the volumes and distortions of the voices). Each of the eight bits in AUDCTL (0--7) controls some aspect of the sound produced. These eight bits correspond to the eight controls in the Sound Editor:
| Bit | Decimal | Description |
|---|---|---|
| 0 | 1 | Switch main clock base from 64 KHz to 15 KHz. |
| 1 | 2 | Insert high-pass filter into channel 2, clocked by channel 4. |
| 2 | 4 | Insert high-pass filter into channel 1, clocked by channel 2. |
| 3 | 8 | Join channels 4 and 3 (16 bit). |
| 4 | 16 | Join channels 2 and 1 (16 bit). |
| 5 | 32 | Clock channel 3 with 1.79 MHz. |
| 6 | 64 | Clock channel 1 with 1.79 MHz. |
| 7 | 128 | Make the 17-bit poly counter into 9-bit poly. |
The clock bits (0, 5, and 6) speed up or slow down clock timers, making higher or lower frequency ranges possible. Setting the voices to 1.79 MHz with bits 5 and 6 will produce a much higher sound. The 64 KHz clock will produce lower sounds, and the 15 KHz clock the lowest.
The filter bits (1 and 2), when turned on, allow only frequencies higher than the clock value to pass through.
Bits 3 and 4 each join two of the channels together to permit 16-bit frequency resolution, allowing greater range (nine octaves instead of five) and pitch accuracy. Normally, the POKEY chip uses only 8-bit frequency resolution.
Finally, bit 7 makes the 17-bit poly counter into a 9-bit poly counter. If this bit is set when using distortion, the distortion pattern becomes more obvious.
Playing The Sounds
Let's go back to the Sound Menu, where there's one more option we haven't covered:
SOUND MENU
1--Envelope Editor, Voice 0
2--Envelope Editor, Voice 1
3--Envelope Editor, Voice 2
4--Envelope Editor, Voice 3
5--Play Voices Menu
6--Clear all voices
7--MAIN MENU
Your choice (1--7): ?
After editing all four voices, you might want to hear what they sound like alone or in unison. Option 5 brings up the Play Voices Menu, which offers all 15 combinations of the four voices at a single keystroke:
PLAY VOICES MENU
-- Voice Numbers --
A--0,1,2,3
B--0,1,2
C--0,1,3
D--0,1
E--0,2,3
F--0,2
G--0,3
H--1,2,3
1--1,2
J--1,3
K--2,3
L--0
M--1
N--2
0--3
P--PAST MENU
You'll notice, however, that the sound plays very slowly when you use this option. This is because of the memory consumed by the program, BASIC, and the routine that checks which voices are played in each combination. But don't fret--the sounds are much faster (and better) when played with a shorter BASIC program, such as Program 2, Sound Player. This program simply loads and plays any sound created with the Sound Editor.
Program 3, Sound Program Writer, takes a sound created with the Sound Editor, compacts it, and automatically writes a BASIC program to play it. During the compacting phase, all unused bars at the ends of envelopes are chopped off. In addition, a menu asks you to choose which voices should be included, and all unused voices are omitted from the resulting program. So, for instance, if you design a sound that uses only one of the four voices, you can tell Sound Program Writer to discard the unused voices and use only the one you edited. This makes the sound play noticeably faster.
To add the sound to a BASIC program of your own, simply use the program created by Sound Program Writer as a subroutine. It's saved on disk in ASCII format and can be merged into any program with ENTER.
Disk Operations
Before you can play a sound with the Sound Player or convert it into a program with the Sound Program Writer, you have to save it on disk with the Sound Editor. To do this, select option 2 on the Main Menu (Save/Load/Del/Dir sound envelopes). This brings up the Input/ Output Menu:
INPUT/OUTPUT MENU
1--Directory of *.SND files
2--Save envelopes file
3--Load envelopes file
4--Delete envelope file
5--MAIN MENU
Choice: ?
Pick option 2 to save a finished sound on disk. When you type in the filename, don't use an extender; the Sound Editor automatically appends the .SND extender to all envelope files. The same is tine when loading a file with option 3 or deleting a file with option 4.
Option 1 calls a directory of all files on the disk with the .SND extender, and option 5 returns to the Main Menu. You can also abort any save, load, or delete operation by typing X and pressing RETURN at the filename prompt.