Adding
System Power To
ST BASIC
Part 2
Kevin Mykytyn, Editorial Programmer
ST BASIC
Part 2
Kevin Mykytyn, Editorial Programmer
The VDISYS command lets you fill in the gaps in Atari ST BASIC by calling system routines to do jobs that would otherwise be impossible. Part 1 of this series explained the fundamentals of VDISYS and examined a general-purpose drawing routine. This part shows how VDISYS can perform two other important tasks-reading the screen position of the mouse pointer and sensing the status of the mouse buttons. An example program lets you create a custom shape for your ST's mouse pointer.
Have you ever tried to read the Atari ST's mouse controller from BASIC? If you have, you already know that BASIC lacks commands to read the mouse position or button status. Like certain other tasks, mouse reading can be done from BASIC only with the aid of VDISYS. Once you know how to read the mouse, you may also want to change the mouse pointer's appearance. This article explains how to do both.
Before you type in the example program below, here are some tips that make it easier to enter ST BASIC programs. First, although it may be obvious to some of you, it is far easier to enter a program from the Edit window than the Command window. (To move to the Edit window, type EDIT at the Command window's OK prompt or choose the Start Edit option from the Edit menu.) The Edit window's full-screen editor is much more convenient for entering program lines than the Command window's single-line interface. You can also run a program directly from the Edit window (type RUN or choose the Start option from the Run menu). When the program is finished, control returns to the Edit window, so you can immediately modify or add new lines to the program.
The Edit window has one feature that you may or may not appreciate. Until you press RETURN, the line you're working on appears in ghost mode (the letters look gray and fuzzy). The purpose of ghost mode is to show which lines you have changed. That's helpful to inexperienced programmers, but an annoyance in many cases, since ghosted letters are harder to read than normal ones. To disable ghost mode, enter this line in the Command window:
POKE SYSTAB+2,0
Another way to ease the task of program entry is to increase the speed of the cursor. This is done from the Control Panel. The second slider from the top (the one with a rabbit and a turtle) controls the cursor speed. To increase the speed, click on the slider and drag it to the left (toward the rabbit). To slow it down, drag the slider to the right. You can also turn the keyboard beeping sound off and on by clicking the C key icon in the Control Panel.
Redesigning The Pointer
Two more steps are required before typing in the pointer-editing program. First, set the computer to medium resolution (use the Set Preferences option). Second, turn off buffered graphics from BASIC's Run menu. If your ST has more than 512K of Random Access Memory (RAM) or the TOS operating system in Read Only Memory (ROM), the second step may or may not be necessary, but it can't hurt in any case.
Now enter Program 1 and save it to disk. It lets you change the mouse pointer from the familiar arrow shape to a custom design of your own. When you run the program, a grid appears on the left side of the screen, and the word DONE is shown on the right. To edit the pointer shape, move the mouse pointer into the grid, then click the button on any square you want to change. Clicking on a square toggles it on or off-if the square is on (dark) when you click, it is turned off (erased) and vice versa.
Once you're satisfied with the new pointer, move the mouse out of the grid and click on the word DONE. The program then asks for the location of the new pointer's hot spot-a single dot that the computer uses to tell exactly what the pointer is pointing at. On the normal mouse pointer, the hot spot is located at the very tip of the arrow. But you can place it anywhere within your custom pointer shape.
After you locate the hot spot, the new pointer appears on the screen. At this point, the program asks whether you want to save the pointer shape data to a disk file for later use. If so, press Y and enter a filename when prompted. If you press any other key, the program ends without saving the shape. Program 2 (see below) provides a method for reloading the shape data from the disk file and making the custom pointer appear in a BASIC program of your own.
Reading The ST's Mouse
If you're unfamiliar with the usage of VDISYS, CONTRL, and PTSIN, you may want to read Part 1 of this article (April COMPUTE!) before going any further. It explains the fundamentals of calling VDI routines from ST BASIC.
As mentioned earlier, ST BASIC has no commands to read the mouse or the state of the mouse buttons directly. Fortunately, there is a VDI routine (appropriately named Readmouse) which gives this information. Only three steps are needed to call this routine. Since Readmouse has an opcode of 124, we first execute POKE CONTRL,124 to tell the ST which VDI routine to call (line 90 in Program 1). This routine doesn't involve any vertices or attributes, so CONTRL+2 and CONTRL+6 are POKEd with zeros. Once that brief preparation is complete, the statement VDISYS(0) actually calls the routine.
As you may recall, Part 1 explained how to pass information from BASIC to a VDI drawing routine. When that routine was done with its work (drawing a graphic shape), we didn't care whether it passed any information back in the other direction. But many VDI routines pass significant information back to BASIC. Thus, calling a routine like Readmouse involves a two-way information transfer. You must supply certain data before calling the routine; and when it returns control to BASIC, the routine sends other information back to you.
Part 1 also explained how the parameter blocks named PTSIN and INTIN are used to pass data from BASIC to a VDI routine. These parameter blocks are paralleled by PTSOUT and INTOUT, which perform the same operations in reverse. Though they're considered reserved variables (which you can use only in certain, predefined ways), PTSOUT and INTOUT each point to a block of special storage locations in memory called a parameter block. Like PTSIN, PTSOUT points to a temporary holding area for information about x and y position coordinates. Like the INTIN parameter block, INTOUT defines the area where other information (attribute data, etc.) is passed.
Position And Button Status
To read the mouse pointer's screen location, call the Readmouse routine and PEEK the memory locations defined by PTSOUT and PTSOUT+2. In Program 1, this is done at line 110. The statement X=PEEK(PTSOUT) transfers the value stored in PTSOUT in the variable x, representing the mouse pointer's horizontal position. Similarly, Y=PEEK(PTSOUT+2) makes y equal to the mouse pointer's vertical position.
To read the status of the mouse buttons, call the Readmouse routine and PEEK the locations defined by INTOUT and INTOUT+2. INTOUT returns information about the left button, and INTOUT+2 tells you the status of the right button. If a button is pressed, the value in the corresponding location is 1; if it's not pressed, the value is 0. Program 1 reads both mouse buttons at line 120. When the left button is pressed, the variable LBUTTON is set to 1; when the right button is pressed, the variable RBUTTON is set to 1. Table 1 outlines the information you need to use Readmouse.
Table 1: |
Readmouse Parameters |
|
Input Parameters |
||
| POKE CONTRL,124 | (opcode) | |
| POKE CONTRL+2,0 | (number of vertices) |
|
| POKE CONTRL+6,0 | (number of attributes) |
|
| Output Parameters | ||
| PEEK(PTSOUT) | (horizontal mouse position) |
|
| PEEK(PTSOUT+2) | (vertical mouse position) |
|
| PEEK(INTOUT) | (1 = left button pressed) |
|
| PEEK(INTOUT+2) | (1 = right button pressed) |
|
Customizing The Pointer
Though the ST's familiar arrow pointer may be suitable most of the time, occasionally you might want it to look like something else. In a drawing program, for instance, why not reshape the pointer as a pencil or a paintbrush? Once you know how to modify the pointer's appearance, you can make it look like a pointing hand, a musical note, a scientific symbol, or whatever else is needed to give your program that unique, Customized look.
The VDI routine that redraws the mouse pointer is called Set Mouse Form, usually abbreviated as SMF. Because the SMF routine requires a lot of information, its setup procedure is fairly complex. The first step, as always, is to POKE the opcode for the VDI routine into CONTRL. Since the opcode for SMF is 111, Program 1 performs POKE CONTRL,111 at line 210. Next, you must POKE the number of vertices (0 in this case) and the number of attributes (37) into CONTRL+2 and CONTRL+6 (lines 210-220).
The mouse pointer can move anywhere on the screen, so there's no need to provide x and y coordi nates for the shape as a whole. However, you must tell the system where, within that shape, it should put the hot spot. The hot spot's coordinates are defined relative to the upper-left corner of the new pointer shape. POKE the x coordinate value in INTIN and the y coordinate in INTIN+2. At the same time, you should also POKE a 1 into INTIN+4 (lines 220-230).
Who Was That Masked Mouse?
The mouse pointer you see on the screen is actually made of two separate parts-the pointer shape itself and a second shape called a mask. Both forms are the same size (16 pixels high and 16 pixels wide) and appear at the same place on the screen. Since the pointer and the mask can be different colors, this permits you to make a two-color mouse pointer. To create the illusion of solidity, for instance, you might draw the main body of the pointer in one color and add a darker shadow along its lower edges. To set the mask's color, POKE the desired color number into location INTIN+6. POKE the pointer's color into INTIN+8.
After you've defined the colors, you must supply shape information for both the pointer and the mask. Each shape requires 32 bytes (16 words) of data. The figure below illustrates how the 16 words of shape data go together to make up the entire shape.
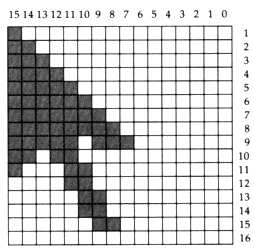
Mouse Pointer Data
If you visualize the pointer shape within a 16 X 16 grid, the first 16-bit data word is in the top row of the grid, the second data word represents the second row, and so on. To pass the shape information to the SMF routine, you must first calculate the 16-bit values represented by the "on" bits within this grid. When that's done, the data for the mask is POKEd into locations INTIN+10, INTIN+12 ... INTIN+40. The pointer shape data is POKEd into locations INTIN+42 through INTIN+72. Don't be concerned if that sounds a bit confusing. Program 1 does all the calculations and POKEs for you automatically. For those who are interested, Table 2 outlines the information needed by the SMF routine.
Table 2: Set Mouse Form (SMF) Parameters Input
Parameters
POKE CONTRL,111 (opcode) POKE CONTRL+2,0 (number of input vertices) POKE CONTRL+6,37 (number of attributes) POKE INTINA (X=hot spot horizontal coordinate) POKE INTIN+2,Y (Y=hot spot vertical coordinate) POKE INTIN+6,mask color POKE INTIN+8,pointer color POKE INTIN+10-INTIN+40,mask shape data POKE INTIN+42-INTIN+72,pointer shape data |
Saving Custom Pointers
Once you've created a custom pointer with Program 1, it appears on the screen and works just like the normal one. However, the pointer reverts to its usual shape as soon as you exit BASIC.
To help you incorporate custom pointers in your own BASIC programs, Program 1 lets you save all the pointer shape data in a disk file. Program 2 illustrates how to read the shape data from the disk file and recreate the custom pointer in another program.
The first two data items in the disk file are x and y coordinates for the pointer's hot spot. The next 16 data items are the 16 words (32 bytes) of shape data for the pointer and mask forms. After this data has been retrieved, it's simply a matter of performing the setup and calling the SMF routine just as we did in Program 1.
To incorporate this routine in your own program, replace the INPUT statement in line 10 with FN$="FILENAME" using your own filename in place of FILENAME. Of course, you could also convert the shape data into DATA statements contained in the program itself.
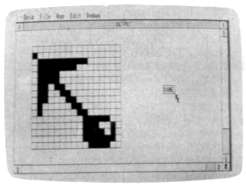
This drawing grid (created by Program
1) lets you create custom mouse pointers
for use in your own ST BASIC programs.
Program 1: ST Mouse
Pointer Editor
10 FULLW 2:CLEARW 2:COLOR 1,1,1,1
20 DIM AR(16,16),SHAPE(30):FOR A=
1 TO 16:FOR B=1 TO 16:AR(A,B)=0:
NEXT B,A
30 FOR A=50 TO 306 STEP 16:LINEF A,
20,A,148:NEXT
40 FOR A=20 TO 148 STEP 8:LINEF 50,
A,306,A:NEXT
50 GOTOXY 48,8:PRINT "DONE":Q=43
0:R=72:LINEF Q,R,Q+36,R:LINEF Q+
36,R,Q+36,R+10
60 LINEF Q+36,R+10,Q,R+10:LINEF Q,
R+10,Q,R
70 GOSUB READMOUSE:IF LBUTTON
=TOGGLE THEN 70 ELSE TOGGLE
=LBUTTON
80 IF LBUTTON THEN GOSUB FLIP:GO
TO 70 ELSE GOTO 70
90 READMOUSE: POKE CONTRL,124
100 POKE CONTRL+2,0:POKE CONTR
L+6,0:VDISYS (0)
110 X=PEEK(PTSOUT):Y=PEEK(PTSOU
T+2)
120 LBUTTON=PEEK(INTOUT):RBUTT
ON=PEEK(INTOUT+2)
130 RETURN
140 FLIP: GOSUB LOCATE
150 IF XP>24 AND XP<27 AND YP=
8 THEN GOTO DEFINEIT
160 IF XP<1 OR XP>16 OR YP<1 OR YP
>16 THEN RETURN
170 IF AR(XP,YP) THEN AR(XP,YP)=0:C
OLOR 1,0:GOTO 190
180 AR(XP,YP)=1:COLOR 1,2
190 FILL XP*16+44,YP*8+18:RETURN
200 DEFINEIT: GOTOXY 43,12:PRINT"
CHOOSE HOT SPOT":GOSUB HOT
SPOT
210 POKE CONTRL,111:POKE CONTRL
+2,0
220 POKE CONTRL+6,37:HX=XP:HY=
YP
230 POKE INTIN,XP-1:POKE INTIN+2,
YP-1:POKE INTIN+4,1
240 POKE INTIN+6,0:POKE INTIN+8,1
250 FOR A=10 TO 40 STEP 2:T=0
260 FOR B=16 TO 1 STEP-1:T=T-2^(1
6-B)*(AR(B,A/2-4)=1):NEXT
270 POKE INTIN+A,T:POKE INTIN+A
+32,T:SHAPE((a-10)/2)=t
280 NEXT:VDISYS (0):CLEARW 2:GOTO
XY 32,0:PRINT "DEFINED"
290 PRINT "Do you want to save this sh
ape?":A=INP(2):IF A<>121 THE
N END
300 INPUT "Filename";FN$:OPEN "O",#
1,FN$:PRINT #1,HX;HY
310 FOR A=0 TO 15:PRINT #1,SHAPE(
A):NEXT:CLOSE #1:END
320 HOTSPOT: GOSUB READMOUSE:I
F LBUTTON=TOGGLE THEN 32
0 ELSE TOGGLE=LBUTTON
330 IF LBUTTON=0 THEN 320
340 GOSUB LOCATEJF XP<1 OR XP>1
6 OR YP<1 OR YP>16 THEN 340 EL
SE RETURN
350 LOCATE: XP=INT((X-50)/16)+1:YP
=INT(Y-40)/8)+1:RETURN
Program 2: Pointer Loader
10 DIM SHAPE(30):CLEARW 2:GOTOX
Y 0,0:INPUT "Filename",FN$:OPEN "I
",#1,FN$
20 INPUT #1,HX,HY:FOR A=0 TO 151N
PUT #1,SHAPE(A):NEXT
30 POKE CONTRL,111:POKE CONTRL
+2,0
40 POKE CONTRL+6,37
50 POKE INTIN,HX-1:POKE INTIN+2,H
Y-1:POKE INTIN+4,1
60 POKE INTIN+6,0:POKE INTIN+8,1
70 FOR A=10 TO 40 STEP 2:T=SHAPE(
(A-10)/2)
80 POKE INTIN+A,T:POKE INTIN+A
+32,T
90 NEXT:VDISYS (0):CLEARW 2:GOTOX
Y 0,0:PRINT "Defined"