IBM Disk RX
Michael A. Covington
Did you erase a file by accident? Maybe you can resurrect it with "IBM Disk RX". This interesting utility also lets you explore how information is stored on your disks. It runs on any IBM PC with at least 128K RAM and a disk drive, or Enhanced Model PCjr with Cartridge BASIC. For DOS 2.0 or 2.1.
If you're anything like me, about once a month the dreaded misfortune befalls you: You find you've erased your only copy of an important program or document. Perhaps you thought you had a second copy when you didn't, or perhaps it was just a silly mistake. Maybe you typed the wrong filename because you were thinking about two files at once.
Fortunately, deleted files can often be recovered. When you delete a file from an IBM PC or PCjr disk, the data isn't really erased. Instead, the space on the disk that the file occupied is marked as free space for future use. The contents of the file aren't overwritten until the space is needed for something else. So if you've accidentally deleted a file—and you haven't yet written anything else onto the disk—there's at least a chance you can get the file back. "IBM Disk Rx" lets you search through a disk to locate your data, reconstruct the file in a memory buffer, and then save a copy on a new disk.
How To Recover A File
In brief, here are simple instructions for using IBM Disk Rx:
- Make sure to write nothing else on the disk containing the data you want to recover. Any new files or data would probably overwrite the deleted file. Immediately after the accident, remove the disk from the computer and set it aside.
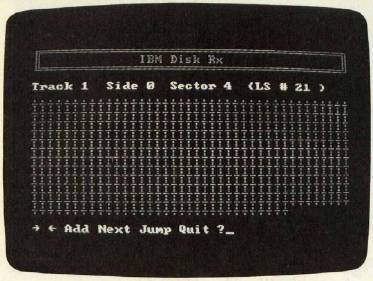
- Call up IBM Disk Rx and start it running. When it's ready, insert the disk with the deleted file into the drive. By following the Disk Rx screen instructions, you can display sectors of the disk on the screen, one at a time.
- Step through the disk, sector by sector, hunting for pieces of your lost file. Press N (for Next unallocated sector) as many times as necessary until you come to the first sector of your file. Then press the A key to add that sector to the Disk Rx memory buffer. Then press N again to find the next sector, and so forth. Nine times out of ten, you can work your way through the whole file using just the N and A keys; you'll know you're done when you reach a sector that isn't part of the file.
- After you've put together all of your file in memory (the Disk Rx buffer holds up to 48K), press Q to quit. Disk Rx asks you to insert another disk and type a filename. Then it saves a copy of the rebuilt file.
But sometimes it's not this simple. It's not always easy to recognize pieces of your deleted file or to determine their proper order. Some skill is involved; IBM Disk Rx can't work miracles by itself. As we'll explain in a moment, if you accidentally delete a file from a heavily used disk, the sectors you need to retrieve may be scattered all over the disk and are difficult to reorganize. Occasionally it may be easier to recreate a lost file than to reconstruct it. That's a choice you'll have to make after examining a problem disk with Disk Rx.
Searching For Sectors
To use Disk Rx effectively, you must learn to recognize fragments of your deleted file when you see them. As you view the contents of each sector on the screen, keep in mind that Disk Rx has to translate some characters to make them displayable. For example, Disk Rx does not skip to a new line when it encounters a carriage return character in a sector. If it did, an entire sector might not fit on the screen. Instead, control characters such as carriage returns and linefeeds are represented by adding 32 to their ASCII values and displaying the result in inverse video. This is like pressing a Ctrl key combination on the keyboard—a Ctrl-A, for instance, shows up as the letter A in inverse video.
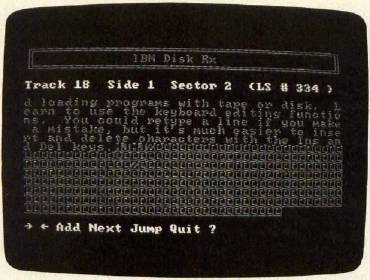
If you accidentally erased a text file, your job is relatively easy. Most of the text does appear onscreen as normal characters. For ASCII text files, the end of a line is represented by Ctrl-M and Ctrl-J (carriage return and linefeed). The end of a file is usually denoted by Ctrl-Z, after which there may be random data (usually repeated material from the previous sector). Most word processing files follow this system (Figure 1), though additional special characters may also be present.
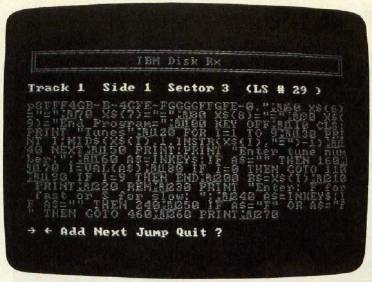
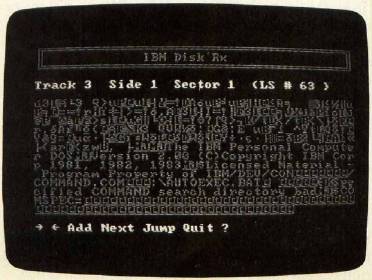
Other types of files look quite different. Tokenized BASIC programs, for instance, are a jumble of characters in which only the variable names, quoted strings, and comments are recognizable (Figure 2). And in a machine language program, you may not be able to recognize anything except a few messages (Figure 3). The main challenge in these cases is to identify the beginning of your file. Also, these files usually don't end with Ctrl-Z like text files. However, spurious material at the end of a program is unlikely to cause problems if the program is a closed loop.
To get a feel for how different types of files appear onscreen, practice examining some sectors with Disk Rx. The utility won't alter or harm your disks in any way.
Restoring Order
Your second task when reconstructing a deleted file is putting the pieces back together in the proper sequence. This is made a lot harder by the way an IBM computer stores files on a disk.
The basic problem is that files aren't necessarily stored in blocks of contiguous sectors. For instance, assume that you've saved two files on a freshly formatted disk. Now let's say you delete the first file, then save a new file which is longer than the deleted one. DOS (the Disk Operating System) starts writing the new data in the gap left by the deleted file. When it runs out of room there, it skips over the sectors occupied by the second file and saves the rest of the new data in another block. Therefore, the new file is split into two parts, or noncontiguous blocks, around the existing file.
As you might expect, a heavily used disk—on which you've saved and deleted many files of different lengths—can get pretty messy. A long file might be scattered in separate blocks all over the disk. They're not only noncontiguous, but also nonconsecutive. The last part of a file might be stored in a block before the first part of a file.
All this is normally something you'd never think about because DOS takes care of the messy details. DOS keeps a map on the disk to keep track of which blocks of sectors belong to which files (called allocation). The map also tells DOS how to put the sectors together in the proper order (called linkage).
When you delete a file, the sectors of actual data are left undisturbed, but unfortunately, the map is altered. All of the allocation and linkage information is erased.
Some disk operating systems (for example, Commodore and Atari) store the linkage information within the data sectors themselves. It's therefore easy to reconstruct deleted files on these disks since each sector points to the next sector in the linked chain of files. But since PC-DOS stores the linkage information in a map which is altered when the file is deleted, you have to link sectors back together the hard way. If the disk hasn't been used much, you might be lucky enough to find all or most of the sectors contiguous and consecutive. Otherwise, you must examine each sector, one by one, and restore the proper order yourself. Fortunately, Disk Rx has a few features to make the job possible.
Solving The Puzzle
When sectors of a deleted file are randomly scattered all over a disk, your best bet is probably to recover your file in more than one piece, then put the pieces together in the correct order using the COPY command in DOS.
To do this, retrieve a block of sectors using the Disk Rx buffer. Save each block as a separate file on a scratch disk. When you've collected all the blocks that belong to the lost file, try to reassemble them on the scratch disk in the right order with COPY. (See your DOS manual for instructions on combining, or concatenating, multiple files with the COPY command.)
An alternative is to search through the disk until you find out where the scattered blocks of sectors are, then use the Disk Rx buffer to reassemble them in the proper sequence. Disk Rx lets you jump directly to any sector when you press the J key.
One warning is in order: If you are piecing together a file and cannot locate the original last sector of the file, you'll get strange results when you try to reload the partial file. Without the last sector, the file will be missing its end-of-file marker (the Ctrl-Z character mentioned above). In this case, random data will appear to be appended to the end of the file when it is reloaded into memory. Or, if you have a program already in memory when you load the partial file, any portion of the program in memory that's beyond the end of your partial file will be added to the file.
Exploring Disks
You can also use Disk Rx to examine the contents of any sector on a disk, whether or not it is part of a file. You can even examine non-IBM disks, as long as they have 40 tracks and eight or nine 512-byte sectors per track. (This doesn't mean that the program can read any disk; generally only IBM-compatible computers use the disk format of 40 tracks with eight or nine sectors of 512 bytes.) Internally, DOS refers to sectors by their logical sector numbers (Table 1). The same numbering system is used for all disks, though some disks lack some of the sectors (there is no side 1 on a one-sided disk, and no sector 9 on any track of an eight-sector disk).
Table 2 is a guide to the special areas that DOS records at the beginning of each disk. The boot record is generated by the FORMAT command in order to distinguish between system and nonsystem disks. Then comes the file allocation table (FAT), the map which identifies the status of each sector (free space, last sector of a file, or part of a file which continues in sector number so-and-so). The FAT looks like gibberish on the screen; each entry occupies one and a half bytes, and fairly elaborate techniques are needed to decode it.
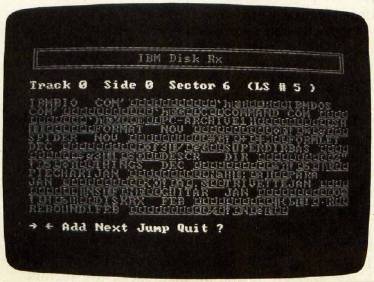
Finally, there is the directory (Figure 4), which lists all the files (and/or subdirectories) together with codes for the sectors in which they begin. Examining the directory can be a good way to find out what files have been erased, since the filenames are clearly legible and a special character replaces the first letter of the name of each erased file. Note also that the directory sectors list hidden files such as IBMBIO.COM, even though the DIR command doesn't.
How It Works
The heart of Disk Rx is a machine language routine that asks DOS to read a particular sector, identified only by logical sector number. The statements in lines 90–210 POKE this routine into memory. You can use this routine in your own programs to read disks sector by sector. Note that before the routine is called, DOS must be notified that the user may have changed disks; this is done by executing any DOS operation that refers to drive A. I used CHDIR (line 260) because it does not cause an error if a non-IBM disk is inserted.
To set aside a large buffer in which to store the reconstructed file, Disk Rx manages memory in a somewhat unusual way. The CLEAR statement in line 50 tells the BASIC interpreter not to use addresses from hexadecimal 3C00 to the top of the 64K segment. As indicated in Table 3, this area contains a 48K workspace in which the recovered file is put together, followed by the machine language subroutine and some space for its parameters, including the 512-byte sector itself.
| Table 1: | |||
| Sector-Numbering In DOS 2.0 And 2.1 | |||
| The same numbering system is used for all disks, and DOS keeps tabs on which numbers are not used on particular disks (that is, sector 9 of any track does not exist on eight-sector disks, and side 1 does not exist on a one-sided disk). | |||
| Logical Sector Number | Track | Side | Sector |
| 0 | 0 | 0 | 1 |
| 1 | 0 | 0 | 2 |
| 2 | 0 | 0 | 3 |
| 3 | 0 | 0 | 4 |
| 4 | 0 | 0 | 5 |
| 5 | 0 | 0 | 6 |
| 6 | 0 | 0 | 7 |
| 7 | 0 | 0 | 8 |
| 8 | 0 | 0 | 9 |
| 9 | 0 | 1 | 1 |
| 10 | 0 | 1 | 2 |
| 11 | 0 | 1 | 3 |
| 12 | 0 | 1 | 4 |
| 13 | 0 | 1 | 5 |
| . | . | . | . |
| . | . | . | . |
| . | . | . | . |
| 717 | 39 | 1 | 7 |
| 718 | 39 | 1 | 8 |
| 719 | 39 | 1 | 9 |
| Table 2: | ||||
| Special Sectors At The Beginning Of Disks | ||||
| 8-sector, 1-sided disk | 8-sector, 2-sided disk | 9-sector, 2-sided disk | 9-sector, 2-sided disk | Area |
| 0 | 0 | 0 | 0 | Boot record |
| 1 | 1 | 1–2 | 1–2 | First copy of FAT |
| 2 | 2 | 3–4 | 3–4 | Second copy of FAT |
| 3–6 | 3–7, 9–10 | 5–8 | 5–11 | Directory |
| Table 3: | |
| Special Disk Rx Memory Locations (Hex) | |
| 0000-3BFF | BASIC program and variables. |
| 3C00-FBFF | 48K buffer for storing recovered files. |
| FC00-FC20 | Machine language subroutine to read disk sectors. |
| FD00-FDFF | Transfer area for contents of sector. |
| FF00 | Indicates which disk drive to read (0 = A, 1 = B, etc.) |
| FF01 | Low byte of logical sector number. |
| FF02 | High byte of logical sector number. |
| FF03 | Return code from subroutine (successful read = 0, error = 1) |
| Table 4: | |
| Important Disk Rx Variables | |
| DISREAD | Address of machine language subroutine. |
| FAT | Array in which file allocation table is stored. |
| FATP | Pointer used to read FAT. |
| FATSIZE | Number of elements actually used by array FAT. |
| FATV | Decoded FAT entry for a particular sector (unallocated sector = 0). |
| NONDATA | Number of sectors occupied by boot record, root directory, and file allocation table. Counts the nonexistent ninth sector on eight-sector disks. |
| PCT! | Percentage of buffer used. |
| SCTR | Logical sector number of current sector. |
| SECTORS | Sectors per track (eight or nine). |
| SIDES | 1-sided disk = 1, 2-sided disk = 2. |
| STP | Points to next available byte in buffer where file is retrieved. |
| STPF! | STP in floating-point form. |
| SUM | Checksum to verify correct typing of DATA statements. |
To identify unallocated sectors (which are likely to contain deleted files), the program decodes the FAT entry for each sector and searches for values of 0. This is done in lines 1130–1170 and 1660–1720.
The rest of the program is relatively simple. As each sector is read, Disk Rx displays the contents by PEEKing the 512 bytes of memory beginning at hex FD00. If the sector is to be added to the workspace, these 512 bytes are POKEd into locations starting at STP (Storage Pointer), which is initially hex 3C00. At the end, the contents of the workspace are written out to a file one byte at a time.