Atari Touch Tablet And Light Pen
Tom R. Halfhill, Staff Editor
One of the most marvelous things about home computers—particularly Atari computers—is their full-color graphics. And one of the most frustrating things about home computers can be the complexity of programming those graphics.
Nearly everybody has been impressed by the dazzling graphics demos on the computer screens at the local computer shop or department store. But when you first bring the computer home, unwrap it, set it up, and plug it in, the screen is forbiddingly blank—all it says is READY.
The computer may be ready, but you aren't. Where do you start? How can you learn to create those wonderful graphics which helped sell you on the computer in the first place?
If you're ambitious, you might start tackling the BASIC programming manual, plus other books and magazines. But it could require hours of study before your first crude graphics even begin to appear on the screen. And by then you'll be yearning for a better way.
There are better ways, of course. For instant results, there's nothing like plugging in some sort of input device which lets you draw and paint using skills you've been developing since your first scribbles in kindergarten. Ideally, this input device should feel to your fingers like a traditional pencil, crayon, or paintbrush; its effect on the screen should resemble the effect of these conventional tools on paper; and it should insulate you from the extensive programming.
Some graphics-drawing programs use joysticks or paddle controllers as input devices. These are not traditional drawing implements, but they aren't hard to master—particularly if you've played videogames. Still, it would be nice if the years you spent learning how to manipulate pencils, pens, and paintbrushes could be wedded directly to an input device which acts like a pencil, pen, or paintbrush, and which also eliminates the need to program the computer on its own level. Such a device would also make the computer much more accessible to youngsters. They're still struggling to develop basic skills and don't need anything extra to confuse them.
Generally, two solutions have been invented: light pens and touch tablets (also called graphics tablets). Examined objectively, they are technically similar—both translate the position of a stylus into coordinates which the computer understands as a point on the screen. Therefore, both devices bypass a major step in programming.
But in other, more subjective ways, light pens and touch tablets are quite different. Each device has its own "feel," and the ultimate choice must depend on your own preferences. It's analogous to the differences between drawing in chalk or in pen-and-ink. When choosing between a light pen and a touch tablet, your best bet is to try your hand at both before deciding. However, there are a few objective differences which might sway your decision one way or the other. Fortunately, two recent products from Atari, Inc., give Atari users a wider choice between these two types of drawing tools.
Compatible With Almost Any System
The Atari Light Pen package includes a stylus with a touch-sensitive tip that plugs into a joystick port with a 46-inch cord; AtariGraphics software on a snap-in ROM cartridge; and a 20-page manual. The package works on any Atari computer, but at least 48K RAM is recommended (and required to save screen images on disk). To save screens on tape, at least 16K RAM is required.
The Atari Touch Tablet package includes a graphics tablet with two fire buttons that plugs into a joystick port with 48-inch cord; a plastic stylus with a tiny fire button that plugs into the tablet via a 27-inch cord; AtariArtist software on a ROM cartridge; a DOS 3.1 diskette; and a 21-page manual.
The package works on any Atari computer with at least 16K RAM.
Getting started with either package is quick and easy. You just plug in the light pen or touch tablet, insert the ROM cartridge, and switch on the computer. If you have a disk drive, you insert a system disk with DOS before booting up. Both packages seem to work equally well with all versions of Atari and OS/A+ DOS.
Light pens require calibration, so the first thing the AtariGraphics software asks you to do is point the pen at a certain spot on the screen. If nothing happens, it probably means the brightness on your TV or monitor is too low. Remember, a light pen contains a photo�sensor that actually reads the light emitted by the screen. If there isn't enough light, the computer can't determine where the pen is pointing.
Proper calibration is the Achilles heel of light pens, and the Atari Light Pen is no exception. Response can vary from screen to screen, static electricity can interfere with the readings, and generally you'll have to turn up the brightness until the colors are partially washed out. In fact, some dark colors won't register a reading at all. One solution is to draw with bright colors and then change them into the darker colors you really want after the work is finished. Fortunately, because the Atari is the only home computer besides he IBM PCjr with color indirection, this is very easy to do. After the light pen is calibrated, the main drawing screen appears.
The touch tablet, of course, requires no calibration, so after title screen, the main menu screen appears.
Two Types Of Menus
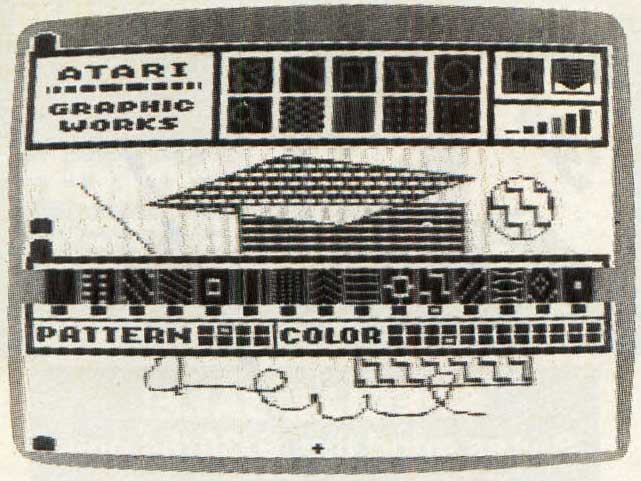
Although the AtariGraphics light pen) and AtariArtist (touch tablet) programs share many smilarities, they have different kinds of menus. The Atari-Graphics software was obviously influenced by the philosophy exemplified by the Apple Macintosh. Along the left side of the screen are four tiny white tabs; pressing the light pen to any of them causes a menu to slide over your drawing. The four menus allow you to choose drawing modes, colors, patterns, and storage options. When you point to the tab again, the menu slides back off the screen, leaving your drawing intact. You can even make the tabs themselves disappear by pressing the TAB key on the keyboard.
In contrast to this pull-out menu approach, the AtariArtist software has the more conventional alternate menu screen. Pressing either fire button on the touch tablet or the button on the stylus instantly flips between the drawing screen and the menu.
With either program, selecting menu options requires only two steps. All the options are represented on the screen as icons—small self-explanatory pictures. With the light pen, you point to the option icon you want and then softly push the pen against the screen. The pen's pressure-sensitive tip registers your choice. When using the tablet, you move a pointer around the screen by gently touching the tablet's surface with the stylus or your finger.
When the pointer indicates the function you want, you press either fire button on the tablet or the button on the stylus. Again, this confirms your choice. (With three buttons to choose from, lefties aren't left out.)
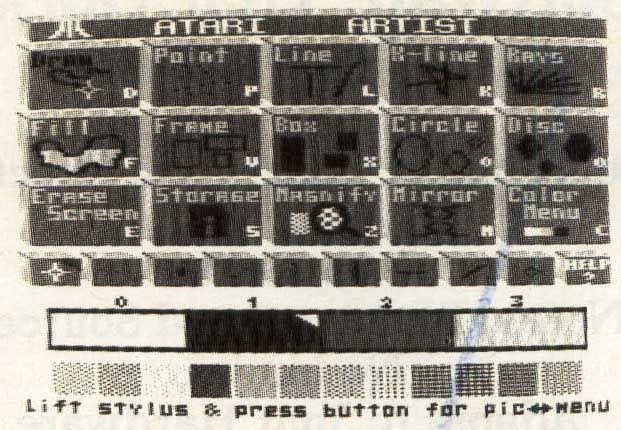
The menu options available in AtariArtist and AtariGraphics are quite similar. With either system you can draw freehand; automatically draw circles, rectangles, and straight lines connecting any two points; automatically fill any shape with a wide variety of colors and patterns; change your selection of colors and patterns; magnify a picture for fine detail work; draw in two-way or four-way mirror modes, in which each stroke on one part of the screen is mirrored on the opposite part; and, of course, save/load screens using disk or tape.
Color Tradeoffs
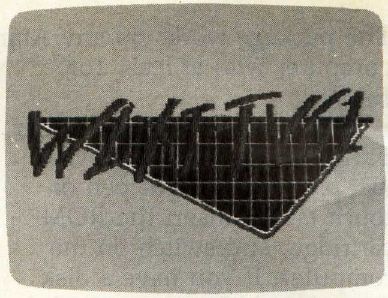
But there are important differences between the two programs, too. For instance, the AtariGraphics light pen software has three major functions missing from AtariArtist: You can enter text on the screen from the keyboard; superimpose a grid of dots over your picture as a guide for drawing straight lines or proportioning; and draw, any kind of parallelogram, not just squares and rectangles. On the other hand, the AtariArtist touch tablet software has options that AtariGraphics lacks: you can draw discs (solid circles) and boxes (solid rectangles); you can draw "rays" (numerous lines emanating from a single point); and you can vary the brush stroke of the stylus from fine to broad, or even simulate drawing with two or three styli at once.
Of course, there are ways around each program's limitations. You could make discs and boxes with the light pen by drawing a circle or rectangle, then filling it; you could draw parallelograms with the touch tablet by connecting straight lines; and you could produce rays with the light pen by drawing each radiating line separately. It's probably safe to say that any screen which could be created with one system could be duplicated with the other.
Both AtariGraphics and AtariArtist let you work with a palette of 128 possible colors, o which only four can be displayed on the screen simultaneously. At first this might seer like an odd limitation, since Atari computers are capable of 256 colors. The explanation is that Atari had to compromise t keep the packages compatible with all Atari computers, past and present. Ataris manufactured before early 1982 have the CTIA graphics chip instead of the more recent GTIA. The CTIA chip displays only half a many luminances—eight for each of the 16 colors, instead of the GTIA's 16 luminances.
The limit of four simultaneous colors is another compromise. Some Atari graphics modes can display more than four colors, but at lower resolutions. AtariArtist and AtariGraphics both employ a graphics mode of 160 by 192 pixels (screen dots), sometimes referred to as GRAPHICS 7-1/2. It can be accessed on Atari XLs in BASIC, but not on previous Ataris without special programming. The Atari's maximum resolution is 320 X 192 pixels (GRAPHICS 8), but that mode offers only two colors. So Atari traded less resolution for more colors.
Interestingly, though, the pointer on the AtariArtist color mode steps twice for each luminance level—as if the 16-luminance, 256-color capabilities were built-in, but dormant.
Canvas Vs. Sketchbook
The drawing possibilities offered by the AtariGraphics and AtariArtist programs are so much alike that a purchase decision will probably be based on the hardware: light pen versus touch tablet (unfortunately, the light pen software won't work with the touch tablet or vice versa). This is where your personal sense of each device's "feel" is all-important.
The idea of a light pen night seem more natural. After til, it's like moving a paintbrush across a canvas or a crayon cross paper. It's the way you've always created paintings or drawings.
The touch tablet, in contrast, might seem unnatural, unlike any traditional art medium, it separates the mechanical action from the artwork. It's part of like drawing by remote control.
But all is not as it seems, light pens can be finicky as mentioned above. Also—and don't underestimate this—light pens can strain your arm and eyes, because you have to reach up to the screen and sit very close.
The touch tablet lets you relax at a comfortable distance from the computer, but it also takes some getting used to. The separation of manipulation from creation is analogous to word processing. When writing, you're supposed to look at the screen instead of the keyboard; likewise, when drawing you're supposed to look at the screen instead of the tablet. Most people catch on fairly quickly.
The touch tablet does have several advantages which are more tangible. It's probably more suitable for small children, since it responds better and can be manipulated with fingers instead of a stylus. You can copy small pictures with it by slipping the picture beneath the removable plastic surface and then tracing it with the stylus.
The AtariArtist color menu includes a spectacular option that lets you temporarily replace any of the four screen colors with a scrolling 128-color rainbow. Another option calls up a help screen for confused beginners. The magnify option is by far more versatile—you can perform virtually any function available in the normal mode, while the light pen software merely lets you change the colors of pixels. And finally, pictures made with the tablet take up much less room on tape or disk than pictures made with the light pen, thanks to a data-compaction scheme.
Before buying one of these packages, at least give the other a fair test. Either way it's hard to go wrong. Both are high-quality, well-designed products.
Atari Touch Tablet $89.95
Atari Light Pen $99.95
Atari, Inc.
1265 Borregas Avenue
P.O. Box 427
Sunnyvale, CA 94086