Commodore Disk Drive Device Number Update
I am the owner of a 64 and two 1541 disk drives, and was therefore quite interested in the item you published about changing (1541) device numbers in "Readers' Feedback" (April 1984).
Unfortunately, the picture you showed has little relationship to the circuit boards in the newest models of the 1541 disk drive (light brown case).
I would appreciate your printing a note showing the jumper locations for the newer model 1541s.
Eric H. Larson
As you pointed out, there are two versions of the 1541 disk drive. The older version, usually with a white case, contains a long circuit board that runs the length of the drive. The newer version, usually in a brown case, contains a shorter board.
The method for changing device numbers on the newer 1541s is the same as we described before, except for the position of the jumpers.
Unplug the drive from the wall and then carefully unscrew and remove the top half of the brown case. Then remove the large silver colored shield inside the disk drive. This will expose the circuit board. As you view the drive with the front toward you, the jumpers are near the center of the circuit board toward the front (see picture below).
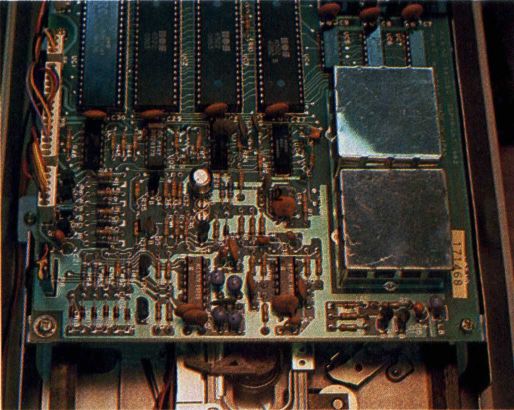
The two jumpers look like round spots of silver solder (approximately ⅜-inch diameter each) separated into halves, with the two halves connected by a thin strand of solder. To change the device numbers of the 1541 disk drive, the thin strand connecting the two halves should be scratched away on one or both of the jumpers. As you look from the front of the drive, the jumper nearest the front is jumper number 1, and the rear is jumper 2.
As stated in the 1541 user's manual, cutting jumper one, jumper two, or both, produces different numbers. Following is a chart showing the different combinations.
| Jumper cut | New Device Number |
| None | 8 |
| 1 | 9 |
| 1 and 2 | 11 |
Remember, though, that unless you're handy with a soldering iron, changing the device number via hardware modifications is permanent.
Also remember that—although not specifically stated in the user's manual—opening the disk drive and performing these modifications yourself may void the warranty. Consult your local Commodore representative and thoroughly read the user's manual before attempting any of these modifications.
If you feel uncomfortable changing the device number using the hardware method, the same thing can be achieved with a software (program) modification. Here is the procedure:
- Turn off all disk drives.
- Turn on the disk drive whose device number you want to change.
- Type and enter the following commands:
CLOSE 15: OPEN 15, 8, 15
PRINT # 15, "M-W", CHR$(119) CHR$(0) CHR$(2) CHR$(n + 32) CHR$(n + 64)
CLOSE 15
Change the n in the PRINT#15 command above to the device number you want to assign to the disk drive. It might be best to limit the device numbers to the range between 9 and 14.
Now you can turn on the other drive(s), and start processing.
Note the syntax of the PRINT#15, "M-" … command. Contrary to the instructions in the 1541 user's manual, do not include the colon after the memory-write (M-W) command. If the colon is included, the device number change will not be successful.
The 1541 demo disk that was included with your drive also contains a program to change device numbers. LOAD the program DISK ADDR CHANGE then RUN. The user prompts will tell you what to do.