Changing The 1541 Device Number
I just purchased my second Commodore 1541 disk drive. I want to change the device number using the hardware method, but I am having trouble doing it.
The directions in the 1541 user's manual give ten steps to follow, but they leave out the most important part. Step number seven states: "Locate device number jumpers. If facing the front of the drive, it's on the left edge in the middle of the board." Direction number eight states: "Cut either or both of jumpers 1 and 2."
But once you have removed the case as directed, you find five plugs labeled P4 through P8 with a total of 21 wires. The instructions don't tell which wire is which.
Can you tell me which are the correct two wires to cut so I can change the device number?
Pat Cardinal
Some of this confusion is due to the fact that the jumpers which are to be cut are not wires. The jumpers are actually two mounds of solder, each about ¼ inch in diameter. If you face the front of the disk drive, they are located on the left edge of the circuit board behind the plugs and wires you described. As shown in the picture, each round drop of solder is separated into halves, with a thin strand of solder connecting each half. You cut the jumpers by taking a sharp, pointed object and scraping away, or breaking, the connecting strand. Be careful to avoid damaging any other components on the circuit board.
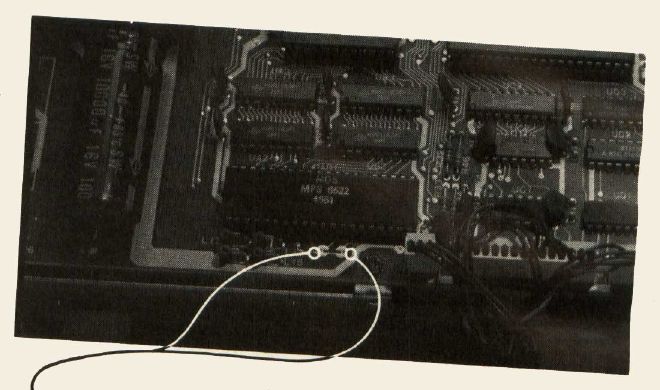
As stated in the user's manual, cutting jumper one or jumper two, or both, produces different device numbers. Here is a chart showing which device number is produced when the jumpers are cut:
| Jumper Cut | New Device Number |
| None | 8 |
| 1 | 9 |
| 2 | 10 |
| l and 2 | 11 |
One important note about changing the disk drive device number: Once the jumpers are cut, it's difficult to reverse. Also, this sort of modification should be left to an experienced electronics technician unless you know exactly what you are doing. And be sure the drive is not plugged into the wall if you remove the cover to attempt this fix.