A Multicolor Atari Character Editor
Charles Brannon, Program Editor
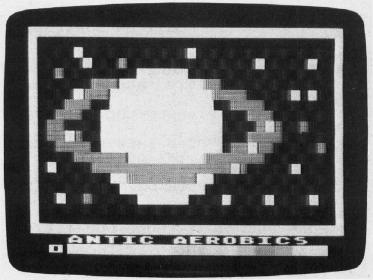
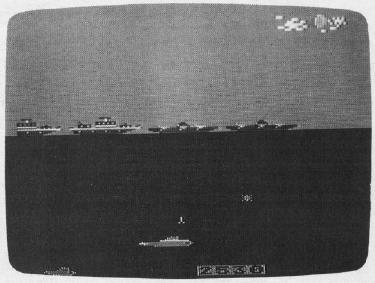
This program makes colorful animation easy and fun. You II find "ANTIC Aerobics" to be an invaluable tool for working with four-color characters. There's also a submarine chase game to illustrate these techniques, an entertaining game in its own right.
Remember the last time you played an arcade game? You probably controlled a realistic-looking ship, plane, race car, or even a Q*bert. If you tried to program such a game and ended up discouraged, here's the answer. Using one of the Atari's least used (and possibly most interesting) graphics modes, you can animate multicolor objects with simple PRINT statements.
If you've been programming for a while, you know about most of the Atari's 14 graphics modes (17 if you count GTIA modes). For example, GRAPHICS 8 is the high-resolution screen with the smallest controllable "dots." GRAPHICS 3 uses the least memory and gives you four-color graphics in a 40x24 format (each "dot" is as large as the text cursor). And there are the text modes, such as GRAPHICS 1 (double-wide), GRAPHICS 2 (double-wide and twice as high as normal text), and of course, GRAPHICS 0, the normal white-on-blue text screen.
Silicon Symbiosis
All these graphics modes are supported-by the ANTIC chip, which has been called a video microprocessor. ANTIC's job is to tell the GTIA, an essentially "dumb" chip, how to display a TV screen. Your job is to tell the ANTIC how to format a screen. Fortunately, the Atari's operating system already knows how to set up graphics screens for the ANTIC.
But this doesn't mean that you can't "do it yourself." In fact, it's rather easy to create your own custom screens with all kinds of graphics modes mixed together. Although we won't go into detail here, you can refer to Craig ChamberŁlain's "How to Design Custom Graphics Modes" in COMPUTE!'s First Book of Atari Graphics if you'd like more information.
Hidden Modes
ANTIC can generate more graphics modes than most people think. For example, there is a special variation on GRAPHICS 0 that lets you design characters within a 9×8 matrix for true descenders (the "tail" on a g,j,p,q, or y). There's a special graphics mode "between" GRAPHICS 7 and GRAPHICS 8 that is a four-color mode with a resolution of 160×192 (some call it GRAPHICS 7 ½).
ANTIC 4 And 5
However, let's limit ourselves here to the five-color character modes. In GRAPHICS 1 and 2, you get four colors of text (for example, A, a, inverse A, and inverse a). Each character can have a different color, but you can have only 64 characters, and you are limited to one color per character. But two special ANTIC modes, ANTIC 4 and ANTIC 5 (or IRG 4 and 5 according to the hardware manual), allow four colors per character.
Unfortunately, the use of these modes is not intuitively obvious. It helps if you know binary (base two arithmetic). You don't really have to understand how to program characters in these modes to write games with them, as long as you have a utility to do it for you ("ANTIC Aerobics," found at the end of this article). But for those with an inclination to understand the details, the following discussion should be illuminating. Otherwise, you can skip ahead to "Using The Program."
Assumptions
Let's start by making a few assumptions for the sake of brevity: that you understand binary numbers, know how to create custom character sets, understand the relationship between COLOR and SETCOLOR, and have a good working knowledge of BASIC.
You know that when defining a normal Atari character you get eight bits or pixels horizontally and eight bytes vertically. The letter A would be defined in binary as (we'll use open boxes for zeros, and solid squares for ones):

Every bit represents one pixel (picture element, or "dot"). In the multicolor modes, it takes two bits to represent four colors (00, 01, 10, 11), so the bits are "paired up." You still use only one byte per line, so you get only four pixels horizontally, although you still get eight lines vertically. Since the size of the character is the same as a GRAPHICS 0 character (in ANTIC 4), this implies that each pixel is twice as wide as a single-color pixel.
If you're using a standard character editor such as SuperFont or Instedit, you must remind yourself that you must reserve two bits per pixel.
When designing a four-color character, use the following combinations:
 (00) = background color (COLOR 0, SETCOLOR 4)
 (01) = COLOR 1 (SETCOLOR 0)
 (10) = COLOR 2 (SETCOLOR 1)
 (11) = COLOR 3 (SETCOLOR 2)
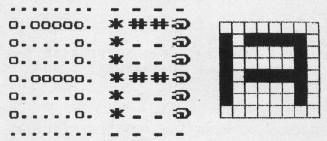
In addition, if you print the character in inverse video, the COLOR 3 bit pattern (binary 11) will be displayed with the color in the fourth color register (SETCOLOR 3). Here's what three different colored A's would look like:

Now there's nothing to keep you from combining all the colors in a single character. For example, here's an A with its left side in COLOR 1, the right side in COLOR 2, and the top and middle segment in COLOR 3. To the right is the same character with bit pattern 00 shown as a period, bit pattern 01 as an *, bit pattern 10 as an @, and bit pattern 11 as a #:
If you try to program other shapes, however, such as an alien invader or a race car, you will find that you need more than one character per shape. Four pixels don't give you much to work with. But if you put two characters side by side, you're back in eight-bit business. As long as you're doing that, you can create matrices of two-by-two characters, or any size you like. You can create "building block" characters, "primary" shapes that you use to build larger objects. But if you try to make larger, more complex "pictures," you'll probably discover that the task of designing each character and piecing the characters together can be rather maddening. That's where ANTIC Aerobics comes in.
Using The Program
ANTIC Aerobics lets you draw a free-hand shape or picture that is 32 pixels wide and 16 pixels high. You can then "compile" the shape into a set of 16 characters. You display the shape as two rows of eight characters. If you put the shape into the character set on top of the alphabet, you could show it on the screen with a statement like:
200 PRINT "ABCDEFGH" : PRINT "IJKLMNOP"
You can also place each shape into a string. When you PRINT the string, the shape appears. The string is made of eight characters, a cursor down, and eight cursor-lefts to back up the cursor under the first eight, then eight more characters. Following the COMPUTE! listing conventions, it would look like:
C$="ABCDEFGH {DOWN} {8 LEFT} GHIJKLMNOP"
If you also had a string filled with blanks (eight spaces, cursor down, eight cursor-lefts, and eight spaces), you could PRINT the blank string on top of the shape to blank it out. Animation made simple! Program 2 is a submarine game using shapes developed with ANTIC Aerobics. Take a look at the line-by-line explanation for more ideas on animation.
Display List Dickering
To go into the special ANTIC modes 4 or 5, you have to change the display list. Fortunately, this is fairly simple with a mode 4 display; you just change all the 2's in the display list to 4's. You can also POKE in 5's for the double-height ANTIC 5 mode. These two lines will do either one:
ANTIC 4:
GRAPHICS 0 : DL = PEEK (560) + 256 * PEEK (561) + 4
FOR I = 2 TO 24 : POKE DL + I, 4 : NEXT I : POKE DL - 1, 68
ANTIC 5:
GRAPHICS 0 : DL = PEEK (560) + 256 * PEEK (561) + 4
FOR I = 2 TO 12 : POKE DL + I, 5 : NEXT I : POKE DL - 1, 69
You might also want to disable the cursor with POKE 752, 1
How To Use ANTIC Aerobics
Use a joystick to draw. Press the trigger to set a point in the current color. To change colors, press either 0, 1, 2, or 3 (0 is used to erase). If you want to change a color, hold down SHIFT and type the number key. You will see a cursor above a 16-color bar (GTIA only; you'll see 16 densities of vertical lines if you have a CTIA, but you can still use the program). Move the joystick left or right to the color you want. Then push up or down to change the luminance (brightness). When you're through, press the trigger.
There are several other commands to make drawing easier and more fun. For example, to draw a line between two points, press P to set the first point (think "Plot"), then move the cursor to the second spot and press D ("Drawto"). If you move the cursor again and press D, another line will emanate from the original center point. If you want to draw from one line to another without having to reset the starting point, use CTRL-D. Each time you press CTRL-D, a line will be drawn from the last line. This makes it easy to draw lines at odd angles.
What if the cursor is too fast for you? The M command will give you a cursor speed from 0 (fast) to 9 (slow). Just press M and then the appropriate number key.
You can also use the insert line and delete line key (SHIFT-INSERT, SHIFT-DELETE) to insert or delete lines.
Use the S and L keys to either SAVE a shape or LOAD one previously saved. Enter the complete filename, i.e., C: for tape, or D: name for disk. If you see an error message, like "ERROR 162 ON SAVE", press a key to try again. The SAVE command will not work until you "compile" the shape with the C key (see below), since it SAVEs the character bytes, which aren't defined until you compile the shape. You can use the I (Index) command to view the disk directory. Press a key after each displayed name to view the next.
When you press C, the computer will scan the picture you've drawn and convert it into 16 characters. It will then show you what the picture would look like in ANTIC modes 4 (top) and 5 (bottom). To the right is the shape drawn in inverse video, so all bit-pair three's will be in another color (usually pink). Notice that ANTIC mode 5 has vertical pixels twice as high as ANTIC 5 – in fact, each pixel is the same size as a GRAPHICS 7 pixel. What we've got is GRAPHICS 7 resolution (or better) without the exorbitant memory consumption.
DATA Creator
The last option lets you create DATA statements from the characters you've defined. As with the SAVE command, you can write data only after you've compiled the shape. You will be asked to choose at which line number you want to start the DATA statements and the filename for the program you want to create.
The Atari will then write a series of line numbers and DATA statements to tape or disk. To merge these lines later with your own programs, use the ENTER command (ENTER "D : name" or ENTER"C:"). You have to write the lines that READ the data and POKE it into your character set wherever you want it to go (also see Program 2). Since each shape requires 16 characters, you can fit eight shapes into one character set.
If you ever get stuck, the program has a built-in Help function that gives a quick reference list of the commands. Press H, "?", or the Help key on the 1200XL. The commands will be given one at a time at the bottom of the screen. Press a key to advance each command. When you're ready to exit the program, press CTRL-Q.
Sub Attack Program Analysis
Here's a line-by-line explanation of "Sub Attack" (Program 2). We'll look at its structure in some detail as well as explore some programming tips and tricks.
Line 130: Lines 580–890 are the initialization routine. SUBS keeps track of how many "lives" you have. Line 575 prints from one to three miniature subs at the bottom of the screen. Each mini-sub is formed from custom characters.
Line 140: This line clears out applicable variables at the start of each game.
Line 150: This is part of the main loop. The hardware random number generator is used (53770) to decide on a 50/50 chance whether or not to put a ship on the screen. Ships are always spaced at least ten characters apart. Since each ship is eight characters long (including spaces), the closest two ships would be is two spaces.
Line 160: Here, one of the ships is picked. The characters for the ships are stored in a string. The statement is equivalent to R = INT(4*RND(1))*2.
Line 170: POKE 766,1 disables cursor controls, since some of the ships contain control characters which PRINT would execute instead of display.
Line 180: This is the first line in the main loop. It continually checks to see if the high score has been topped. HSCR is initialized to 500 in line 590. If the high score is beat, a special subroutine is called, but (due to BEAT) only once per game.
Line 190: This checks for a change in the score. Many different routines add to or subtract from the score, so this one statement is responsible for noting a change from the previous score (OPTS, for "Old Points") and updating the score line. The POSITION statement centers the score.
Line 200: If there is no mine falling, and if the number in the hardware random number generator is greater than 200 (a 55/255 chance), then a mine position is chosen. If MS = 0, no mine will fall. Otherwise, MS holds the offset from the upper-left corner of screen memory.
Line 210: First, we reset 766, so we can execute control characters. This one line is the core of a tricky animation technique. Instead of moving each ship by drawing and erasing, each ship is placed at the right of the screen. The CHR$(254)'s are CTRL-DELETEs, which pull the line to the left. By PRINTing two of these, we can "scroll" the line to the left. It's possible to use INSERTS to push a line to the right.
Line 220: It's preferable to use short variables like JS (joystick) and FB (fire button) than the longer statements over and over again.
Line 230: FB = 0 if the button is pressed. If no torpedo is in "flight," then we set one up. If TORP is zero, no torpedo will be displayed or updated. Otherwise, TORP holds the actual screen memory location of the torpedo. FIRSTMOVE is set when the player makes any move, such as moving the sub or firing a torpedo. FIRSTMOVE is used to disable the mines falling until the player has begun to move. POKE 77,0 kills attract mode.
Line 240: JS is used as an index into an array containing -1's, 0's, and + l's. The appropriate offset (+ 1 for 7, right, -1 for 11, left) is added to the X (horizontal) position of the submarine. Only nonzero offsets are accepted, so the sub is always moving.
Line 250: Similar to 240, except for the vertical position of the sub. We also have a check for the START button here in case the player wants to restart the game in progress.
Line 260: If the submarine moves up or down, or changes direction, we erase the submarine before the new one is PRINTed.
Line 270: The submarine horizontal variable, SUBX, is updated and checked for wraparound. A single phrase: SUBX = 32-ABS(SUBX) will reverse the illegal -1 and 32 to the legal 31 and 0.
Line 280: If the vertical variable is out of range, we just remove the offset.
Line 290: SUB$ contains the characters for both directions of the submarine. The characters include a leading space if the sub is moving right, and a trailing space if the sub is moving left. The leading or trailing space erases the previous character when the sub moves, without having to erase the whole submarine (which is somewhat "flickery").
Line 300: This is the routine for moving the falling mine. If no mine is selected, then it's skipped.
Line 310: First, we erase the previous mine (if any). The mine is two characters wide, so this makes things complicated. The next position of the mine is found by adding 40 (each screen line is 40 characters long) to the mine position. If the mine has hit the bottom of the screen, it is removed from execution (since it hasn't hit anything).
Line 320: Shorthand, again. Using LOC over and over again is shorter than using SCR + MS. SCR holds the starting address of screen memory. We "look ahead" before we POKE in the mine's characters to check for a "collision."
Line 330: If nothing is hit (PEEK returned a zero for SPACE), the mine is POKEd into its new position, and we go on to the next routine at 480 (which updates the torpedo).
Line 340: Sound effect and explosion time. We assume we've hit the submarine or a torpedo. Color register three is POKEd with random colors, causing anything on the screen drawn using this register to flash and glow. The sixtieth of a second timer is set to zero.
Line 350: A loop to wait a sixtieth of a second. Not really necessary, but we want to slow down this part because the game was compiled.
Line 360: EXL(0-3) contains the left side of three explosion scenes, and EXR(0-3) holds the right side. The sound effect is arbitrary, but the volume is stepped progressively down.
Line 370: The mine is now removed.
Line 380: If the mine hit a torpedo, then both the torpedo and the mine are removed, and the player gets 100 points.
Lines 390-410: Otherwise, the sub was hit, and we flip it back and forth to illustrate its demise.
Line 415: One less submarine, but was it the last?
Line 420: Not if this line is executed. The "dead" sub is erased, and some variables are reset. Line 575 updates the number of little submarine symbols displayed.
Line 430: Start of the "game over" section. Check for high score.
Line 440: Mode 2 without text window. Turn off display list interrupt (to be safe). Messages.
Line 450: Score line. Notice that all four colors are used, upper/lowercase, inverse and normal video.
Line 460: A loop to wait for either START or the fire button to be pressed.
Line 470: Kill attract mode again, restart the game.
Line 480: Check to see if we should move the torpedo.
Line 490: Erase the old torpedo, if indeed the torpedo was where it should be (sometimes the scroll routine will pull a ship into the space where the torpedo was).
Line 500: Move the torpedo up (minus 40 characters per line). Check to see if the torpedo has gone off the "top" of the ocean. If so, deduct ten points, but don't let the score fall below zero.
Line 510: There is no sane reason to use LOC in place of TORP, but I'd done it, and didn't want to change lines 510–550 when I realized the redundancy. Anyway, we check to see if the new position is occupied (meaning a ship). If not (= 0), the torpedo is placed into the spot if the torpedo position is under the water still.
Line 520: The mine checks to see if it hit the torpedo, and here the torpedo checks to see if it hit either the left or the right side of the mine. If so, we just reuse part of the mine explosion routine.
Lines 530–570: A different, complex sound and explosion. The explosion moves left and right from the collision until it runs out of ship characters to blow up. It is complicated. The score depends on how high your ship is in the water.
Line 575: A simple FOR/NEXT loop to print from one to three "subettes" as symbols of how many lives you have left.
Line 580: The start of the really Atari-specific stuff, where characters are initialized, arrays are set up, machine language is read in, and the display list modified. Actually, line 580 is merely a useless REM statement.
Line 590: The game is not started over with RUN, since this would clear out the high score. Instead, we just make sure that we do our DIMensions only once, and then set a flag (DIMMED) to make sure it won't happen again. If you're a novice player, or a 6000-pointer, you can modify HSCR here as a goal to reach.
Line 600: We modify the display list of the 24-line GR.O display to make it a 24-line mixed-mode display (convenient). The cursor is also turned off here.
Line 610: These SETCOLOR statements come from the ANTIC Aerobics program, which generates them with the WRITE DATA STATEMENTS option.
Line 620: The top line (DL-1) is ANTIC 5, multicolor and double-height. Lines 2 to 23 are ANTIC 4, and the last line is ANTIC 6 (a.k.a. GRAPHICS 1). Line 10 is flagged for ANTIC as where the display list interrupt will occur.
Line 630: Screen memory.
Line 640: The character set is placed eight pages (2K) behind the top of memory, about 1K beneath the screen display. The character set pointer now causes ANTIC to display our character set.
Line 650: This important line checks to see if the character set has already been POKEd in previously. If so, why bother to do it again?
Line 660: We put the 128-byte character set up on the screen as four rows of 32 characters so you can watch the characters as they're being redefined.
Line 670: The long list of character set data starts at 1040. Four 8×2 shapes are READ into, and thereby replace, the lowercase and graphics symbols (for this game, no big loss).
Line 680: But then we overlay most of the punctuation and math symbols with the submarine characters. We still have the alphabet, the numbers, and a few punctuation marks free.
Line 690: And here we POKE the alphabet and numbers into the character set from the default ROM set at $E000 (57344).
Lines 700–710: Here we define a couple of characters, including the small submarine used on the score line. You can use the same character set in different modes, although the multicolor characters look odd in GRAPHICS 1, and the text is hard to decipher in ANTIC 4.
Line 730: This machine language section is used for the purely cosmetic purpose of dividing the screen into two parts, sea and sky, and giving us four separate colors for each half. The display list interrupt is easy to understand. It is just a bunch of LDAs (like PEEK, Load Accumulator, a special 6502 "variable") with each color and STA (Store Accumulator into memory, like POKE) into the hardware color registers. The ANTIC chip lets us synchronize this color change with any screen line we choose, and we chose line 10 in line 620 (128 is added to the mode byte).
Line 740: We clear the screen (PUT#6,125) and draw the characters for the sun and clouds.
Line 750: We tell the operating system where our display list routine is, low byte 0, high byte 6 = $0600, 1536, "page six." A single POKE to 54286 tells ANTIC to "start interrupting."
Lines 760–840: The characters for each ship, arranged as eight characters for the top half of the ship and eight for the bottom, are concatenated into a single string.
Line 850: The string holding the characters for the submarine is set up.
Lines 860-870: We READ in the +1,0, and -1 values for the joystick.
Line 880: The initial position of the submarine is set, and the explosion characters are read.
Line 890: That's it for initialization!
Line 900: DATA for the explosion characters.
Lines 910-1030: A special subroutine when you beat the high score.
Lines 1040-1846: Last, but certainly not least, the DATA statements for over 530 bytes of custom character data. This is where almost all your typing mistakes will be made.
Line 1860: Here are the bytes for the small machine language display list interrupt routine. Initially, we do a store into $D40A (any write to $D40A). This makes ANTIC "hold down" the 6502's READY line, effectively freezing the microprocessor until the TV scanning beam hits the right edge of the screen. We don't want to change the colors in the middle of a line, or it would be quite jagged. This handy feature lets us wait until the beam is off the left side of the TV before we make the color change. See Program 3 for a disassembly of the display list interrupt routine (it looks long, but it's only 26 bytes).
Program 3: Disassembly Of The Display List Interrupt Routine
| 72 | PHA | ;Since this is an interrupt, we want to save any registers we use so that when we return from the interrupt, the original routine won't notice anything. PHA means to "push" the accumulator onto the stack. The stack will hold the previous value in the accumulator until we "pull" it off. | |||
| 169 | 6 | LDA | #6 | ;Grey(0 * 16 + 6) | |
| 141 | 10 | 212 | STA | $D40A | ;WSYNC (wait for synchronization) |
| 141 | 22 | 208 | STA | $D018 | ;Color register zero (hardware) |
| 169 | 40 | LDA | #40 | ;2 * 16 + 8, light orange | |
| 141 | 23 | 208 | STA | #$D019 | ;Color register one. Since ML is so fast, the TV beam still hasn't reappeared. We'll be able to make all our changes without having to store to WSYNC again. |
| 169 | 10 | LDA | #10 | ;Light white | |
| 141 | 24 | 208 | STA | $D01A | #;Color register two |
| 169 | 128 | LDA | #128 | ;8*16 + 0, dark blue, for the ocean | |
| 141 | 26 | 208 | STA | $D01C | ;Background color register |
| 104 | PLA | ;Restore accumulator | |||
| 64 | RTI | ;Return from Interrupt (like RETURN from a GOSUB) |